Wide Release Date for MagnaMax for Small Knifemakers
MagnaMax will be on sale May 1st, 2026 at 9am on Niagara Specialty Metals’ online store: https://nsm-ny.com/shop/
You can create an account beforehand so that you are ready to buy once the steel goes live. We made the following commercial to get pumped for the release:
Intro
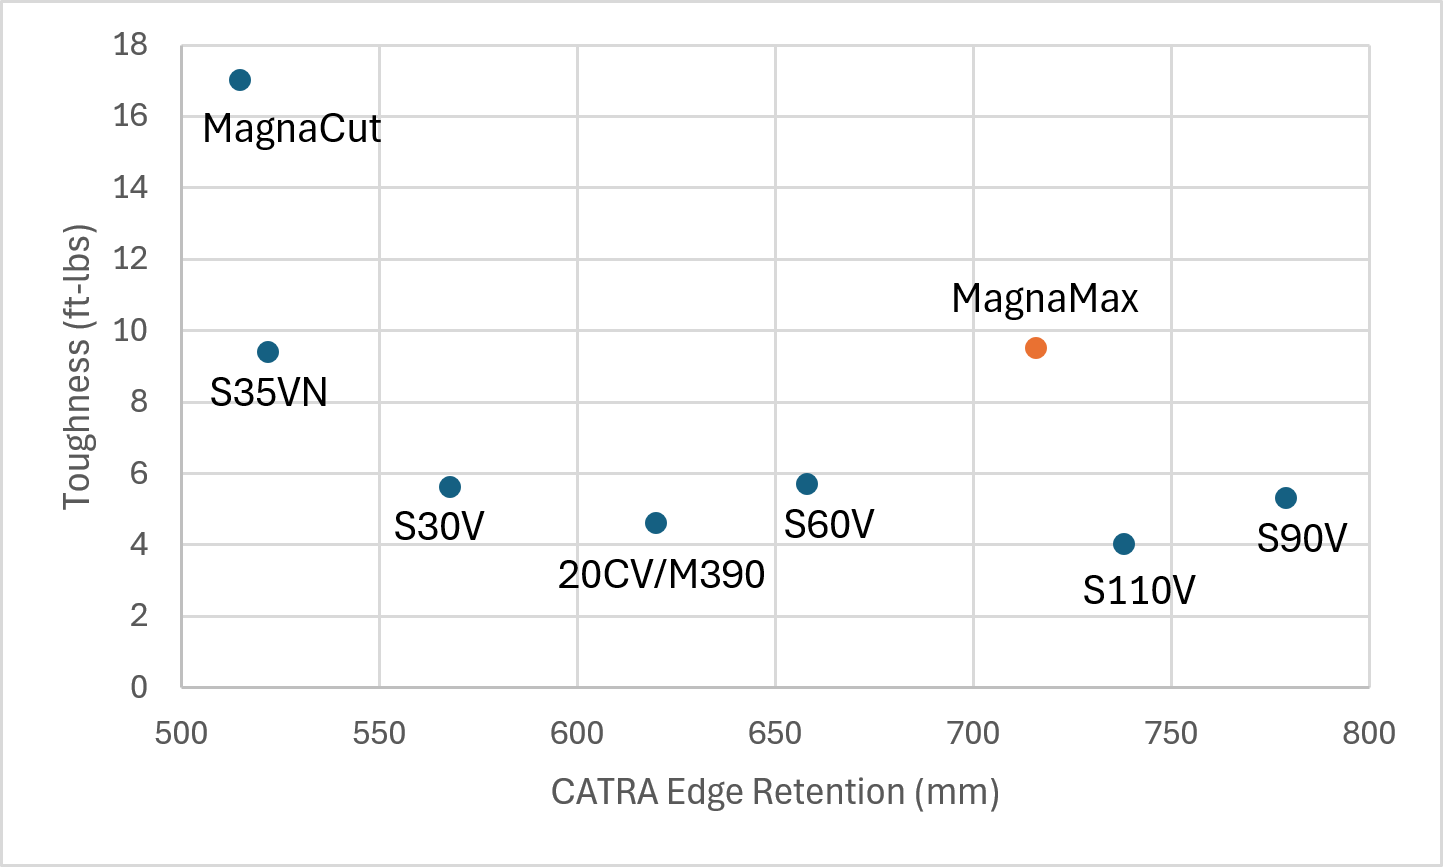
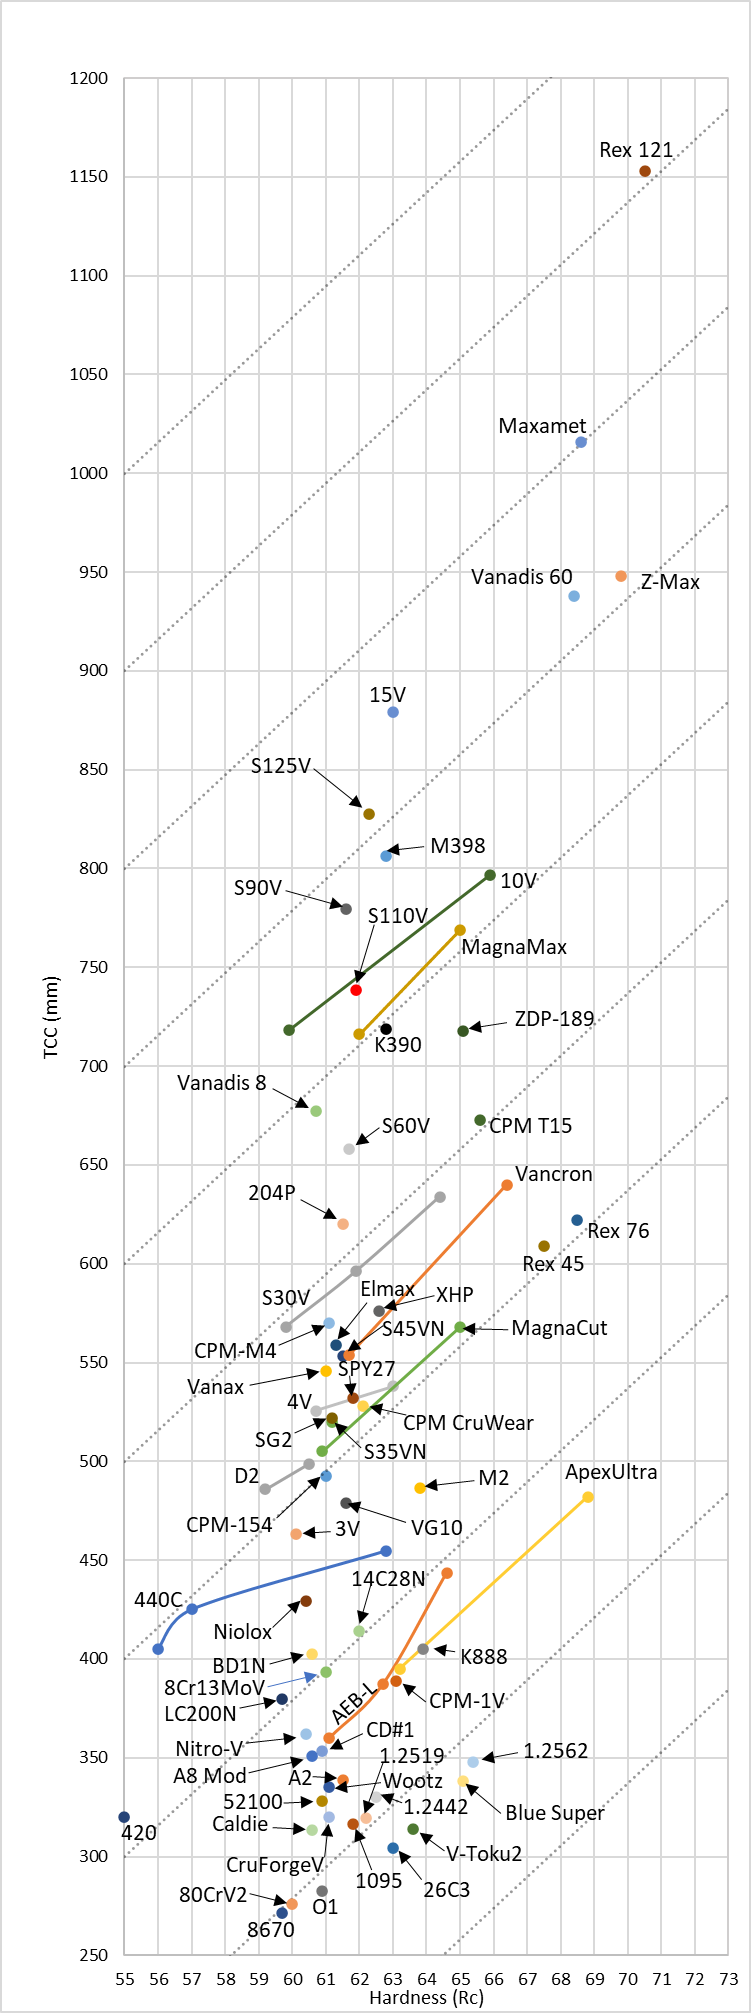
I wrote an article (and created a video) about MagnaMax properties a few months ago. So I won’t be rehashing all of the properties here. Basically, MagnaMax is designed to have enhanced wear resistance and edge retention vs MagnaCut with similar corrosion resistance and hardness potential.
You will also see in the chart above that MagnaMax offers superior toughness and edge retention to the popular M390 and 20CV. It is very difficult to improve both of these properties at the same time, so this is a big improvement. It also maintains similar toughness to grades CPM-154, S35VN, and Vanax, which were formerly the toughest PM stainless steels prior to MagnaCut. So it offers a significant edge retention improvement to those grades, which have had a reputation for good properties in the past.
That property summary article did not have specific heat treatment recommendations because I was waiting on the final material. The initial heat of steel had carbon on the low end of the specification, so it wasn’t as representative of the average material as I wanted. No change was made to the target composition or the specification, it just landed at the lower end for carbon. So now that I have received and tested material closer to the midpoint of the specification I performed a more comprehensive set of tests. Knifemaker Matthew Gregory helped to make the majority of the toughness coupons.
High Level Heat Treatment Summary
Before we get into all of the details I can give a simple summary so you don’t get lost.
With Cryo:
Austenitize 2100-2250°F (1150-1230°C). The baseline temperature for good properties is 2150°F (1175°C).
Plate quench for faster cooling and slightly higher hardness.
After cooling to approximately room temperature, place immediately in liquid nitrogen. The amount of time it sits in the liquid nitrogen doesn’t matter that much, it just needs to reach the temperature. An hour is fine. What does matter is not wasting time before putting it in the liquid nitrogen. You don’t need to check the hardness beforehand.
Temper 300-450°F (150-230°C) twice for two hours each time. 350°F (175°C) is a baseline temperature for good properties.
Without Cryo:
Use your household freezer. It is a myth that it doesn’t have any effect. There is no reason to do no cold treatment. Everybody has or can get a freezer. Dry ice is even better, but despite being about 100°F colder than a freezer often behaves closer to a freezer than to liquid nitrogen.
Austenitize 2050-2100°F (1120-1150°C). 2100°F (1150°C) is a good temperature. It might be possible to go somewhat higher but I worry about excess retained austenite.
Plate quench for faster cooling and slightly higher hardness.
After cooling to approximately room temperature, place immediately in the freezer or dry ice. The amount of time it sits in the freezer doesn’t matter that much, it just needs to reach the temperature. An hour is fine. What does matter is not wasting time before putting it in the freezer. You don’t need to check the hardness beforehand.
Temper 300-450°F (150-230°C) twice for two hours each time. 350°F (175°C) is a baseline temperature for good properties.
Austenitizing hold times:
The required hold time changes with temperature. This is the soak time required after the piece reaches the temperature. It rarely hurts to add extra minutes, it is more common to have an issue with undersoaking.
2050°F (1120°C): 20 minutes
2100°F (1150°C): 15 minutes
2150°F (1175°C): 10 minutes
2200°F (1205°C): 5 minutes
2250°F (1230°C): 5 minutes
Hardness and Cryo
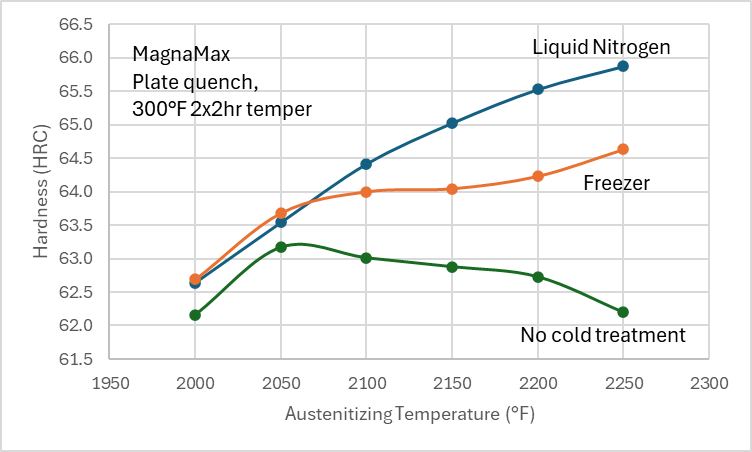
I first made a series of coupons to test the hardening response, including with the addition of a freezer or liquid nitrogen treatment after quenching. I used the soak times in the section above.
You can see that with no cold treatment the peak hardness was 2050°F (1120°C) after tempering at 300°F (150°C). Hardness drops with higher temperatures from excess retained austenite. Hardness rose when using liquid nitrogen all the way to 2250°F (1230°C). It would be unlikely to keep rising much beyond this temperature and the possibility of melting grain boundaries starts to become more of a danger. The freezer also rose all the way up to 2250°F but to a lesser extent. Because the increase was small beyond 2100°F (1150°C) this is why I limited my recommendation for the freezer to that temperature. That makes me think both the retained austenite and hardness of the martensite were increasing beyond that temperature, leading to relatively flat behavior. Excess retained austenite can lead to worse sharpening behavior when deburring. Overall this hardening response is not radically different than MagnaCut.
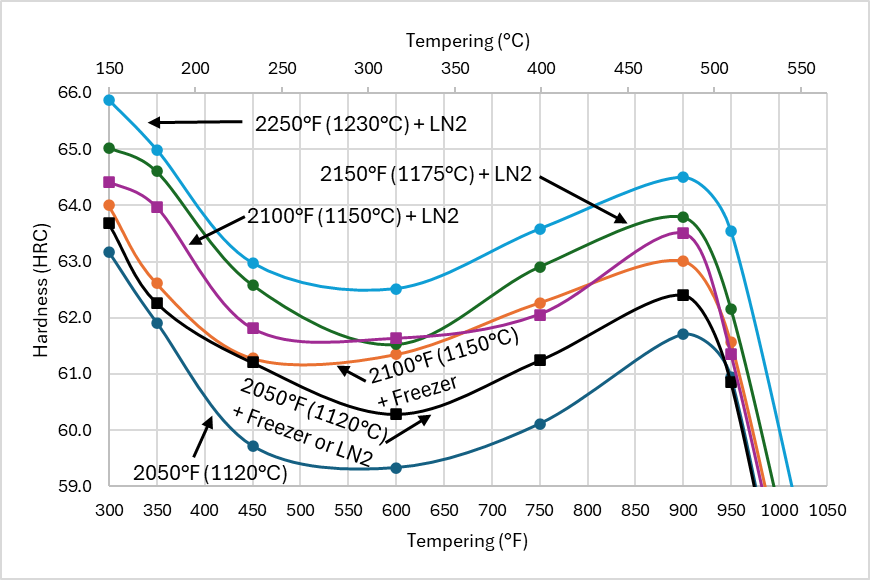
Nothing too crazy showed up in the tempering. You can see that a cold treatment leads to less hardness loss in tempering. Compare 2050°F with and without a cold treatment, or 2100°F with liquid nitrogen vs the freezer. Note that I have a single curve for both freezer or liquid nitrogen from 2050°F, and this was because the two were sufficiently similar to have a single line. Plus don’t want to make the chart too busy.
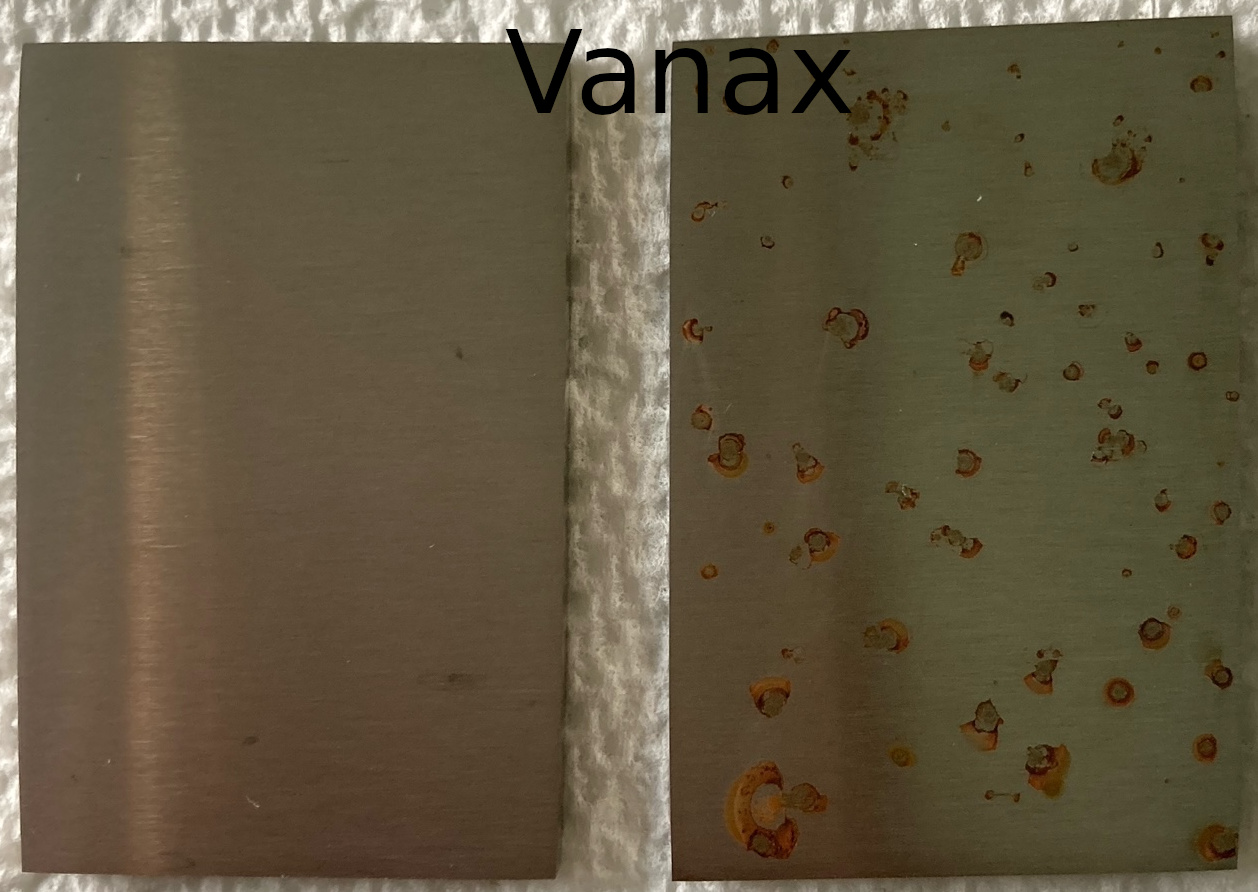
You will also notice that the hardness reaches an initial minimum at 600°F (315°C) and then rose to a secondary peak around 900°F (480°C). This is known as “secondary hardening.” I don’t recommend tempering in that range, especially with stainless steels, because it reduces corrosion resistance. For example see two Vanax coupons below, both sprayed with 1% saltwater. The one of the left was tempered at 400°F (200°C) and the one on the right was tempered at 1000°F (540°C).
Toughness
We also tested a series of charpy toughness coupons for this heat of MagnaMax. I used my standard coupon which is quarter size (2.5 x 10 mm) and unnotched. Three coupons were tested for each condition. We used liquid nitrogen in the heat treatment of all of these coupons directly after the quench. We used austenitizing temperatures of 2000-2250°F (1095-1230°C) and tempering temperatures of 300, 350, and 450°F (150, 175, 230°C).
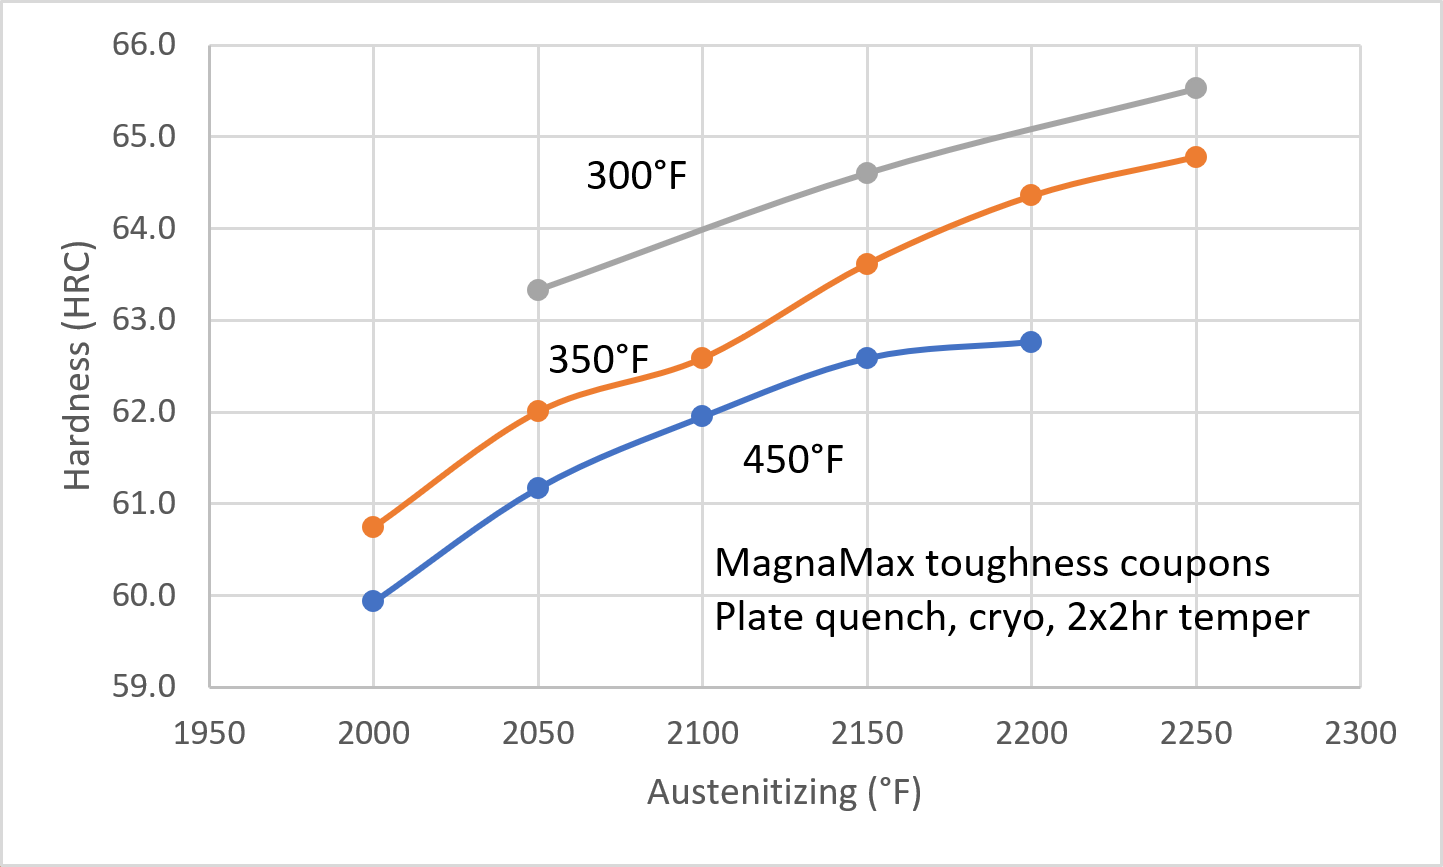
The hardness was slightly lower than the small hardness coupons I showed results from before:
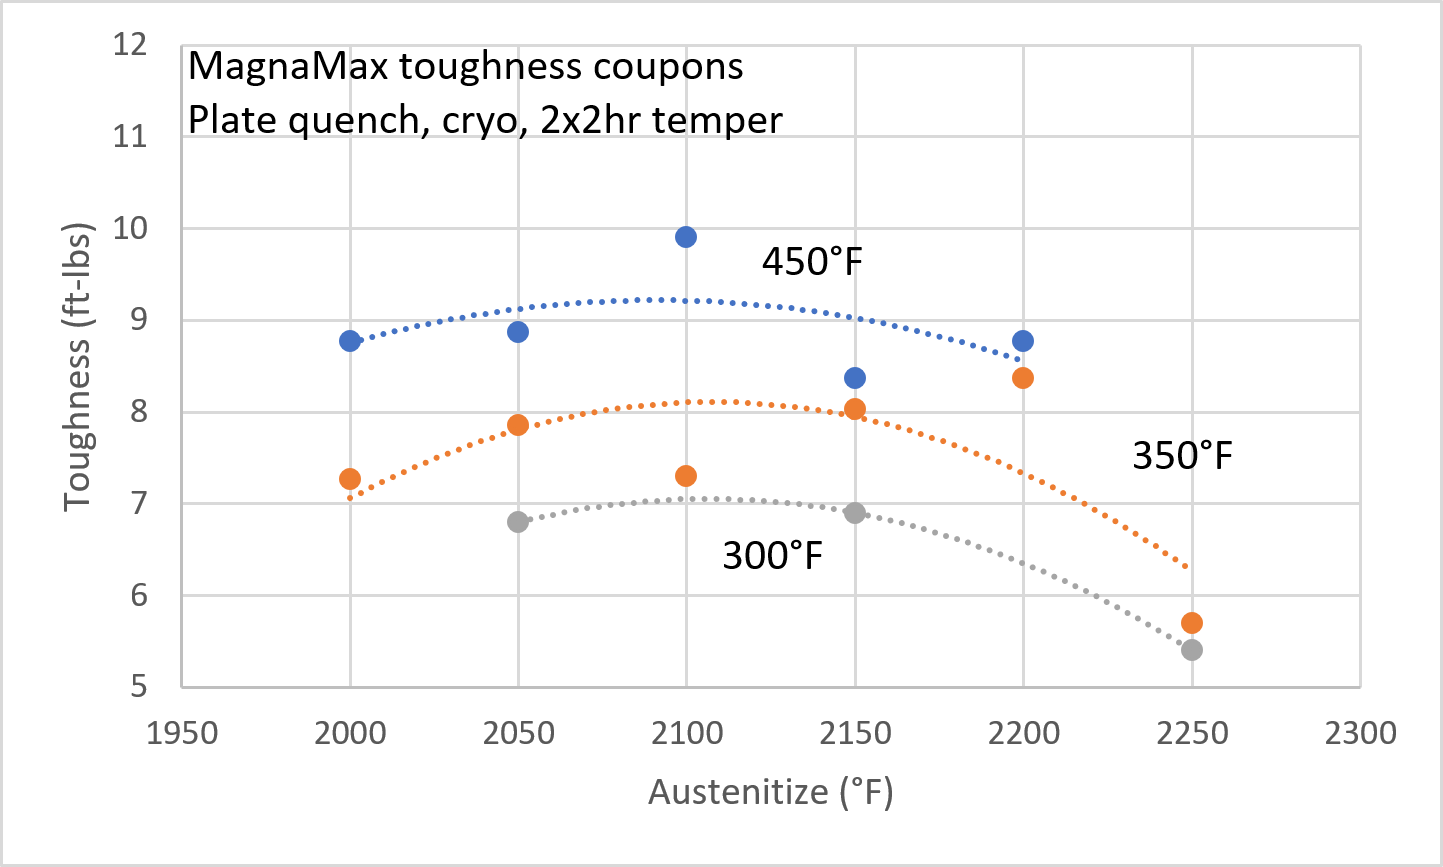
Looking at the resulting toughness, it rose from 2000 to 2050°F (1095 to 1120°C), was relatively flat up to 2200°F (1205°C), and then dropped somewhat up to 2250°F (1230°C). This is why I recommended a baseline austenitizing temperature of 2150°F (1175°C) as this appears to be roughly the peak hardness-toughness, though an argument could also be made for 2200°F (1205°C), in part due to a couple of the 2150°F results being on the low end and a couple of the 2200°F being on the high end. This is likely due to statistical variability of testing.
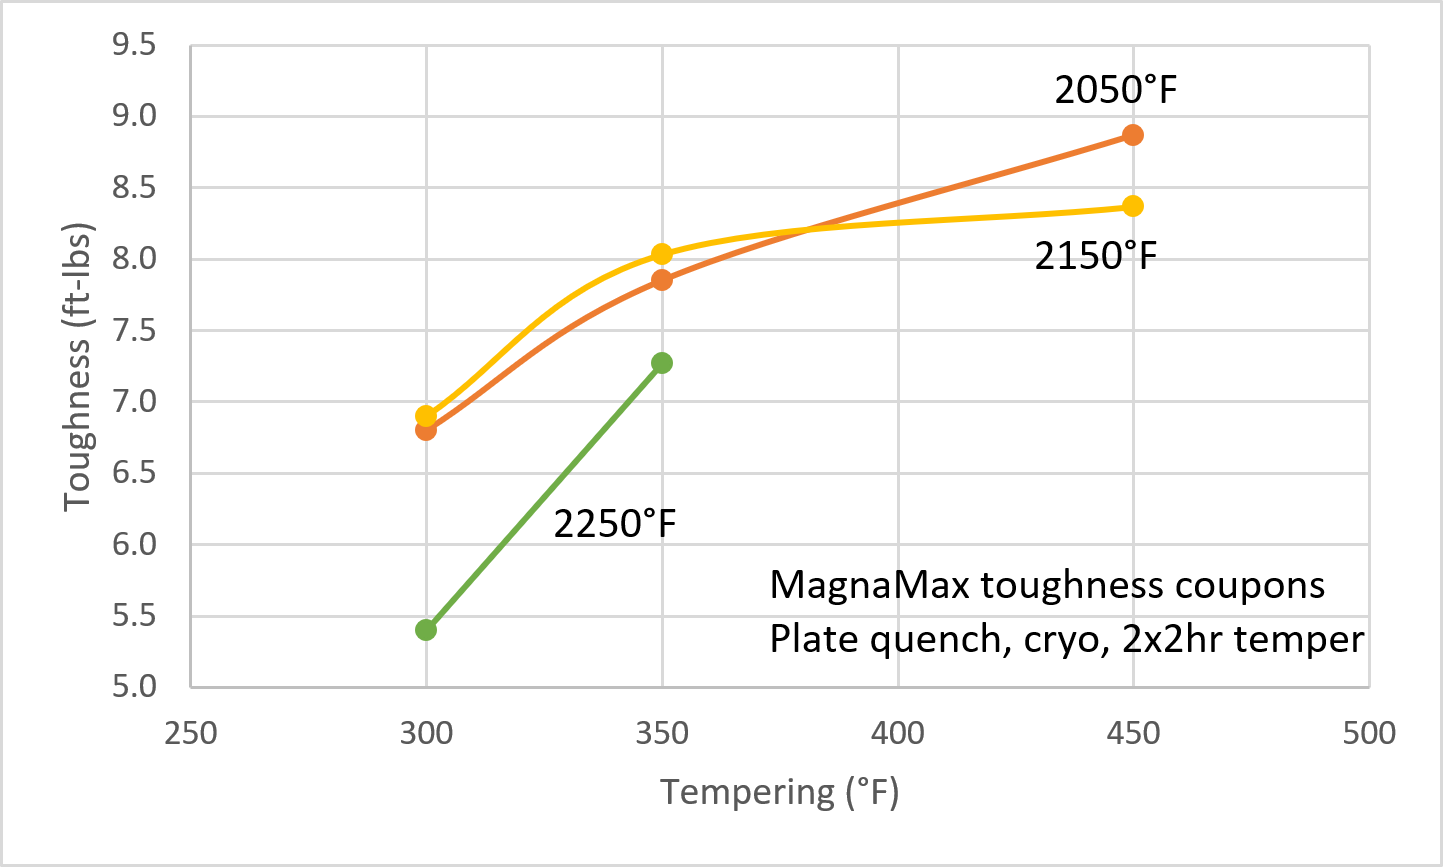
You can also see that toughness increases with tempering temperature as we would expect, which also corresponds to a hardness decrease. Lower hardness generally correlates with higher toughness.
There was a greater increase in toughness between 300 and 350°F (150-175°C) than between 350 and 450°F (175-230°C), which is why I recommended 350°F (175°C) as the baseline tempering temperature.
Hardness-Toughness Balance
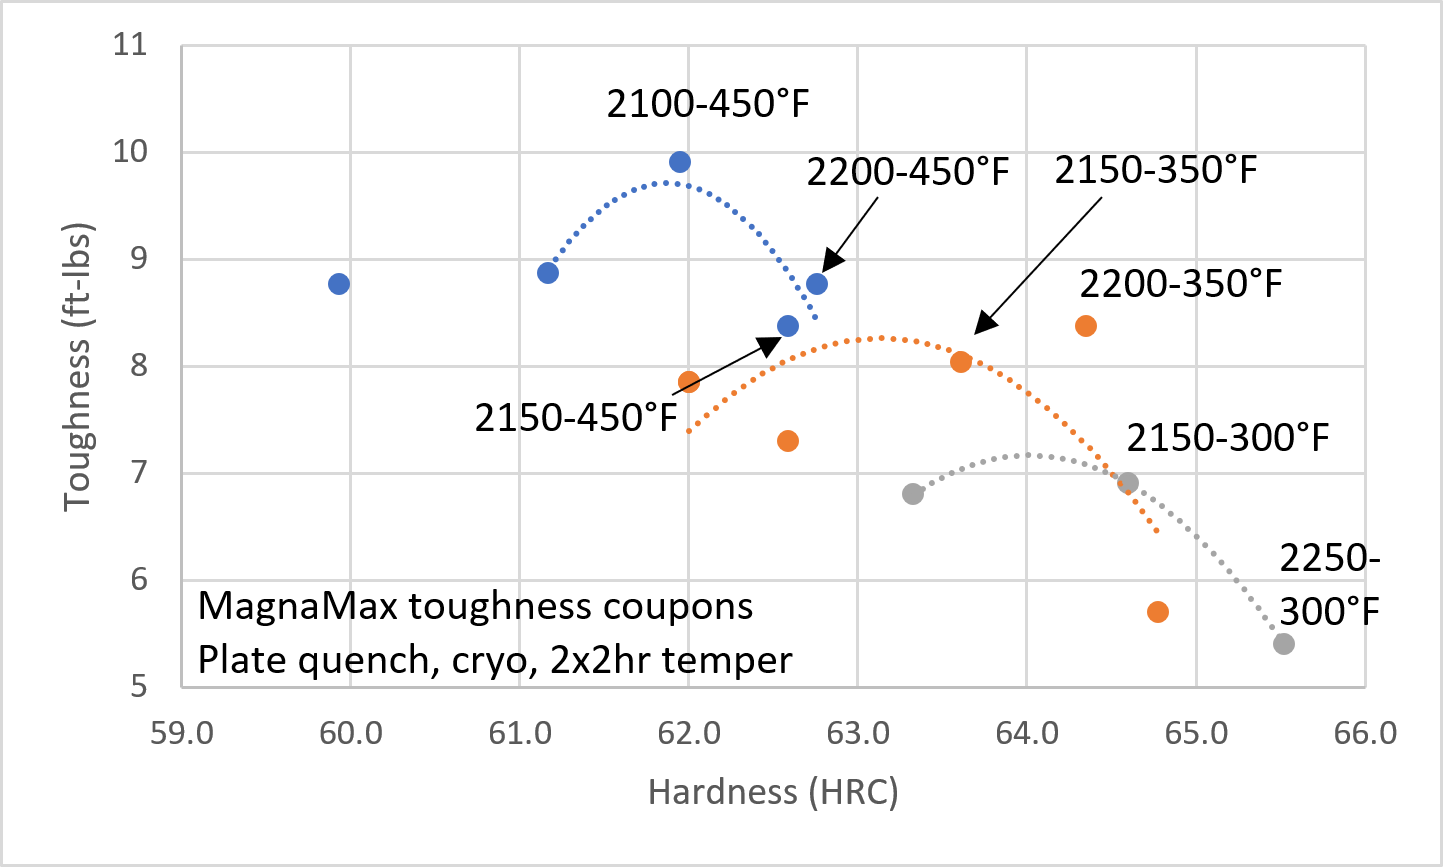
But what we would like to maximize is the highest toughness for a given hardness. So I plotted hardness vs toughness below.
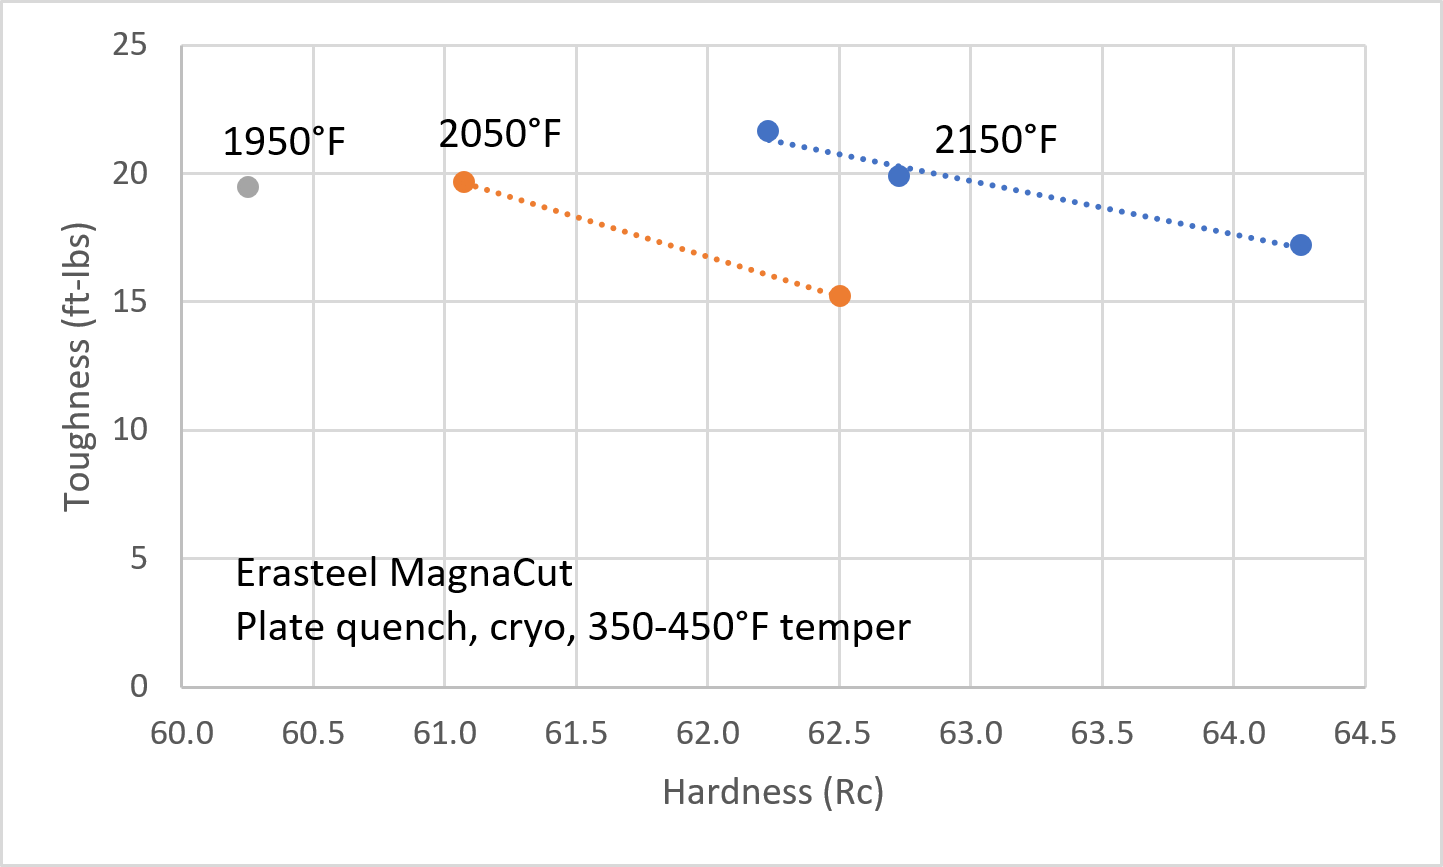
You will notice that the maximum hardness-toughness combinations were generally 2150-2200°F (1175-1230°C) and tempering at 350-450°F (175-230°C). The exceptions include: 1) 2100°F (1150°C) with 450°F (230°C) because that combination gave the best properties for lower hardness. And 2) For maximum hardness you need 2150-2250°F (1175-1230°C) in combination with the minimum tempering temperature of 300°F (150°C). I next overlaid those best heat treatment conditions on top of the similar non-stainless steels K390, Vanadis 8, and CPM-10V:
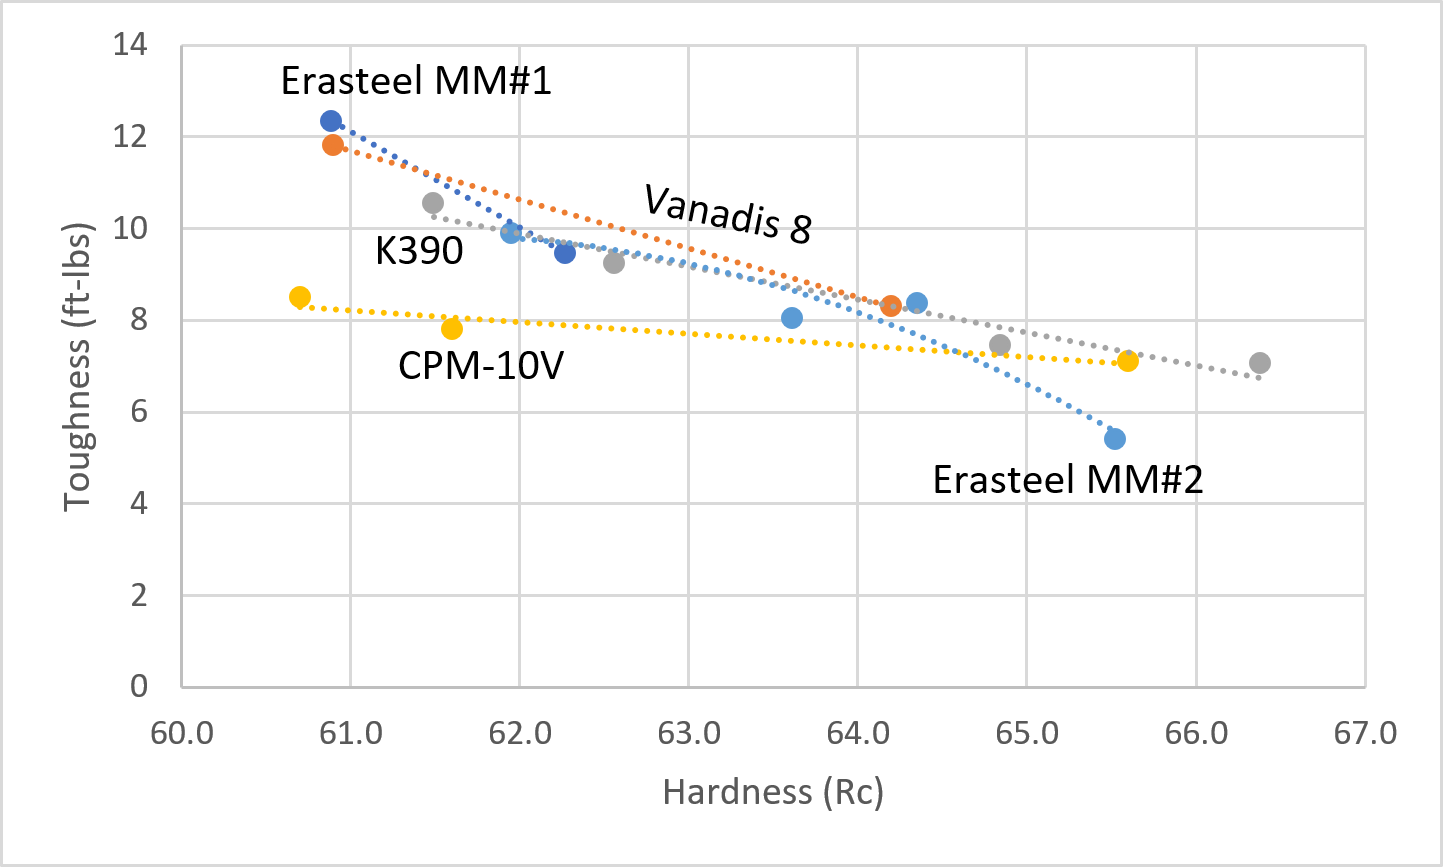
Erasteel MM#1 is the first heat that was shown in the prior article about MagnaMax properties, and Erasteel MM#2 is the final tested material above. You can see that both have a similar hardness-toughness balance, though the new one is skewed to somewhat higher hardness, as expected from more carbon. You will also see that the toughness is very similar to K390 and Vanadis 8, an excellent result given that MagnaMax is a stainless steel with similar wear resistance. So we greatly improved corrosion resistance over those steels while maintaining their other properties. I next plotted those hardness-toughness values vs other stainless powder metallurgy steels:
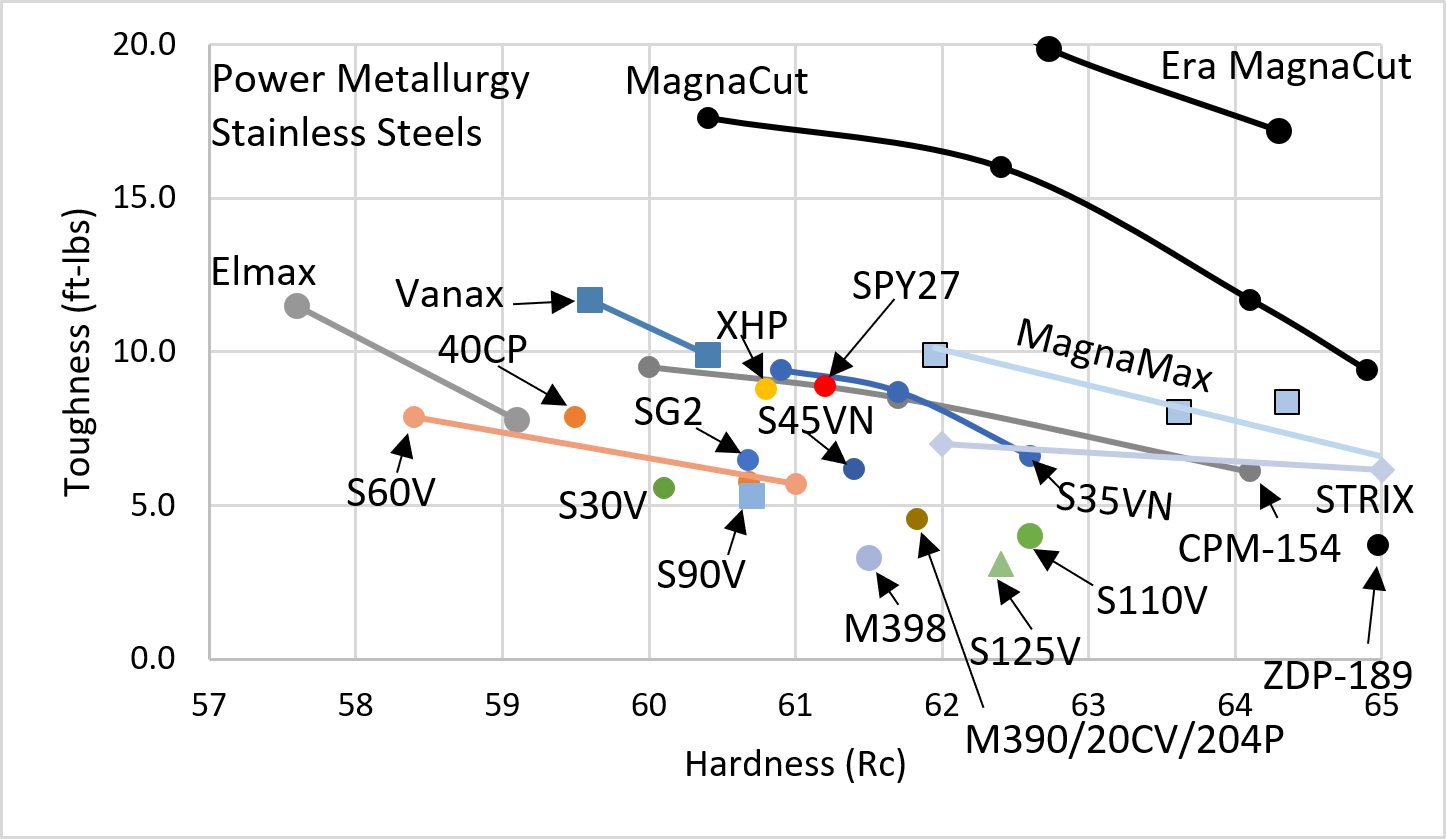
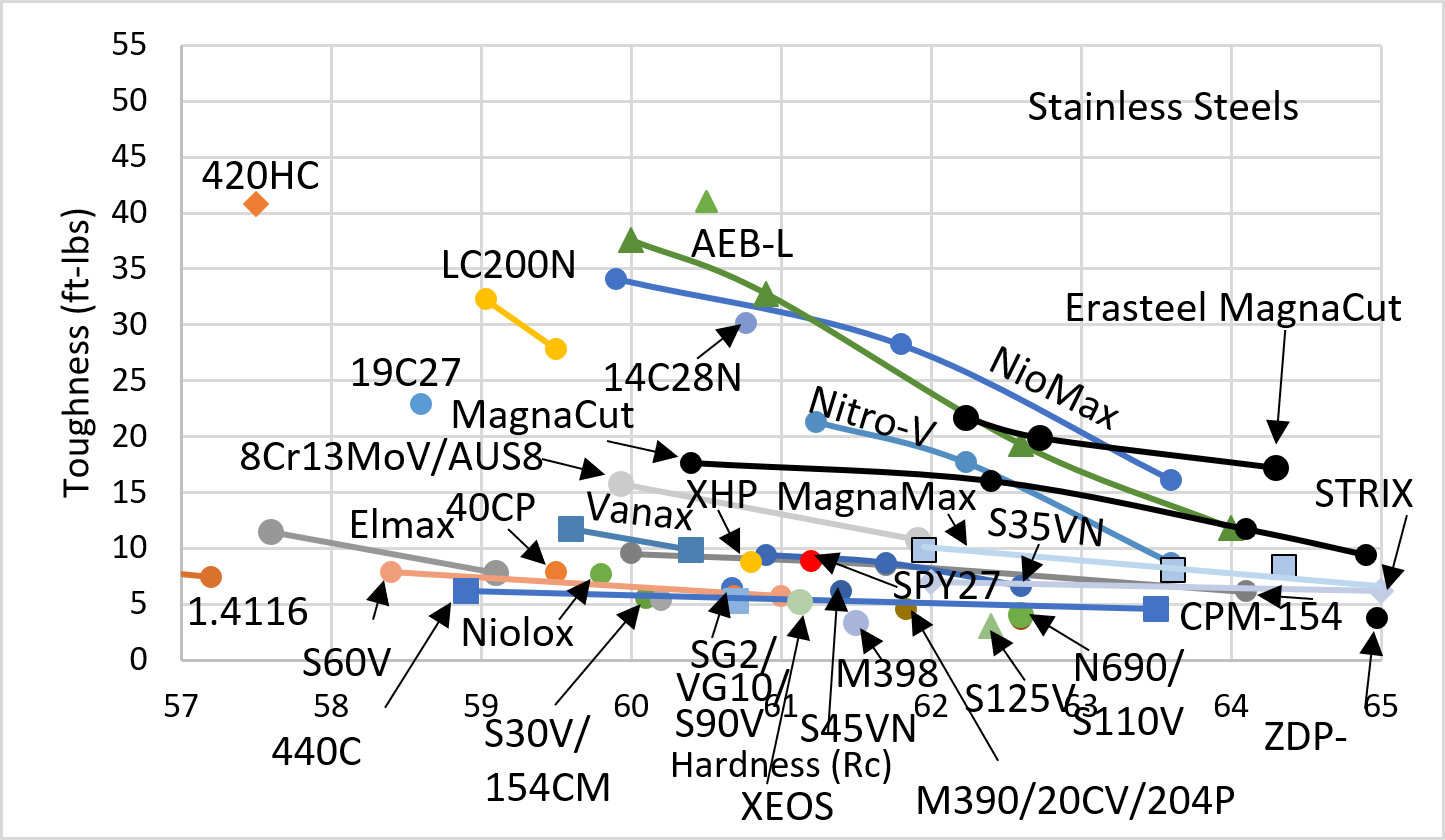
You can see that MagnaMax has superior hardness-toughness than virtually all of the powder metallurgy stainless steels apart from MagnaCut. This includes steels with a good reputation for toughness including Vanax, XHP, S35VN, and CPM-154. And below I have the more complete graph of stainless steels which is a bit busy:
Corrosion Resistance
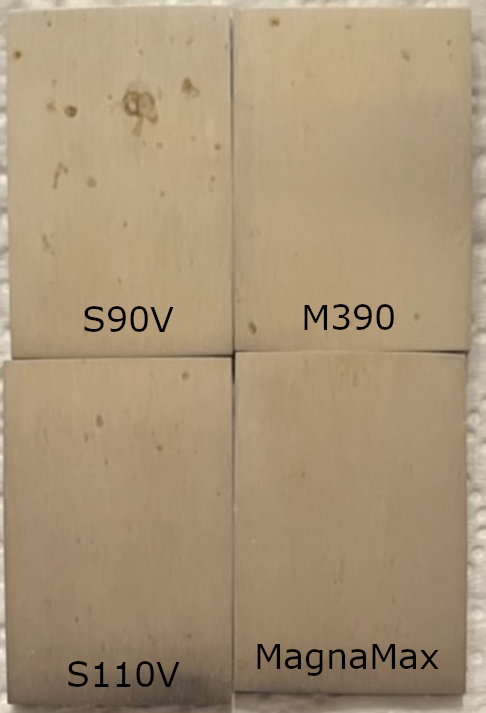
I compared the final higher carbon version of corrosion resistance to the earlier and both passed the 1% saltwater corrosion test. Showing a picture of two clean samples isn’t very interesting, so here is the earlier image of MagnaMax vs other steels:
Each of those was austenitized from 2150°F (1175°C). MagnaMax (and MagnaCut) were designed for all of the chromium carbides to be dissolved around 2050°F (1120°C). After the chromium carbides are dissolved the corrosion resistance doesn’t appreciably change with even higher temperatures. This is different than most other stainless steels which have chromium carbides all the way up to the melting temperature. But using even higher than 2050°F does provide some factor of safety, better ensuring the chromium carbides are fully dissolved.
The other main factors for corrosion resistance are quench rate and tempering temperature. I mentioned in the tempering section that tempering above about 750°F (400°C) leads to a reduction in corrosion resistance and I showed a test with Vanax to illustrate that. Quenching isn’t an issue unless it is very slow, which leads to carbides precipitating on the grain boundaries which can reduce corrosion resistance.
Edge Retention
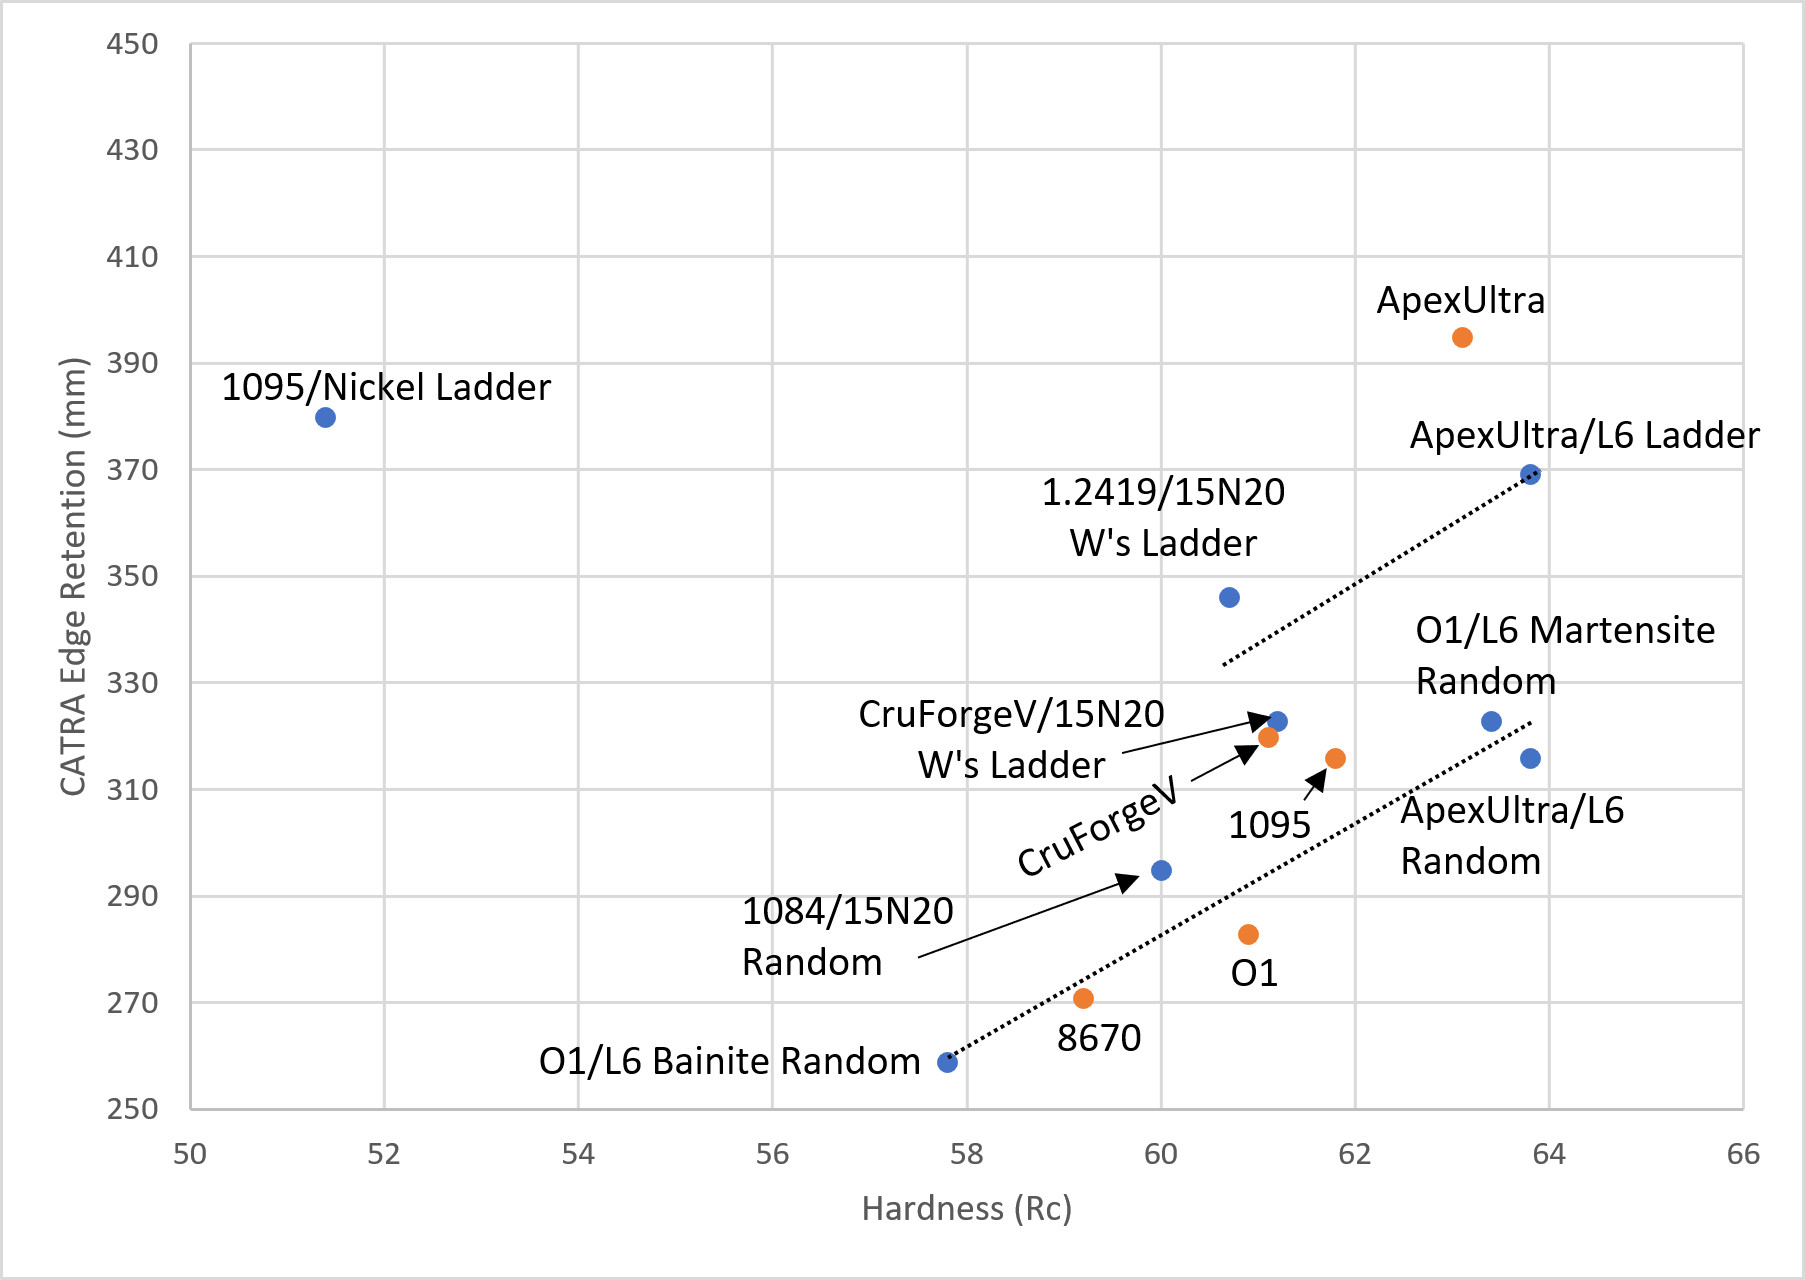
The primary factors for edge wear resistance are carbide volume, carbide hardness (controlled by type), and steel hardness. While the carbides are very important when comparing different steels, there is less of an impact within a given steel. It is true that austenitizing higher dissolves a bit more carbide but this effect is generally drowned out by the increase in hardness. So in general, achieving a higher hardness results in greater edge retention, and there isn’t much point in worrying about the exact austenitizing and tempering temperatures that were used to get there. I have the graph below of CATRA results I tested previously to show where MagnaMax lands and the effect of hardness on the results:
Summary and Conclusions
So I have shown the majority of the heat treatment data that I generated and my reasoning for the different recommendations. I am overall happy with how the heat treatment response ended up. If you want to see the simplified heat treatment recommendations, scroll back near the top where it said “High Level Heat Treatment Summary.” Hopefully that is simple enough for everyone. If not then ask questions in the comments. MagnaMax will be on sale May 1st, 2026 at 9am on Niagara Specialty Metals’ online store: https://nsm-ny.com/shop/
If you would like to support knife steel research, join us at Patreon.com/KnifeSteelNerds. You can read articles and see videos early, discuss topics with fellow steel nerds, and even get a free Knife Steel Nerds mug!
Video
There is also a video version of the following article:
Metallurgists and Knifemakers
Back in 2022, I did a YouTube video called “Do Knifemakers Know How to Heat Treat?” I found video clips where knifemakers explained how to heat treat and how it works, and then I pointed out the misconceptions and misunderstandings they had about metallurgy and heat treating. It worked well because responding to how the knifemakers explained things let me address commonly repeated, untrue claims. Because when I cover my own material, I’m typically just teaching, rather than correcting misunderstandings. However, a handful of comments on the video said I was being unfair or unkind to the knifemakers.
I was a bit surprised by those comments because I thought, “Of course I know more about how steel works because I am a professional PhD metallurgist, so no one should be offended about teaching my discipline.” However, we can always debate the proper tone for such things. But I also think some people misinterpreted my mindset in the video as criticizing, or even parodying, the knifemakers’ understanding of metallurgy. There are also some knife buyers (and even fellow knifemakers) who will lionize the heat-treating prowess of certain knifemakers and believe that they know more than they do. The level of metallurgical understanding of knifemakers varies widely, from knowing almost nothing to having a professional level of knowledge. Many knifemakers are curious about metallurgy because they want to make the best possible products.
Blade Cutlery Hall of Fame Dad and Me
This is largely why I became a metallurgist. My dad, in his knifemaking and Damascus-making, loved learning about metallurgy, and I wanted to learn about it as well. (You can watch an interview with him here). Growing up, my father and I were always excited about the prospect of speaking with metallurgists, such as employees at Crucible Steel or Professors like John Verhoeven. Hoping to gain some secret knowledge from these professionals who had dedicated decades to studying steel. Even now that I am a metallurgist, there is still much to learn. I often learn new things from blacksmiths, bladesmiths, and knifemakers. They may have practical experience that contributes to my understanding of steel. So this article is dedicated to the times when craftsmen taught metallurgists things.
“Damned Good Stuff” and Impact Testing
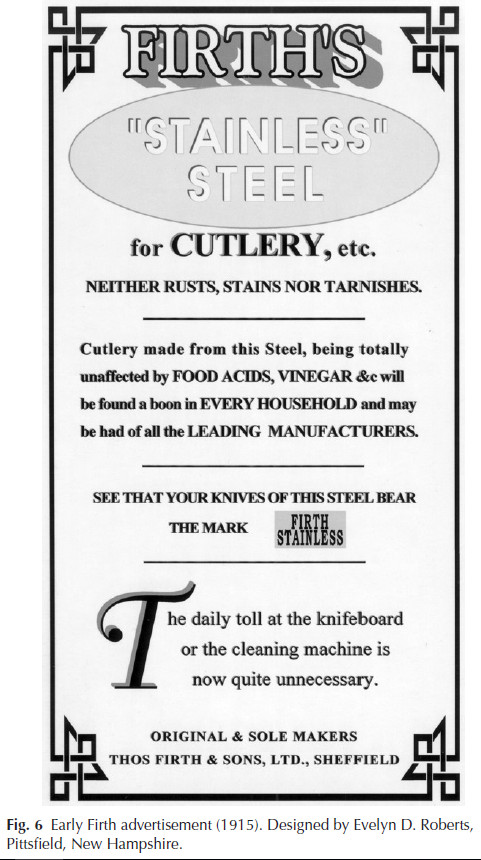
Harry Brearley invented stainless steel in the early 20th century (1912-1914ish), and he developed the common 420 stainless steel, which remains widely used in knives. I wrote a whole chapter in my book, The Story of Knife Steel, about him and what led to the discovery of stainless steel. I pulled a lot of quotes from him because I thought he was funny and interesting.
Brearley credited cutlery manager Ernest Stuart of Mosley Cutlery Company with the success of stainless steel [1]: “It is due to him to say that, from the very first trials, he had confidence in the possibilities of the steel. He made unremitting efforts to adapt the process of knife-making to the unusual qualities of the steel and, so far as the initial use of stainless steel for cutlery is concerned, the credit is due to him and his firm.” Stuart was also the one who named it “stainless” steel, giving it the name it still has today.
The reason I bring up Brearley is because of things he wrote about working with practical craftsmen (such as Ernest Stuart) and their contributions to the understanding of metallurgy. His father was a steelworker and had no scientific training. Brearley said that he was “in appreciation of men, typified by my father, who have exerted a greater favourable influence on the practice of steel-making than they are given credit for.”[1] “The value of scientific control, with its measurings and weighings, is undeniable, but it is sadly blemished by a strutting vanity and snobbish intellectual pride which smothers with confusions aspects of a subject it does not understand.”[1]
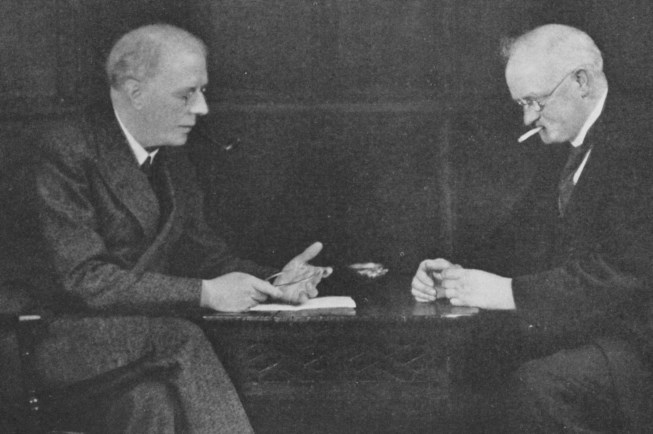
Brearley also said that his brother was a more hands-on person than he was [1]: “He is a better workman, a better observer and more resourceful experimentalist than I am; but he has stuck to the furnaces, mills and forges and done things whilst I have read about them, and looked at things other people were doing, and taken some trouble to describe them in the language learned from books.”
Caption from Brearley: “My brother (sees) more with the naked eye than most people see in them using laboratory equipment. On the other hand, I spent about 20 years in a laboratory, mainly occupied in measuring things. The picture is intended to be symbolic: My brother on the right-hand side is looking at a fractured surface of a piece of an ingot, and I on the left-hand side am pretending to be doing something with a pair of calipers.”
To illustrate the fact that ordinary workers often have methods that are superior to the scientist, Brearley described the history of toughness testing [1]:
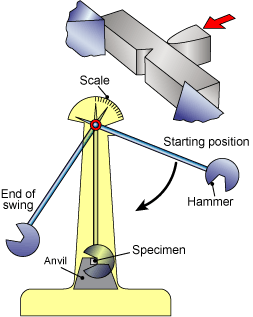
For a century or two the blacksmith has been in the habit of ending a bar of iron or steel after first nicking it with a slate. When the bar is broken, as intended, through the nick, the effort required to break it, appreciated by the smith’s muscles, is registered in his mind – his extremes of judgement are “rotten” and “damned good stuff.” There is not the slightest doubt in the smith’s mind that the material he intends to make something from is all the worse for being “rotten” and all the better for being “D.G.S.” Many years ago, thirty maybe, a young man in Rugby, named Izod, was called upon to explain why of two pieces of steel one failed hopelessly and the other did its job very well. Both chemical analysis and every conventional form of mechanical testing showed that the two pieces were identical; but this young man knew they were not. Bethinking himself of the blacksmith, he notched both pieces, and found the one was “rotten” and the other “D.G.S.” In order to state the difference, which was the only difference he could find, quantitatively, he made a pendulum hammer very much like the existing Izod testing machine, and then went to South Africa, blissfully unconscious that his Rugby adventure was the lead to a new kind of official testing.
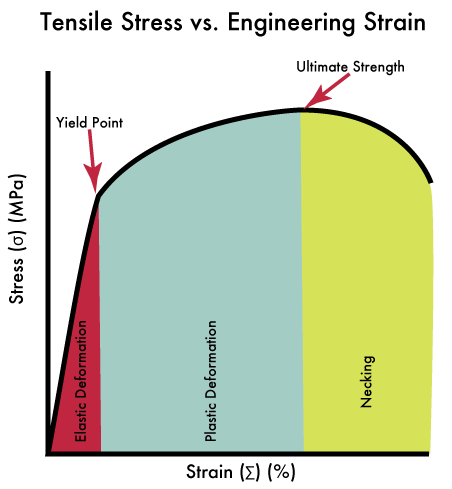
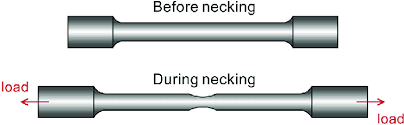
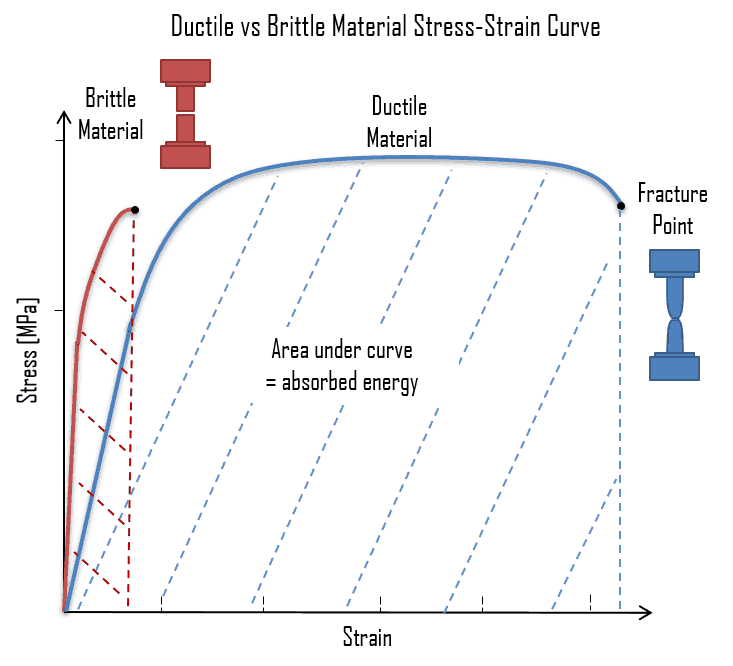
This is a good example of a time when blacksmiths had a simple test for telling whether a piece of steel was processed correctly, and the methods used by the metallurgists would not reveal these most basic properties. The common test used back then by metallurgists, which continues to this day, is the tensile test. The tensile test involves pulling a piece of steel (tension/tensile) until it breaks. The load capacity of the steel is measured during this test along with how much the steel has elongated while it is tested. This generates a “tensile curve” that shows the yield strength, ultimate strength, and ductility (amount of elongation) of the steel. So there is a lot of information that is gained in one simple test.
You’ll see the different regions of a tensile test above. The “elastic deformation” region is where if you remove the load the piece of steel returns to its original dimensions. This is like bending a paper clip and letting go, it returns to the original shape. You will notice that the “curve” is in fact a straight line in the elastic region; as you load the steel it gets longer, and if you let go it returns to its original length. However, if the “yield point” is exceeded, the steel will remain permanently elongated. Just like if you bend a paper clip too far it will remain bent. The “ultimate strength” is the maximum stress the steel can take (stress is load divided by cross-section). The stress actually drops after that until the steel breaks while the steel “necks,” the steel reduces its cross-section before fracture.
In Edwin Izod’s recounting of his learning about impact testing he said [2]:
For some considerable time, however, owing probably to the greater facilities now available, tensile tests … seem to have displaced almost every other test, and in many present-day specifications for steel no other test is prescribed. In special cases, however … it is usual to include a falling-weight test. … [O]bviously a steel that possesses inability to withstand shock would be immediately detected by this method, and it is highly probable that many cases of peculiar breakage would have been avoided had a standard brittleness test been specified, as well as a tensile test; in fact, fractures have occurred in steel which are inexplicable by known chemical or standard physical tests; and some experiments … show that a ductile steel, as evidenced by the usual tensile tests, may be exceedingly brittle.
So he found that a rapid impact test behaved differently a tensile test. This became known as the Izod impact test, which is similar to the Charpy impact test. The difference between an impact test and a tensile test is in the “strain rate” of the test. Tensile tests are done with a relatively slow increase in load being applied. If you take a knife edge and flex it, or take a whole knife and bend it, you are performing an operation relatively similar to a tensile test (or a bend test), where the load/stress is applied fairly slowly. However, if the steel is rapidly impacted the behavior is somewhat different. This is like chopping something hard with a knife, or dropping a knife tip-first into the ground. The knife may have been fine with cutting hard materials, but when dropped the tip broke off. The rapid rate of an impact test can induce brittle behavior in otherwise ductile materials. Blacksmiths had already known this from their experience with breaking pieces of steel, but it took metallurgists longer to figure that out.
Schematic diagram of Charpy impact test
Tensile tests also reveal brittle materials (see below), which shows up with a low ductility result. In fact the majority of knife steels are very high in hardness and contain brittle carbides, so most of them do not have much ductility in a tensile test. Bending tests tend to do better with tool steels because the tested volume is smaller. However, there are certain types of embrittlement that do not show up in a tensile or bending test and are better revealed through impact testing because of the strain rate difference.
I previously wrote about Richtig in an article about his knives. I also covered his history in The Story of Knife Steel book. Richtig began as a blacksmith apprentice at 19 years old in 1906. In 1908 he and a friend set up their own blacksmithing shop until 1923, when he sold his share. In about 1916, he began experimenting with a heat treating process for knives. In July 1925, he leased a shop and began producing knives. Despite his previous experience as a blacksmith, his knives were made by stock removal. His typical knives had a cast aluminum handle though some rare knives had leather washer handles. He primarily produced kitchen and butcher knives though also produced some fighting knives for soldiers.
A Richtig butcher knife that I own
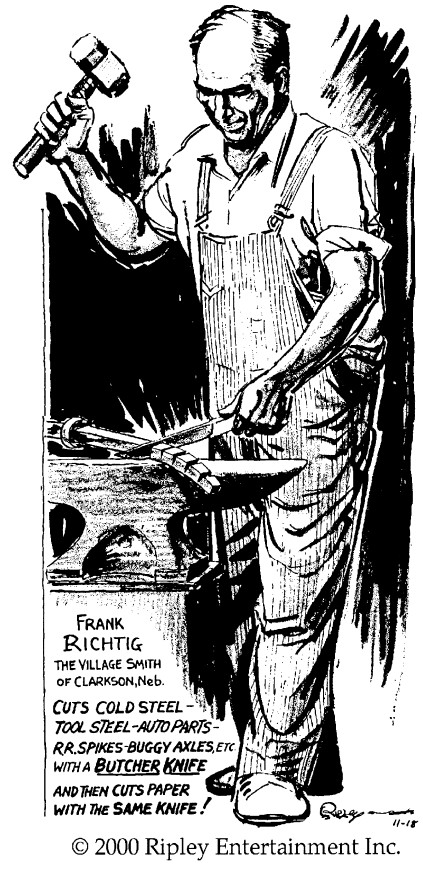
In the early 1930s, Richtig and his wife began traveling to the state fair to demonstrate the superiority of his knives. They would take old pieces of steel like railroad spikes, axles, or horseshoes, and he would hammer the knife through the steel and then slice through newspaper afterward. In 1936 his knives were featured in Ripley’s Believe It or Not!, which was published in newspapers across the country. Richtig advertised that his knives could pass these tests due to superior heat treating [3] : “We have discovered and developed a special new process in tempering knives. This method of tempering assures you of a better and more lasting quality of cutlery.”
Richtig in Ripley’s Believe it or Not
Richtig did, however, say that hammering his knives through iron or steel would void the warranty, and that the knives were ground somewhat thicker for the demonstrations [4]:
If knife proves to be defective in any way within six months after purchase, return same to us and we will gladly replace it. However, if the knife blade back shows it has been hammered upon or shows abuse in anyway, the guarantee is void and the knife will not be replaced… These knives are made of high-grade steel and are suitable for all ordinary uses in the home or place of business. They will do all we claim for them. In reference to the cutting of cold chisels, axles and many other steel articles, I wish to say that in my steel and iron-cutting demonstrations, I use the same steel and temper you will find in my regular stock knives. The size and thickness of the blade is the same, the only difference you will find is in the grinding of the cutting edge. I do not sell my knives for the purpose of cutting steel and iron. The purpose of my steel-cutting demonstrations is to show the toughness and temper in my knives. Many thousands of people have seen my steel-cutting demonstration and were greatly amused by them. Striking a knife with a heavy hammer in cutting steel requires special skill and experience, both of which I have learned and mastered during the thirty years I have been making and improving these knives. My knives are made for general all-around use where good, substantial knives are required.
Richtig’s impressive feats have led many to try to find his heat treatment process. Measurements of Richtig’s knives revealed that the steel composition was nothing special, a simple high-carbon steel like 1095 or W1 [5] . Richtig used steel from the Ryerson Steel Company in Chicago, branded as Ryolite [6] .
When Glen Lambert asked him about his heat treating process, Richtig answered [7], “A man is entitled to some secrets, and that’s mine.” He told Lambert [7] “he had found no one worthy of being told or taught his knifemaking, and until he did, nobody was going to get his ‘secret.’ During his declining years no one came forward, and when he passed away … so did the tempering process.” Of course, this didn’t stop people from trying to recreate his heat treatment. His legend only grew in recent decades as two research papers were published in 2000 [5] and 2015 [8]. The 2000 paper proposed that Richtig had been using an “austempering” process for a bainite microstructure, a type of heat treatment that wasn’t discovered until after Richtig was already famous for his knives’ superior heat treatment. Read about austempering and bainite in this article. In the research reported in 2015, they heat treated 1095 steel using an austempering process and could not match the superior properties reported in the 2000 research paper!
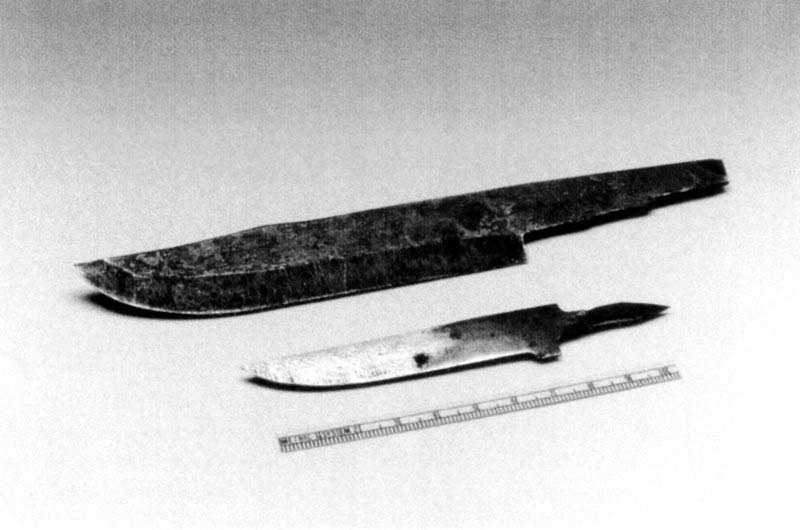
However, there are problems with this conclusion. One is that the hardness of Richtig’s knives varied widely; the knife the researchers attempted to mimic was only 39 Rc, while another knife they tested averaged 50 Rc. The butcher knife I purchased measures 57 Rc. Harlan “Sid” Suedmeier has also tested several Richtig knives and found them to vary in hardness. While Richtig owned a Paragon electric furnace for heat treating, Suedmeier is not sure when he obtained it, which could explain some of the variability. Paragon furnaces did not start until 1948, though perhaps he had another furnace before then.
The two knives analyzed in the 2000 paper
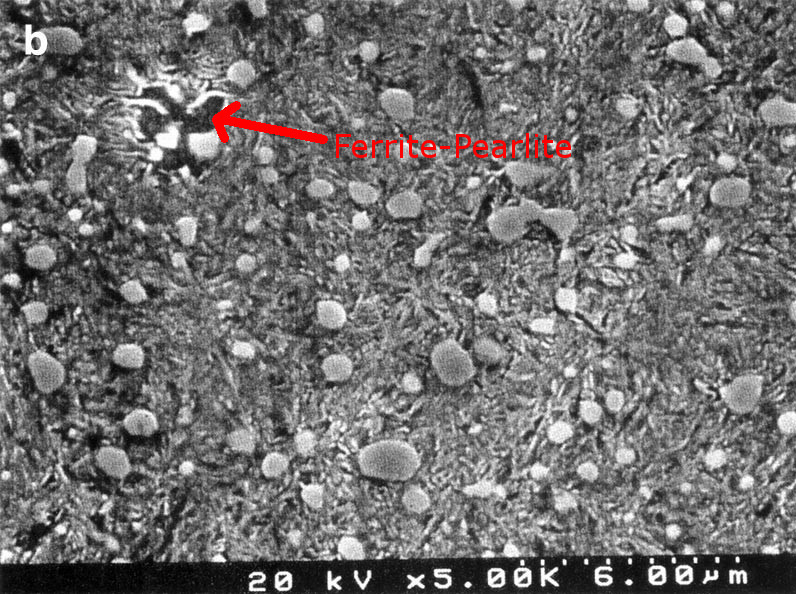
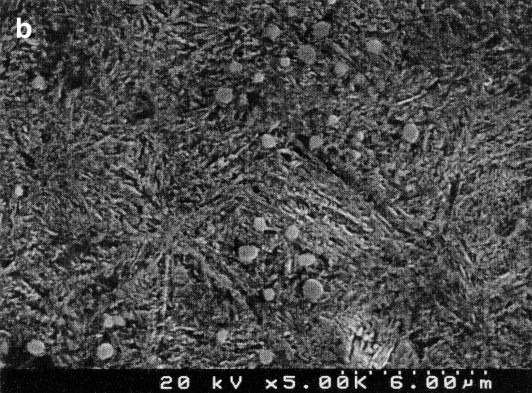
The very low-hardness knife from the research paper is thicker than many of his other blades, and the microstructure shows evidence that the knife wasn’t fully hardened. This “intermediate” microstructure is challenging to mimic with a typical oil quench and temper, or even austempering treatment. The soft phases are very ductile and give the overall steel greater ductility. So the blade that was used for the tensile testing was likely softer than the majority of Richtig knives and was not representative of the typical properties.
The large knife was only 39 Rc and was not fully hardened as can be seen by the remaining pearlite and ferrite
The small knife was fully hardened
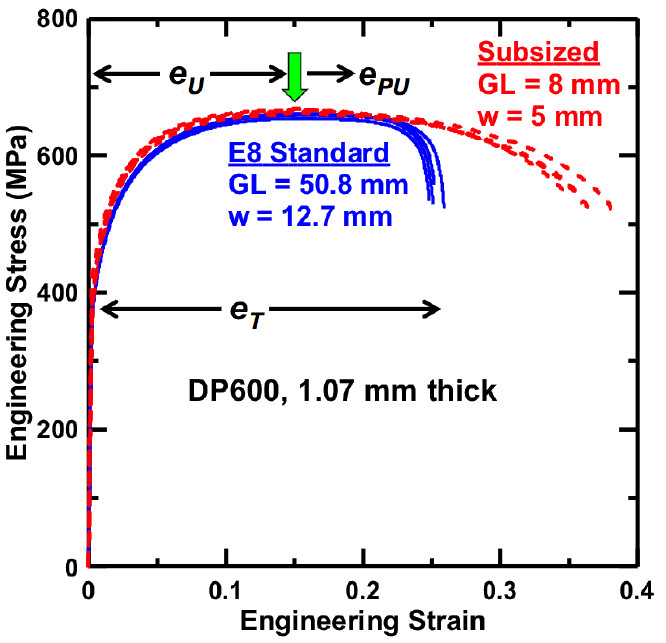
Another issue in the 2015 paper where they tried to mimic the 39 Rc knife was that they used a test specimen size that was much larger than what was used when generating the strength-ductility values in the original 2000 paper. The use of a larger test specimen leads to the same strength value but a significantly lower ductility value. One of the researchers from the 2015 paper, Dr. Jared Teague, has since commented that he believes the specimen size is likely the cause of the lower ductility values in that study.
Comparison of tensile curves from a small tensile specimen (red) and a standard tensile specimen (blue). The small tensile specimen had the same strength but measured much greater ductility.
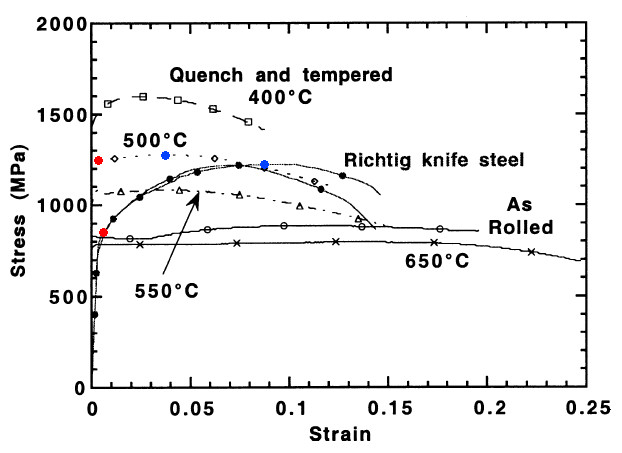
When comparing the tensile properties of the soft Richtig knife to quenched and tempered 52100 in the 2000 paper, they found that the soft steel had better ductility (strain) for a given level of strength (blue dots). Another evidence of the underhardened nature of the soft Richtig knife is comparing the yield strength (red dots) where you can see that the Richtig knife yielded at a much lower stress.
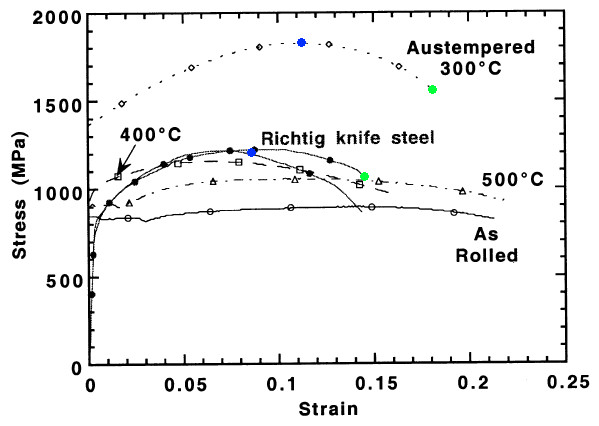
And while the researchers from the two papers were impressed by the properties of the underhardened steel from Richtig’s large knife, in their testing they even found that 52100 austempered at 300°C (570°F) had superior strength (blue dots) and ductility (green dots). However, the 400°C austempered condition was similar to the Richtig knife for strength and ductility. However, the yield strength was higher for the researchers 400°C austempered condition. This shows that it is unlikely that Richtig was using austempering for bainite.
So how did Richtig accomplish his steel-cutting feats? He gave us the clues in the information he had previously provided: he left the edge thicker, and he had 30 years of experience cutting iron and steel with them. Sid Suedmeier, an expert on Richtig knives, shared similar thoughts. I asked him what Richtig’s secret was, and he gave me a one-word answer: “Practice” [9]. The steel and heat treating that Richtig used were not necessarily extraordinary, but he made good knives and was not afraid to test them. His showmanship in demonstrating his knives gave the buying public an irresistible hook, and he became famous for it. But I think Richtig’s most impressive feat might be bamboozling metallurgists several decades later into believing he was using a super heat treatment.
Questek Ferrium M60S Steel
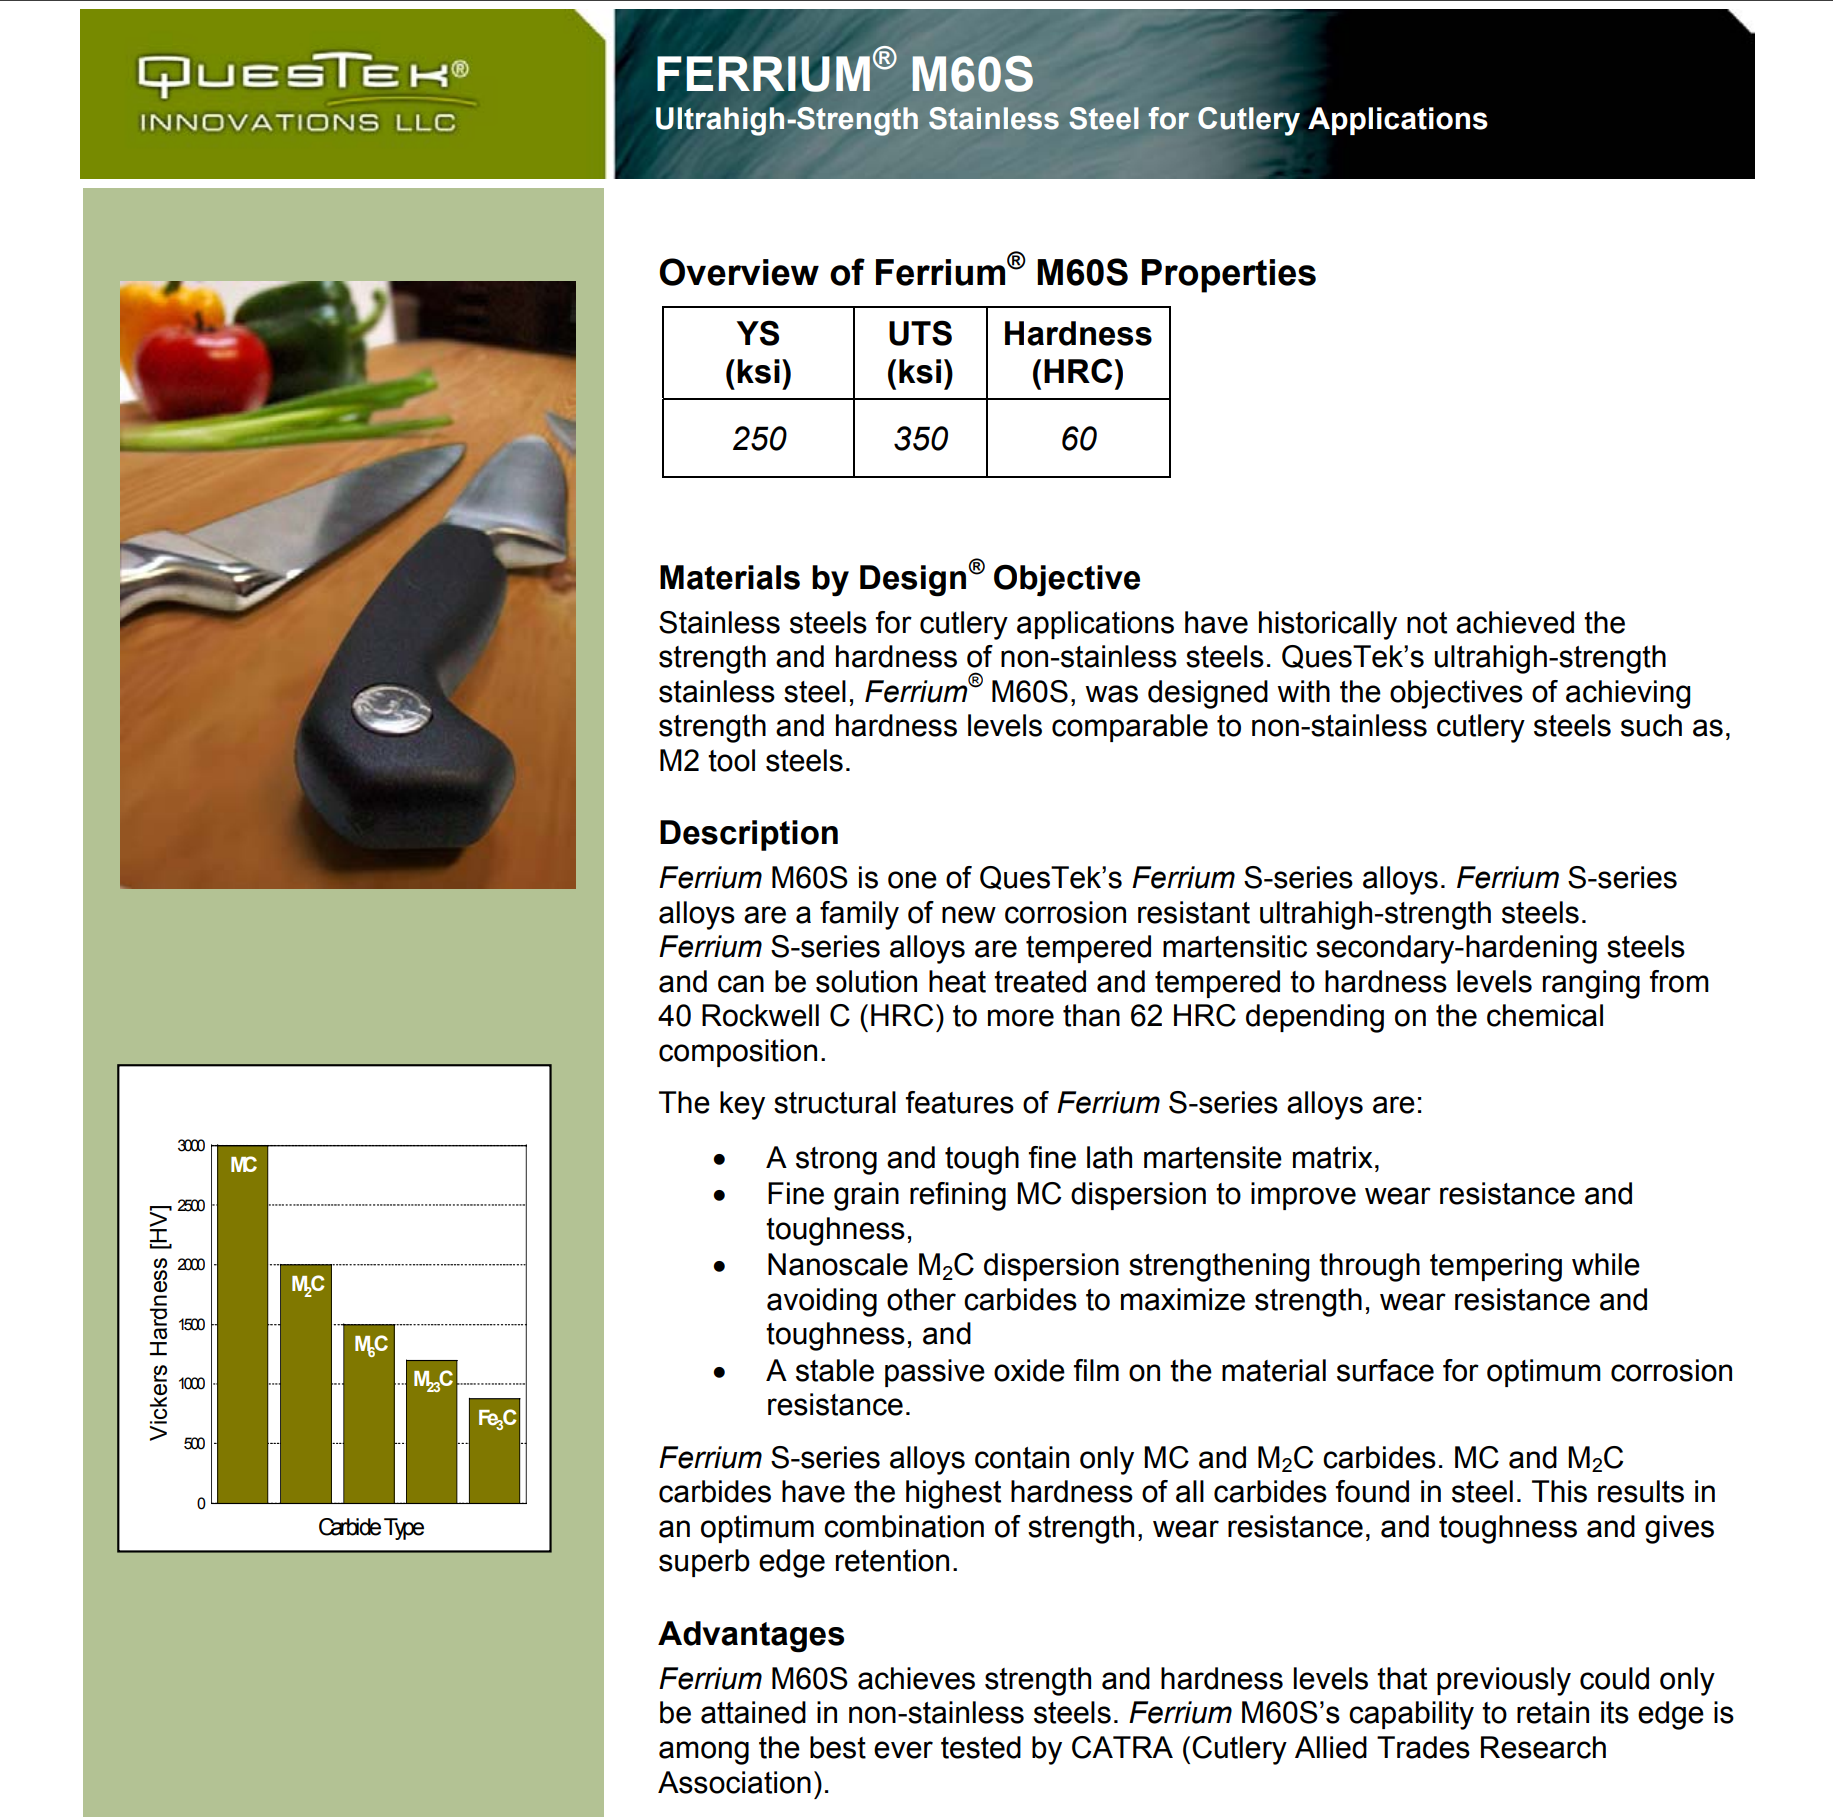
M60S was a brand new steel designed specifically for knives and cutlery that was announced back in 2003. I have written about this steel previously in this article, where I more thoroughly described its history and the design behind it. Here is the first page of the datasheet which advertises what was supposed to make it better:
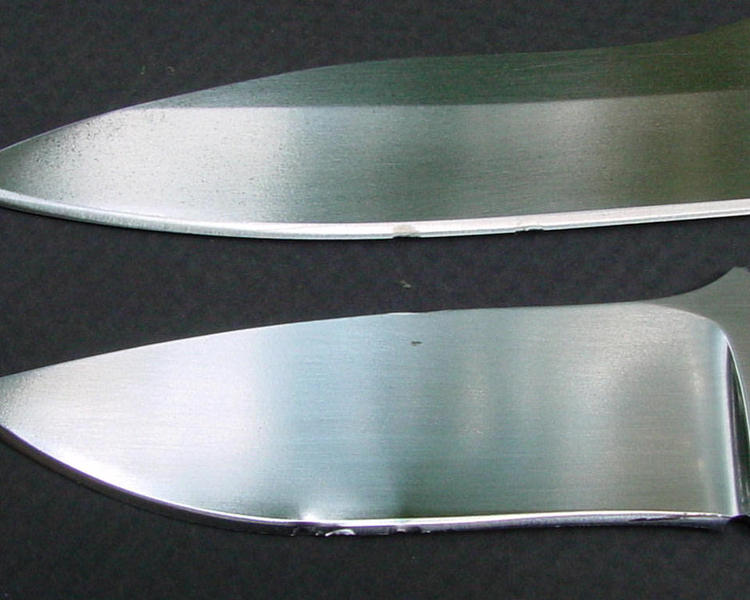
Questek is a company that designs new materials using “Integrated Computational Materials Engineering” (ICME). In other words, they use computer simulations to design new materials. This sounded especially forward-thinking and advanced in 2003. A new knife steel designed by computer-aided metallurgists? Wow! However, this steel never came to market. I contacted the inventors of this steel about why it didn’t come to market and Professor Greg Olson told me by email: “I recall denting of cutting edges due to early yielding from retained austenite.” I had remembered this result. Knifemaker Jerry Hossom reported edges that deformed easily from a sample of the grade he had been provided, heat treated to 60 HRC [10]. Hossom also reported that a knife in S30V had very little damage [11].
Jerry Hossom test of chopping an 8d nail. 61 HRC 154CM (top) and 60 HRC M60S (bottom).
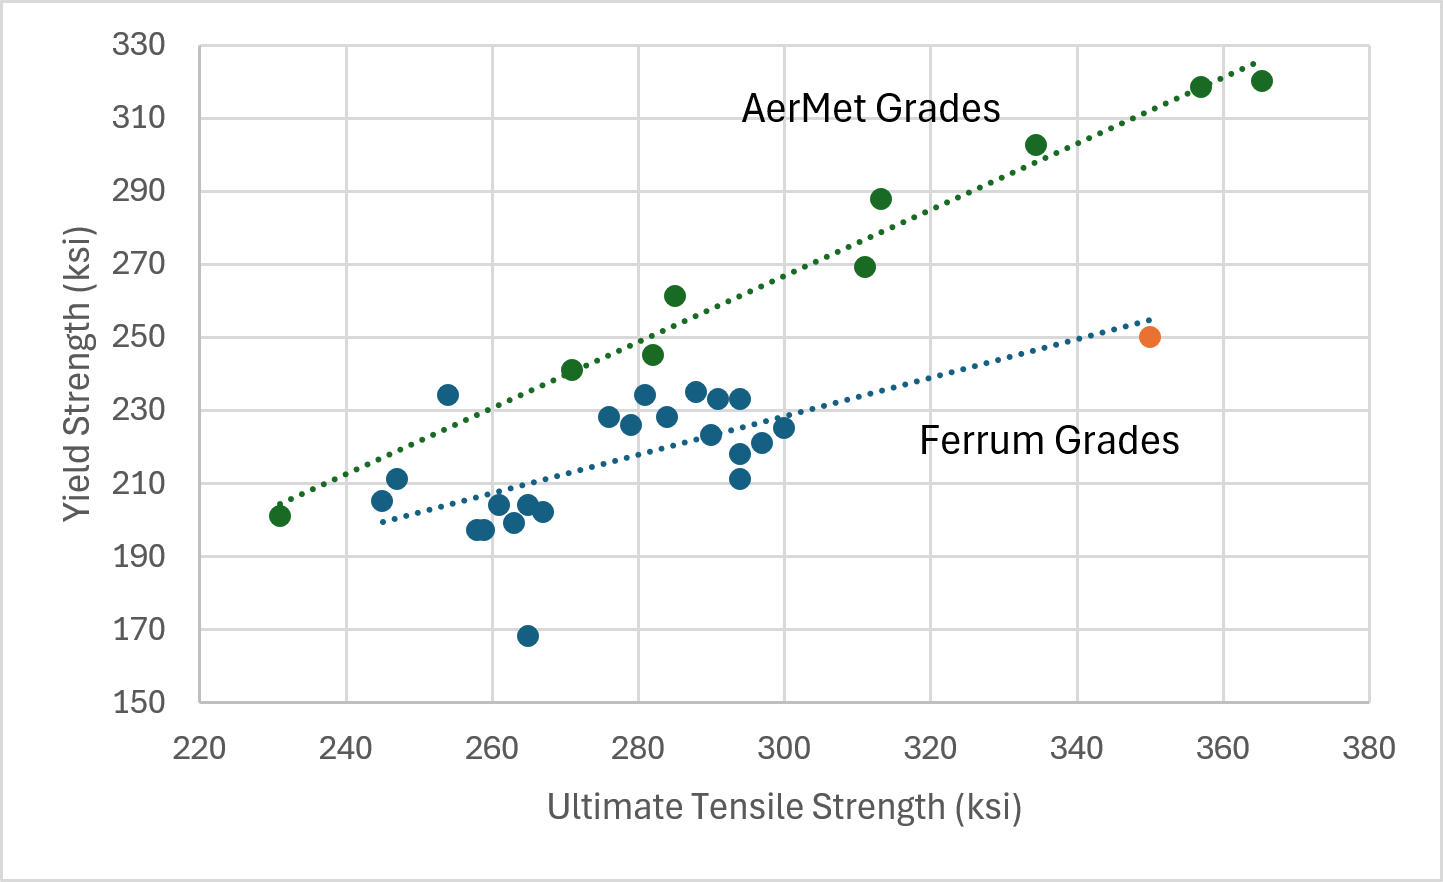
What led to the easy deformation? It wasn’t hardness, 60 HRC was roughly the same as the 61 HRC of the 154CM blade. The difference was in the yield strength of the material. Typically yield strength and hardness are highly correlated, but there are some cases where they deviate. If you look at the M60S datasheet you will see that it says at 60 HRC the yield strength was 250 ksi and the ultimate strength was 350 ksi. This is a relatively low “yield ratio,” or the ratio of yield strength to ultimate strength, YS/UTS. This means that in terms of yielding behavior, the stress required to deform this steel would be lower than other steels heat treated to 60 HRC. I have seen some people speculate that this lower yield strength comes from the strength of this steel being achieved with carbide precipitation rather than strictly higher carbon martensite. However, when comparing the yield strength of Ferrium-series steels [12] to AerMet-series steels [13-16], a non-stainless precipitation strengthened steel, the Ferrium yield strength is significantly lower (M60S is the orange dot):
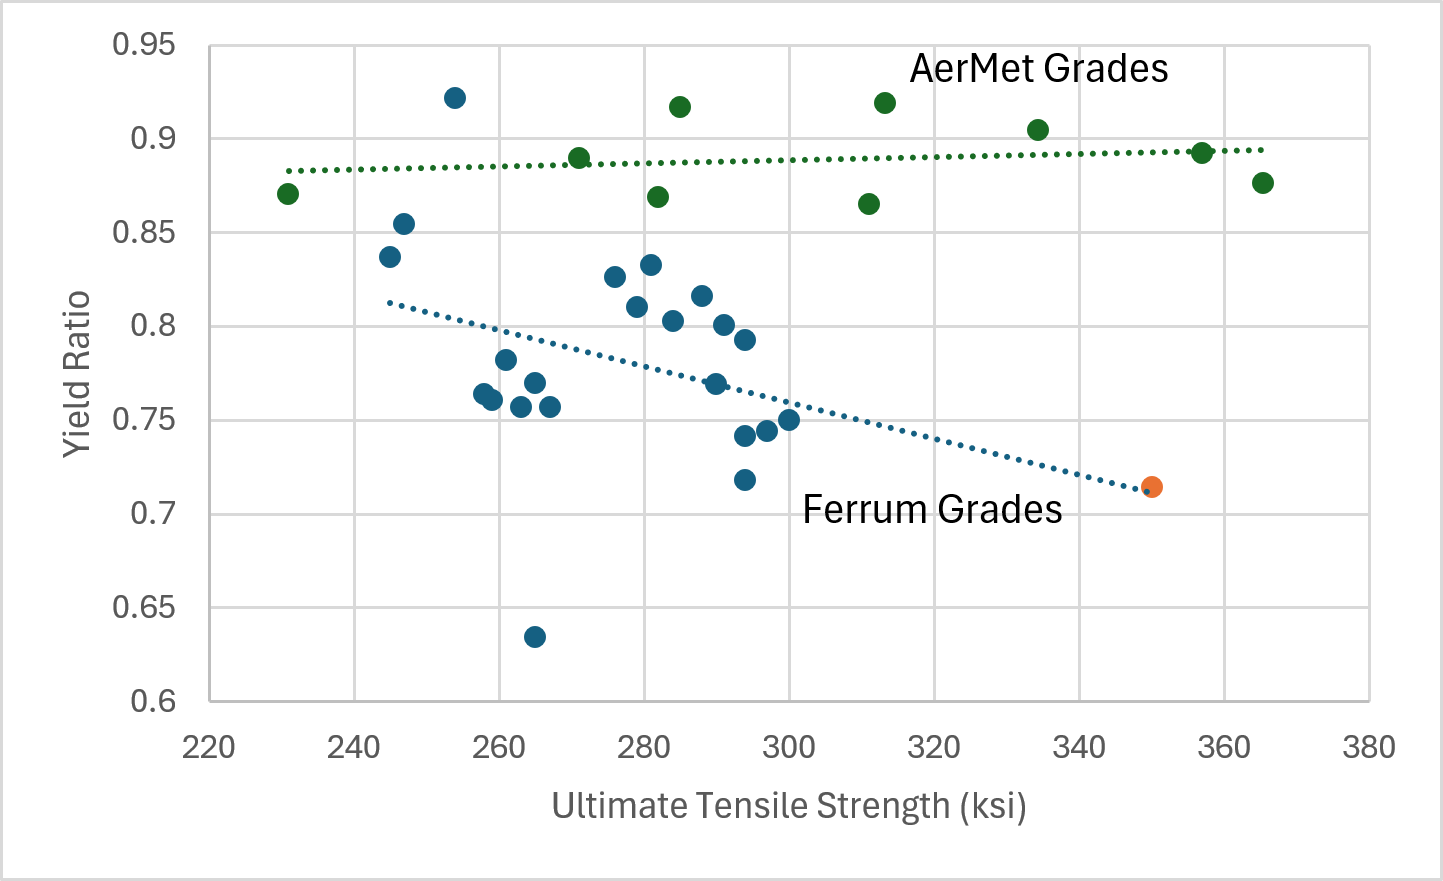
You can see that as the ultimate strength increases, the yield strength of the two sets of materials diverges more and more. This is somewhat clearer if we plot vs yield ratio instead:
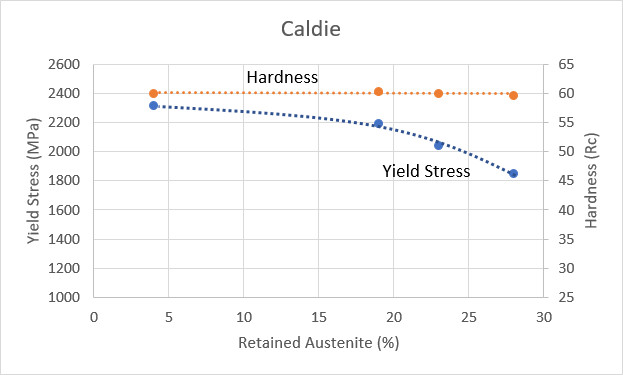
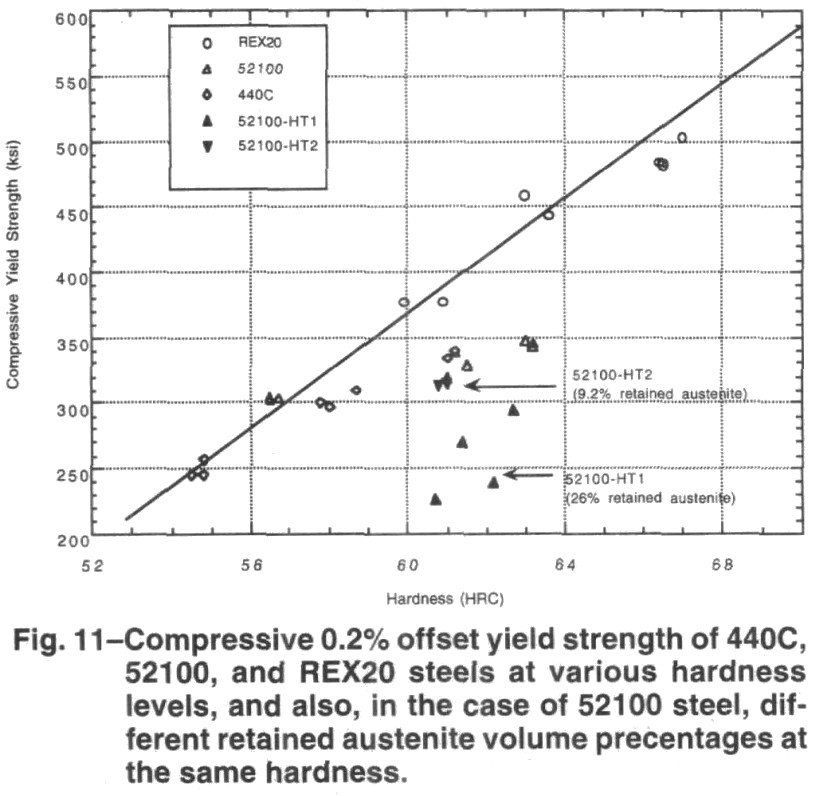
You can see that for the AerMet grades the yield ratio was flat with increasing ultimate strength (and hardness), but for the Ferrium grades like M60S the yield ratio decreased. So while a lower hardness/strength Ferrium grade has been commercialized as Ferrium S53, the yield strength issue became more relevant after pushing the hardness up to 60+ HRC for knives. As Professor Olson noted, this was due to excessive retained austenite in the higher strength Ferrium grade M60S. When steel is quenched from high temperature it transforms from the austenite phase to the hard martensite phase. With certain compositions and temperatures, the austenite does not fully convert, leading to “retained” austenite. Retained austenite can lead to reduced yield strength even while at the same hardness:
Caldie data from [17]
Data from [18]
The Ferrium grades may be more prone to having excess retained austenite than AerMet due to the high chromium content required for being a stainless. It might be possible to modify the alloy design to overcome this limitation but it probably wasn’t worth the time and expense required for doing so. But this is yet another case where a practical test by a craftsman revealed an issue that metallurgists did not predict beforehand. In Professor Olson’s email to me he had also noted that Al Pendray had made a knife in the steel, which I have included a picture of below.
Al Pendray knife in Ferrium M60S
Metallurgists and Knifemakers Working Together
Of course for many of the examples above, the knifemakers/craftsmen and metallurgists were not antagonistic towards each other. Some of the best breakthroughs happen when they work together on a common goal. One of my favorite examples is bladesmith Al Pendray and metallurgist John Verhoeven.
Al Pendray was a bladesmith trying to develop a consistent process for making Wootz. Verhoeven is an emeritus metallurgy professor. Both men reported that they needed the other to solve the question of how Wootz Damascus was made. I won’t recount the entire history here. Verhoeven has a book about the history which I reviewed here. And I also have a chapter about it in The Story of Knife Steel. There are also a couple of videos on YouTube (Video 1 and Video 2). But I will include a couple of my favorite quotes about what the two thought of each other.
Pendray Wootz knife
Verhoeven said about Pendray [19]: “He could have gone to college and gotten a Ph.D. just like that. I never worked with anybody that could learn faster. And he is extremely patient. I think Al is an amazing man. It’s been a pleasure for me to know him.” Verhoeven also reported that Pendray said that it was another famous metallurgist who encouraged him to pursue the mysteries of Wootz [20]: “Al often spoke in a sort of reverent tone of ‘Dr. Cyril Stanley’ and how Dr. Smith had taken him aside at the meeting, encouraged him in his work, saying that it was his opinion that the mystery of how to make these blades would probably be solved by a working smith.”
My Own Experiences
I did a really big study on pattern-welded Damascus a few years ago. My father was a major supporting person in this study as he produced quite a bit of the Damascus for the study. One of the combinations he wanted to look at was 1095 and nickel. The nickel is very soft while the 1095 was heat treated to high hardness like normal for a knife. He felt this might be a good combination to determine if the “Damascus cutting effect” could happen, an old claim that a combination of hard and soft metals could lead to a saw-tooth or serration effect leading to higher slicing edge retention. I told him we shouldn’t waste our time because it wouldn’t work but he insisted. When we tested it we found – it out-cut plain 1095 by a significant margin, out-cutting every other low alloy steel combination, even ApexUltra/L6. In other words, we proved the Damascus cutting effect. And while we didn’t find that effect for several other combinations, it took my knifemaker father to convince me to look at it in the first place.
I hope you enjoyed being tricked into learning about tensile tests in these stories of metallurgists and craftsmen.
[1] Brearley, Harry. Steel-Makers and Knotted String. Maney Pub, 1995.
[4] Suedmeier, Harlan. “More About Richtig Knives.” Knives ’88. 1987.
[5] Wadsworth, Jeffrey, and Donald R. Lesuer. “The knives of Frank J. Richtig as featured in Ripley’s Believe It or Not!®.” Materials characterization 45, no. 4-5, 2000: 315-326.
[6] Suedmeier, Harlan. Phone conversation, 2022.
[7] Lambert, Glen. “F.J. Richtig: Believe It or Not Cutler.” Knives ’84. 1983.
[8] Teague, J., R. LeMaster, J. Rinksc, A. Winkelmannd, and L. Bartlett. “Attempted Replication of Frank Richtig’s Forgotten Steel Heat Treatments.”
[12] Kuehmann, Charles J., Gregory B. Olson, and Herng-Jeng Jou. “Nanocarbide precipitation strengthened ultrahigh-strength, corrosion resistant, structural steels.” U.S. Patent 7,967,927, issued June 28, 2011.
[17] Rehan, Muhammad Arbab, Anna Medvedeva, Berne Högman, Lars‐Erik Svensson, and Leif Karlsson. “Effect of Austenitization and Tempering on the Microstructure and Mechanical Properties of a 5 wt% Cr Cold Work Tool Steel.” steel research international 87, no. 12 (2016): 1609-1618.
[18] Park, W., M. R. Hilton, A. R. Leveille, and P. C. Ward. “Microstructure, fatigue life and load capacity of PM tool steel REX20 for bearing applications.” Tribology & Lubrication Technology 55, no. 6 (1999): 20.
[19] Oppenhemier, Todd. Alfred Pendray, Wootz Hunter – An Homage to a Remarkable Craftsman. YouTube video, 2018.
[20] Verhoeven, J.D. Damascus Steel Swords: Solving the Mystery of How to Make Them. 2018.
In case you haven’t been following steel news, Crucible Steel went through a bankruptcy and no longer exists. I interviewed Bob Shabala of Niagara Specialty Metals about this transition several months ago. Niagara is the company that purchased ingots from Crucible and would hot roll, anneal, and distribute them to knife companies and steel suppliers. They have also recently started a new online store to better sell directly to individual knifemakers. Niagara has managed to keep production going for a wide range of Crucible (and other) knife steels, including:
MagnaCut, CPM154, S30V, S35VN, S45VN, S90V, 3V, 4V, CruWear (NSM Wear), 154CM, 20CV, M4, CPM D2, D2, 440C ESR, 416SS, 6-4 Titanium. MagnaMax should be available in early 2026.
Erasteel purchased the rights to Crucible Steel trademarks. Erasteel is headquartered in France, but its powder metallurgy production is in Sweden. Niagara worked with Erasteel to retain the exclusive rights to purchase MagnaCut ingots and sell the steel to knifemakers and knife companies. Erasteel produces very high-quality powder metallurgy steel. Bob Skibitski was the head of the powder metallurgy steel production at Crucible Steel for 20 years and was hired by Erasteel. He reports that Erasteel production yields higher-quality, “cleaner” steel. You can read his thoughts in an article on Niagara’s website.
Video
There is a video version of this article:
Previous Testing of European Powder Metallurgy Steels
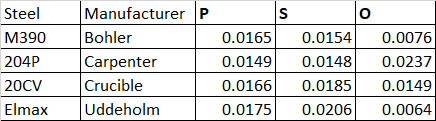
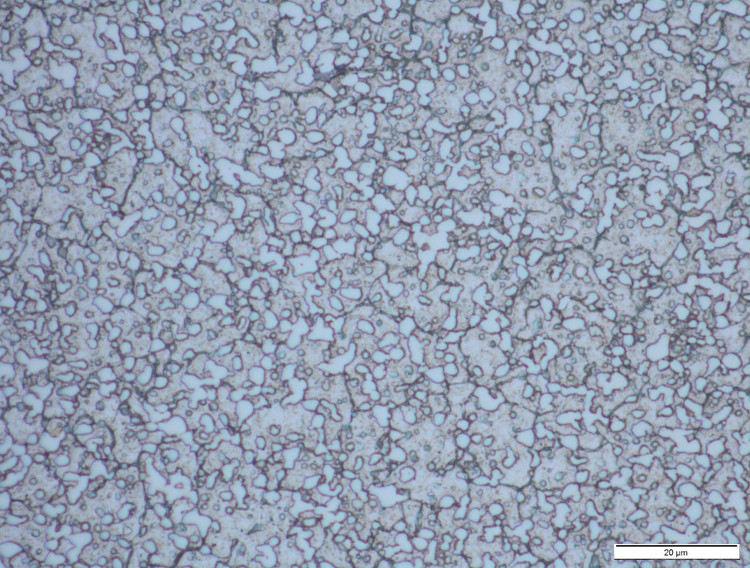
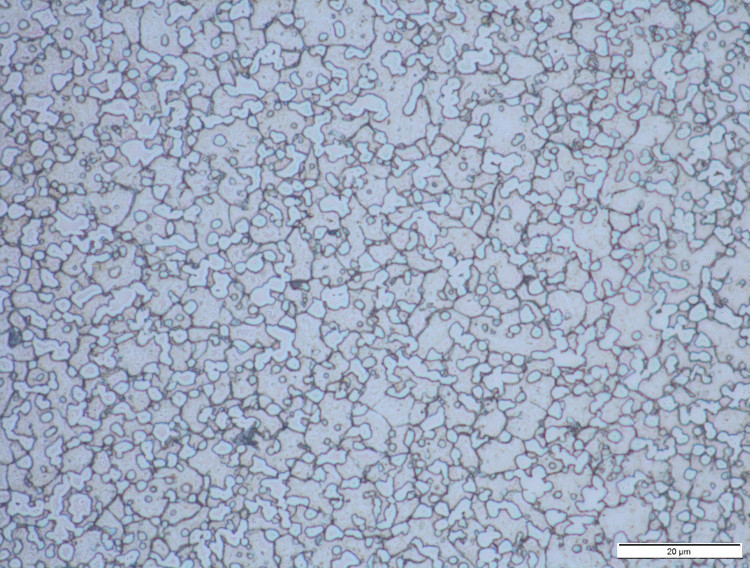
I have published two studies before comparing manufacturing from different powder metallurgy companies. One compared M390, 20CV, and 204P (with the somewhat different Elmax thrown in). The other compared Z-Wear (same as CPM-CruWear) between Crucible and European production. With the M390/20CV/204P study I found the biggest difference between manufacturers was the oxygen content. Oxygen is an impurity and it leads to oxide inclusions that are detrimental to properties. This is something advertised by companies like Bohler-Uddeholm, that their process is “cleaner” and leads to fewer oxides. However, the toughness of the grades was identical, perhaps in part because the carbide content is quite high and carbide size of M390/20CV/204P are basically the same. Even though Bohler advertises a finer powder size, the carbide size is mostly a result of carbide “coarsening” during high-temperature processing after the powder is made, rather than differences in powder size.
M390
20CV
So the carbide volume, carbide size, and resulting toughness are primarily controlled by the composition and method of manufacture (powder metallurgy) rather than the quality of the production. If the oxides are smaller and in a lower volume than the carbides, then the limiting factor for toughness is the carbide, and so oxide inclusion content doesn’t much come into play.
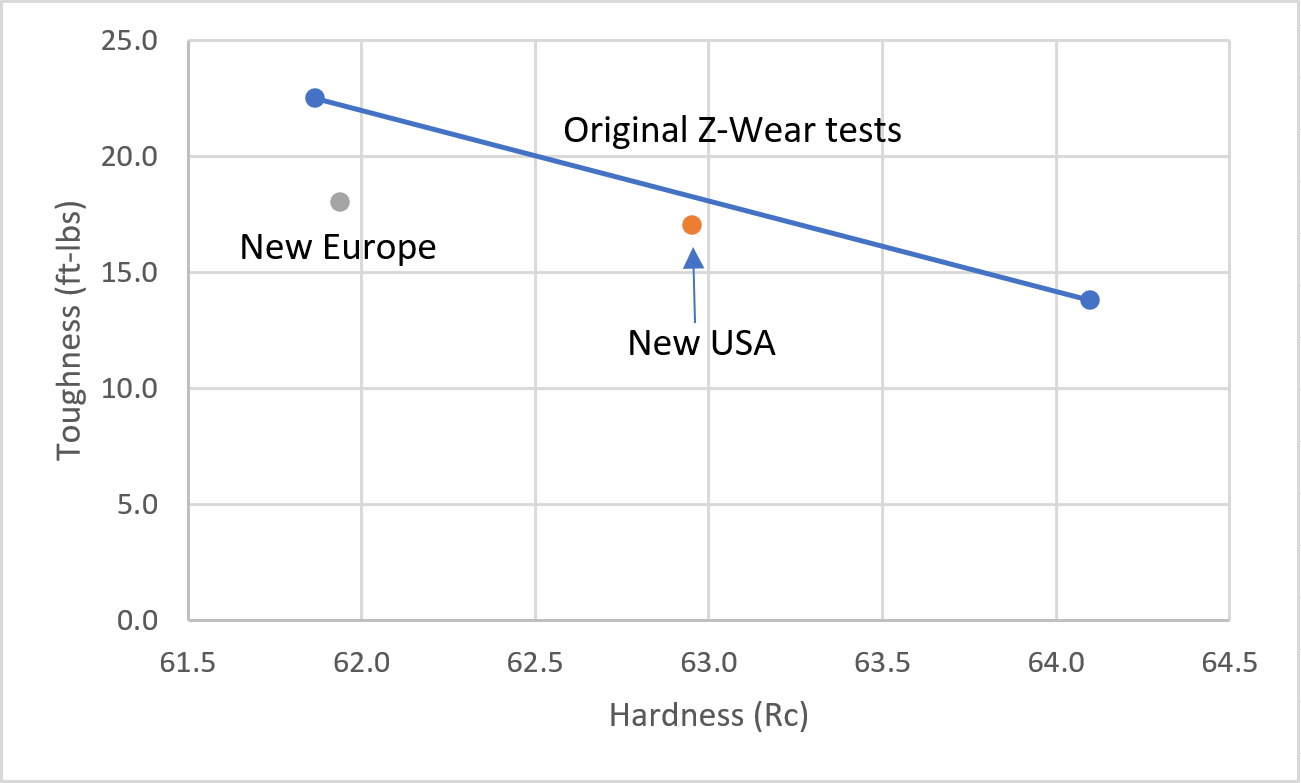
In the Z-Wear study I thought there might be more of an effect of oxide inclusions than the M390 because it has significantly lower amount of carbide. However, the two steels tested relatively similarly in terms of toughness:
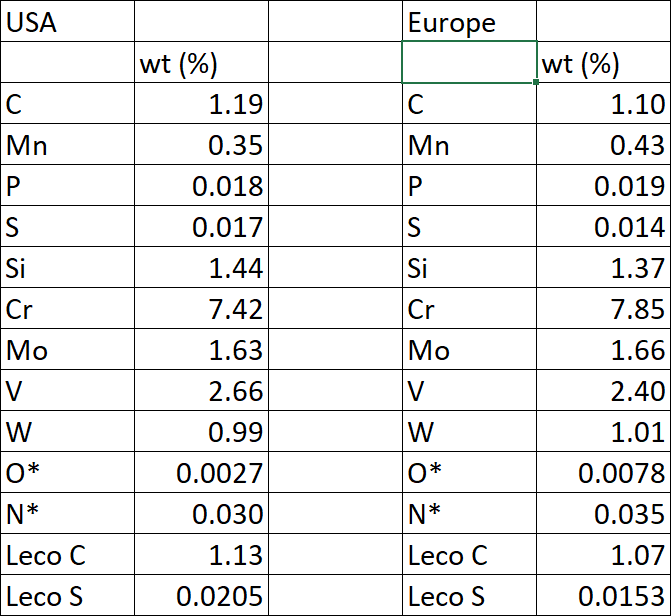
In this case the European-produced version of Z-Wear had slightly higher toughness but it was also at a lower hardness, giving it a slightly worse hardness-toughness balance. In general I called them equivalent in the article. I actually suspect that Zapp had accidentally mixed up the labels of the steels because the oxygen content was lower in the steel that was labeled as “USA” once it was delivered to me. That would mean the European steel had a slightly better hardness-toughness balance, rather than the USA Crucible version.
USA vs European Z-Wear that might have been mislabeled before they were sent to me
Dialing in the Composition for Erasteel MagnaCut
With switching over to Erasteel for MagnaCut production we had several things we needed to figure out. One that might be surprising to people is that steel composition testing is highly dependent on calibration of the instrument and which technique is used. For example, there were significant differences in composition measured between grades in the M390/20CV/204P study and the Z-Wear study. This is not always clear because there is some distribution of composition in manufacturing. If the target is 10% chromium, there is some acceptable range by the manufacturer like 9.5-10.5% Cr. So you can’t measure just one example from different manufacturers and know what the offsets are. So we took pieces of MagnaCut from multiple Crucible “heats” and sent them to Erasteel so that they could have appropriate offsets to match the Crucible material. We will continue to monitor the performance of the new MagnaCut material because of the distributions. If heats on the low end or high end of certain elements are not performing well in one performance category or another we could shift the target or tighten the acceptable ranges. This is the side of development and quality control that is often not seen by the end customer and is probably not very exciting.
Erasteel vs Crucible MagnaCut
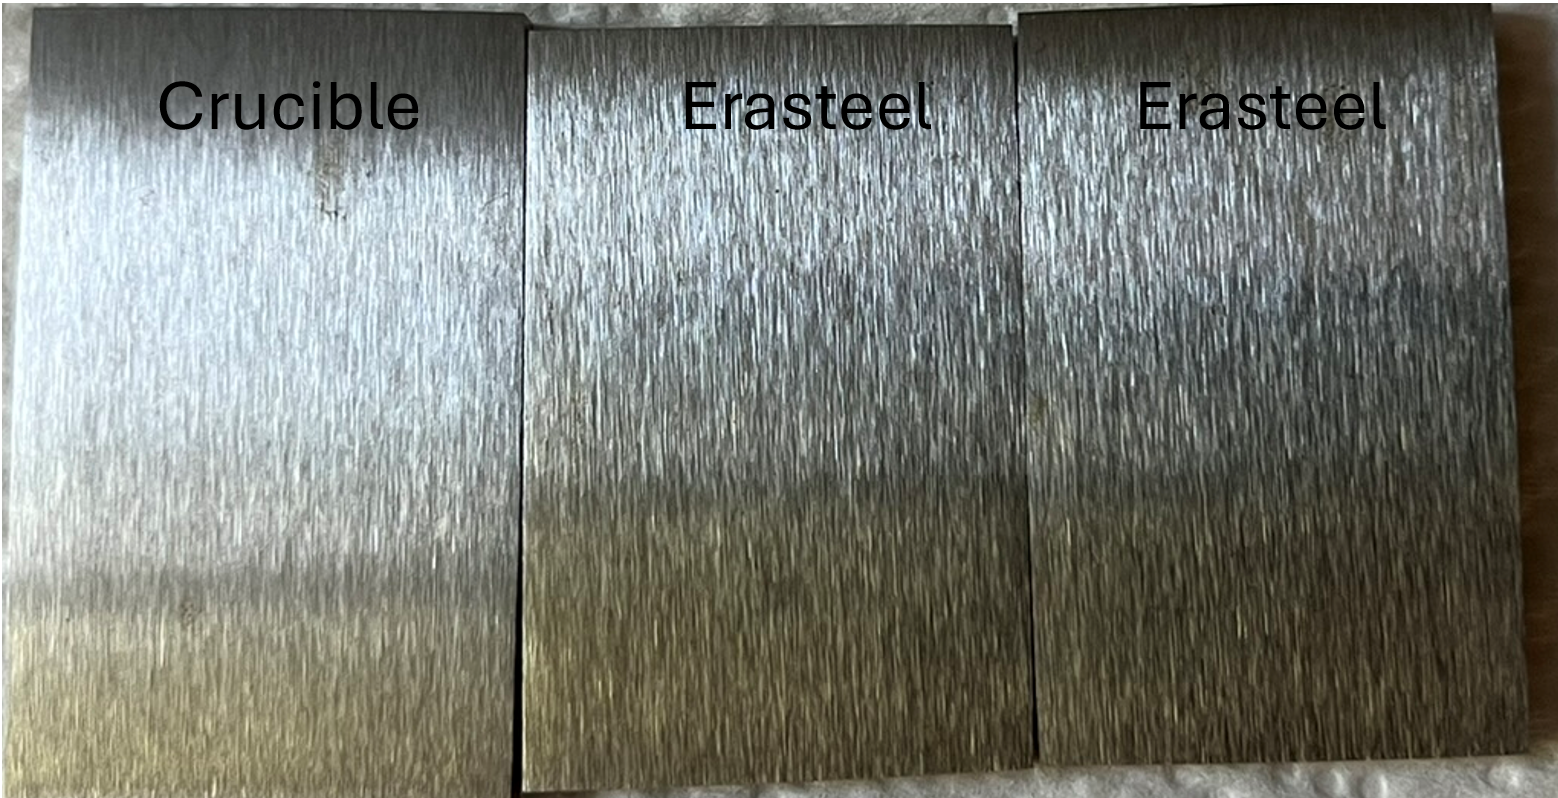
One very important part of MagnaCut is its high corrosion resistance. So I tested with my standard 1% saltwater spray test. Most stainless knife steels will see some rust spots with this test. In this case neither the Crucible or Erasteel material showed any rust spots:
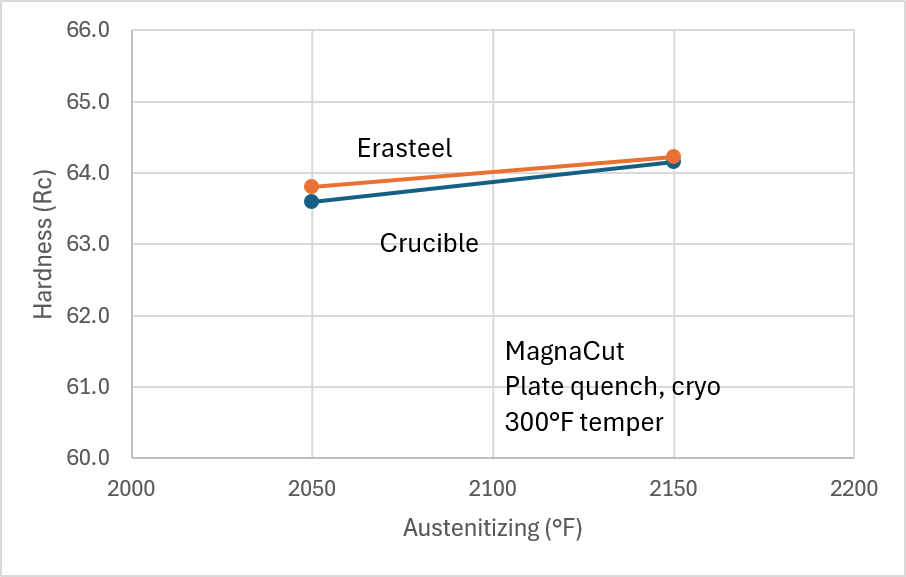
I also tested the hardening response. For a given heat treatment the hardness was very similar, perhaps the Erasteel material was slightly higher:
Surprisingly (based on the Z-Wear and M390 results), the toughness of Erasteel MagnaCut was significantly higher:
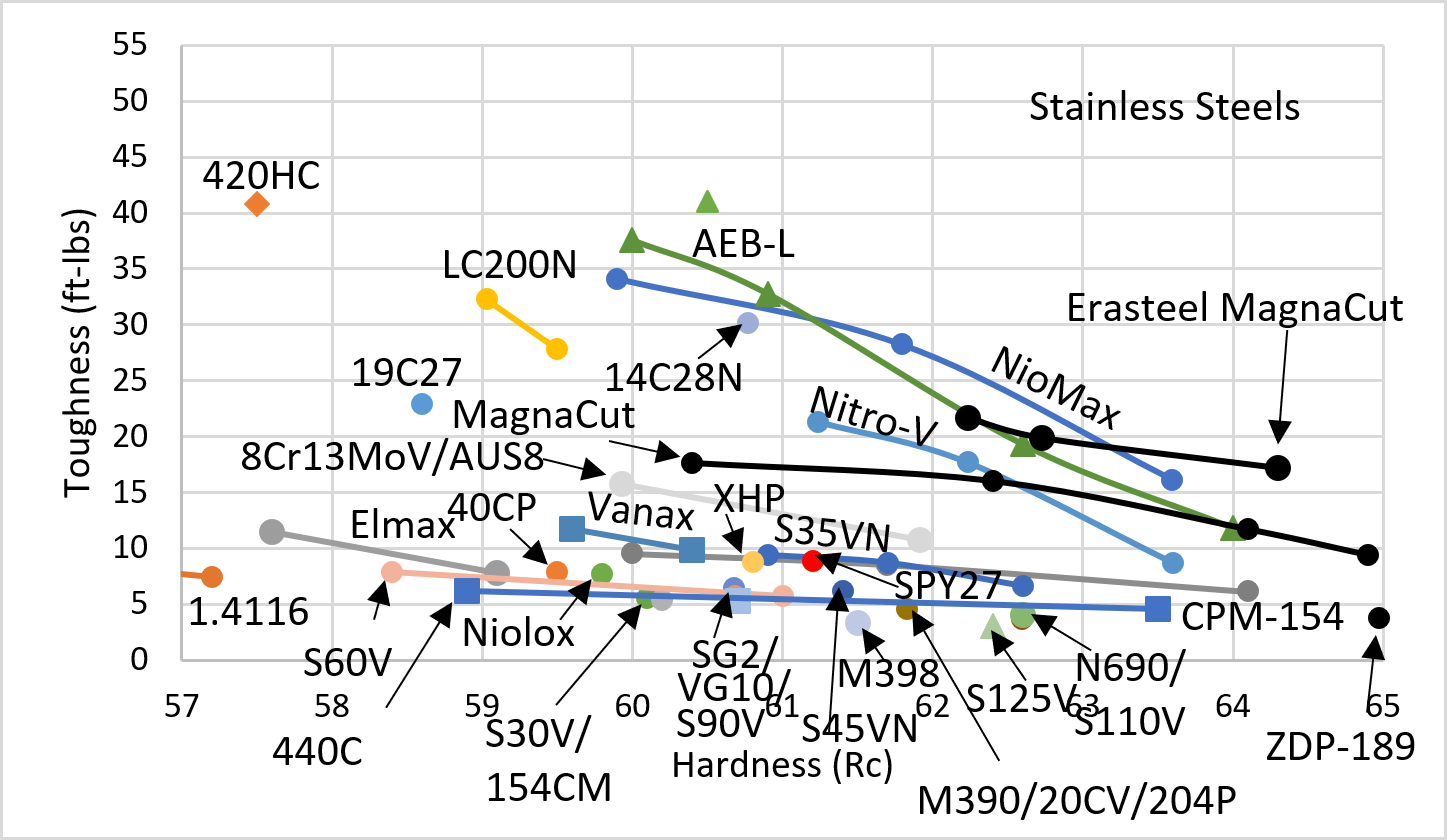
You can see that the Erasteel MagnaCut was significantly higher, matching AEB-L at ~62 Rc, and exceeding it at ~64 Rc. I wouldn’t necessarily extrapolate that up to AEB-L levels at 60-61 Rc but in that hardness range it was very good. Comparing with non-stainless steels this also makes Erasteel MagnaCut look more competitive:
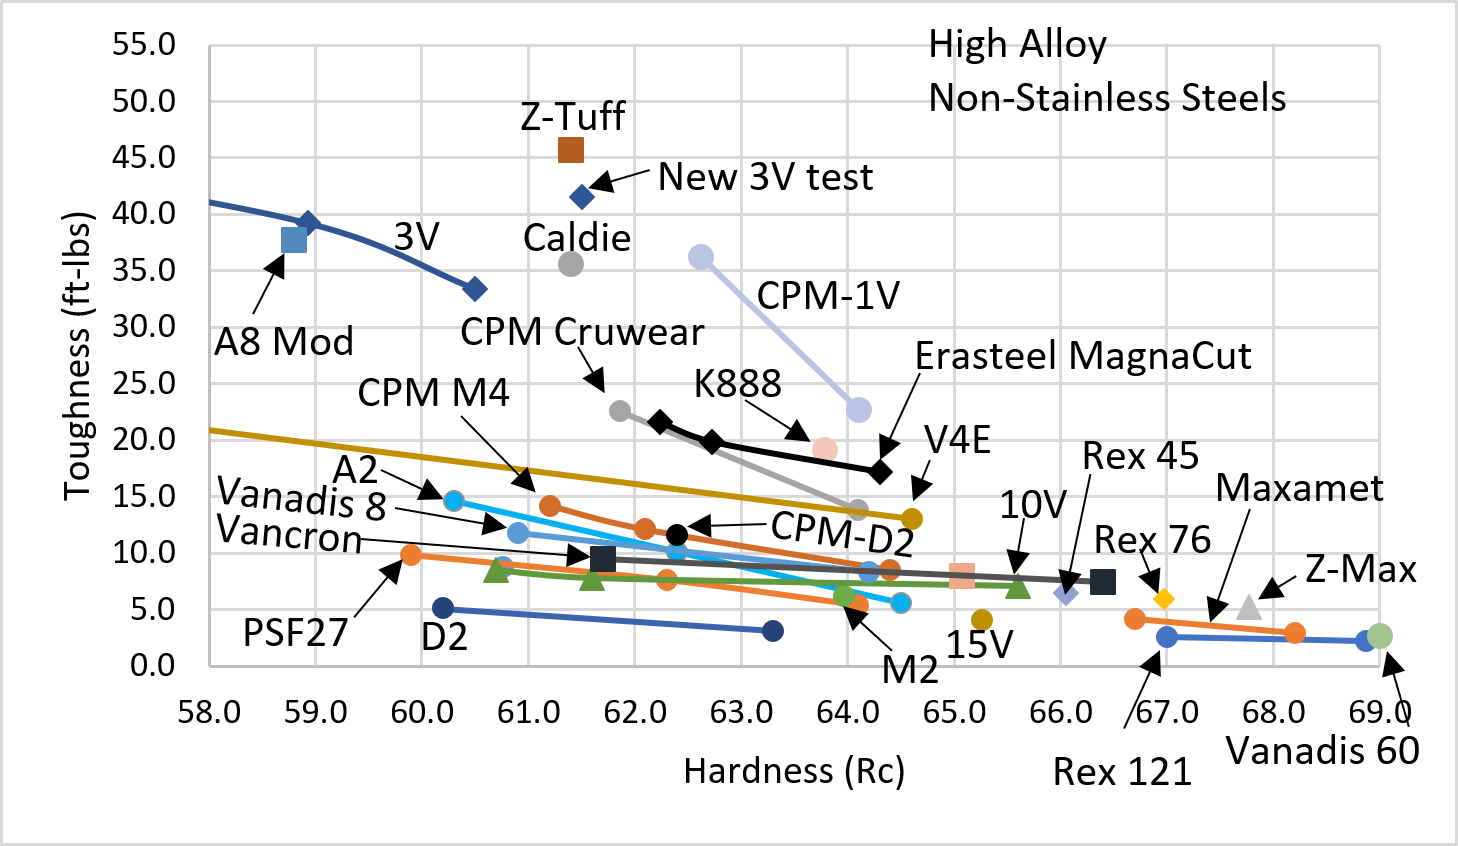
While Crucible MagnaCut was a bit below the best results of CPM-CruWear and Z-Wear, the Erasteel version matches or exceeds it. In my knife steel ratings I had given MagnaCut a “7” for toughness and CPM-CruWear an “8,” so this is exciting. MagnaCut has a similar carbide volume to CPM-CruWear but has even smaller carbides so it was always a bit disappointing that the measured toughness wasn’t matching it. Perhaps this was a case where oxide inclusions were reducing toughness slightly in the Crucible version. Erasteel MagnaCut even roughly matched the new Bohler K888 steel, advertised for its high toughness, and tested better than steels like Vanadis 4 Extra. One thing to note is that toughness differences are basically on a “log scale,” meaning that differences at small values are bigger than those at large values. So the difference between 5 and 10 ft-lbs is about the same as between 10 and 20 ft-lbs.
One difference I noted in toughness testing is that using an austenitizing temperature of 2150°F (1175°C) and then tempering to desired hardness led to better toughness than lower austenitizing temperatures. With Crucible MagnaCut the optimum property balance was with 2050°F (1120°C).
You can see that for a constant toughness of ~20 ft-lbs that the hardness can be higher for that same toughness with a higher austenitizing temperature, about a 2.5 Rc increase.
Summary and Conclusions
The MagnaCut now being produced by Erasteel matches or exceeds the properties of the previous Crucible version. Specifically the toughness showed an improvement. We will continue to monitor the properties of the new material to ensure the performance meets expectations with the new manufacturing partner.
Research like this is made possible by Patreon supporters. That allowed me to purchase the carbide straightening hammers and perform the experiments below. Join at Patreon.com/KnifeSteelNerds if you would like to support further research.
Video
There is also a video version of the following information:
Knife Engineering 2nd Edition
The following study was included in my new book Knife Engineering 2nd Edition. Those that bought the book have already seen some of this information. There are several other studies in the book that have not been published on my website. Go buy the book to see them!
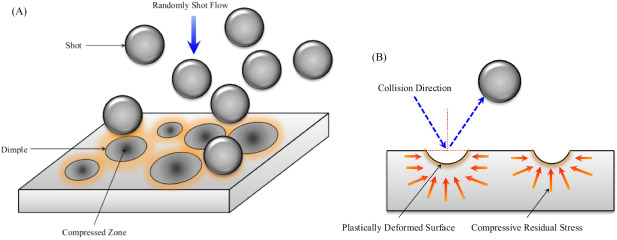
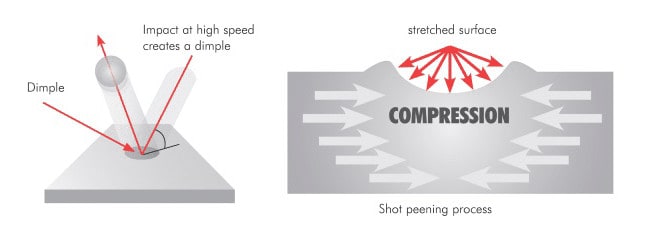
Of course if you cold work too much eventually you will introduce cracks, just like if you continue forging a piece of steel when it has gotten too cold. Peening is a form of cold work that is only applied to the surface. Perhaps the most common and best known form of peening is “shot peening” where steel shot is sprayed against the metal to cold work the surface. This is sometimes done to give a matte finish to metals but generally it is performed to enhance performance of certain parts. The cold work applied to the surface creates an “residual compressive stress.”
Image from [1]
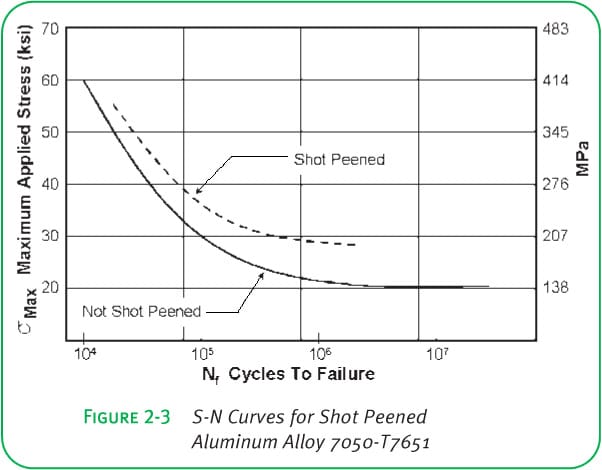
Image from [2]
When knifemakers hear “residual stresses” they sometimes worry but these compressive stresses are not a bad thing. Residual stresses are those stresses that remain when the original force is removed, the stress remains, i.e.. “residual.” Shot peening creates a “compressive” residual stress, as opposed to tensile stress. When the surface is in compression that creates an environment where crack growth is suppressed. You can think of the compressive stress as “pushing” cracks back together rather than pulling the cracks open. So shot peening is often performed on parts that fail to “high cycle fatigue,” or cyclic loading. These are parts like crankshafts, gears, etc. that see millions of cycles and fail due to slow crack growth. Shot peened parts last through many more cycles than those that are not peened. Knives do not generally fail due to high cycle fatigue so this wouldn’t necessarily lead to improvements in knife performance. But we would not expect it to negatively affect performance either.
Image from [2]
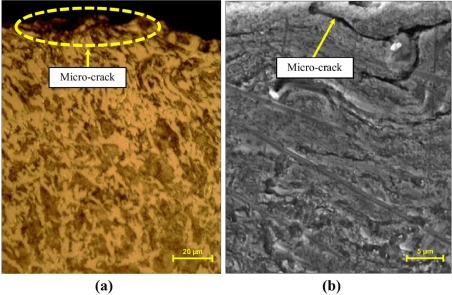
However, there can be dangers to peening. Just as a metal can be cold worked so much that it cracks, a part can also be “overpeened” leading to surface cracks, as seen below in 1045 steel:
Image from [1]
Peen Straightening
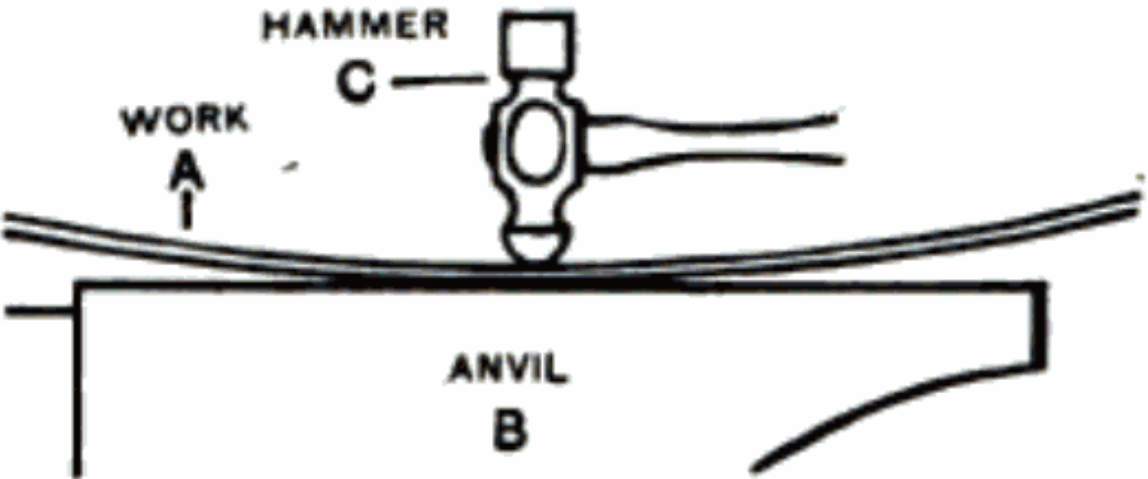
Straightening pieces by peening has been around for over 100 years. For example, here is one illustration of how to do it from 1910:
Image from [3]
The peening is performed on the opposite side from typical forging. The peening “stretches” the worked surface which returns the piece flat. This can be done with most peening methods including shot peening. However, hammer peening has become common for knifemakers over the past decade or two. This can be performed with a carbide ball or with a chisel.
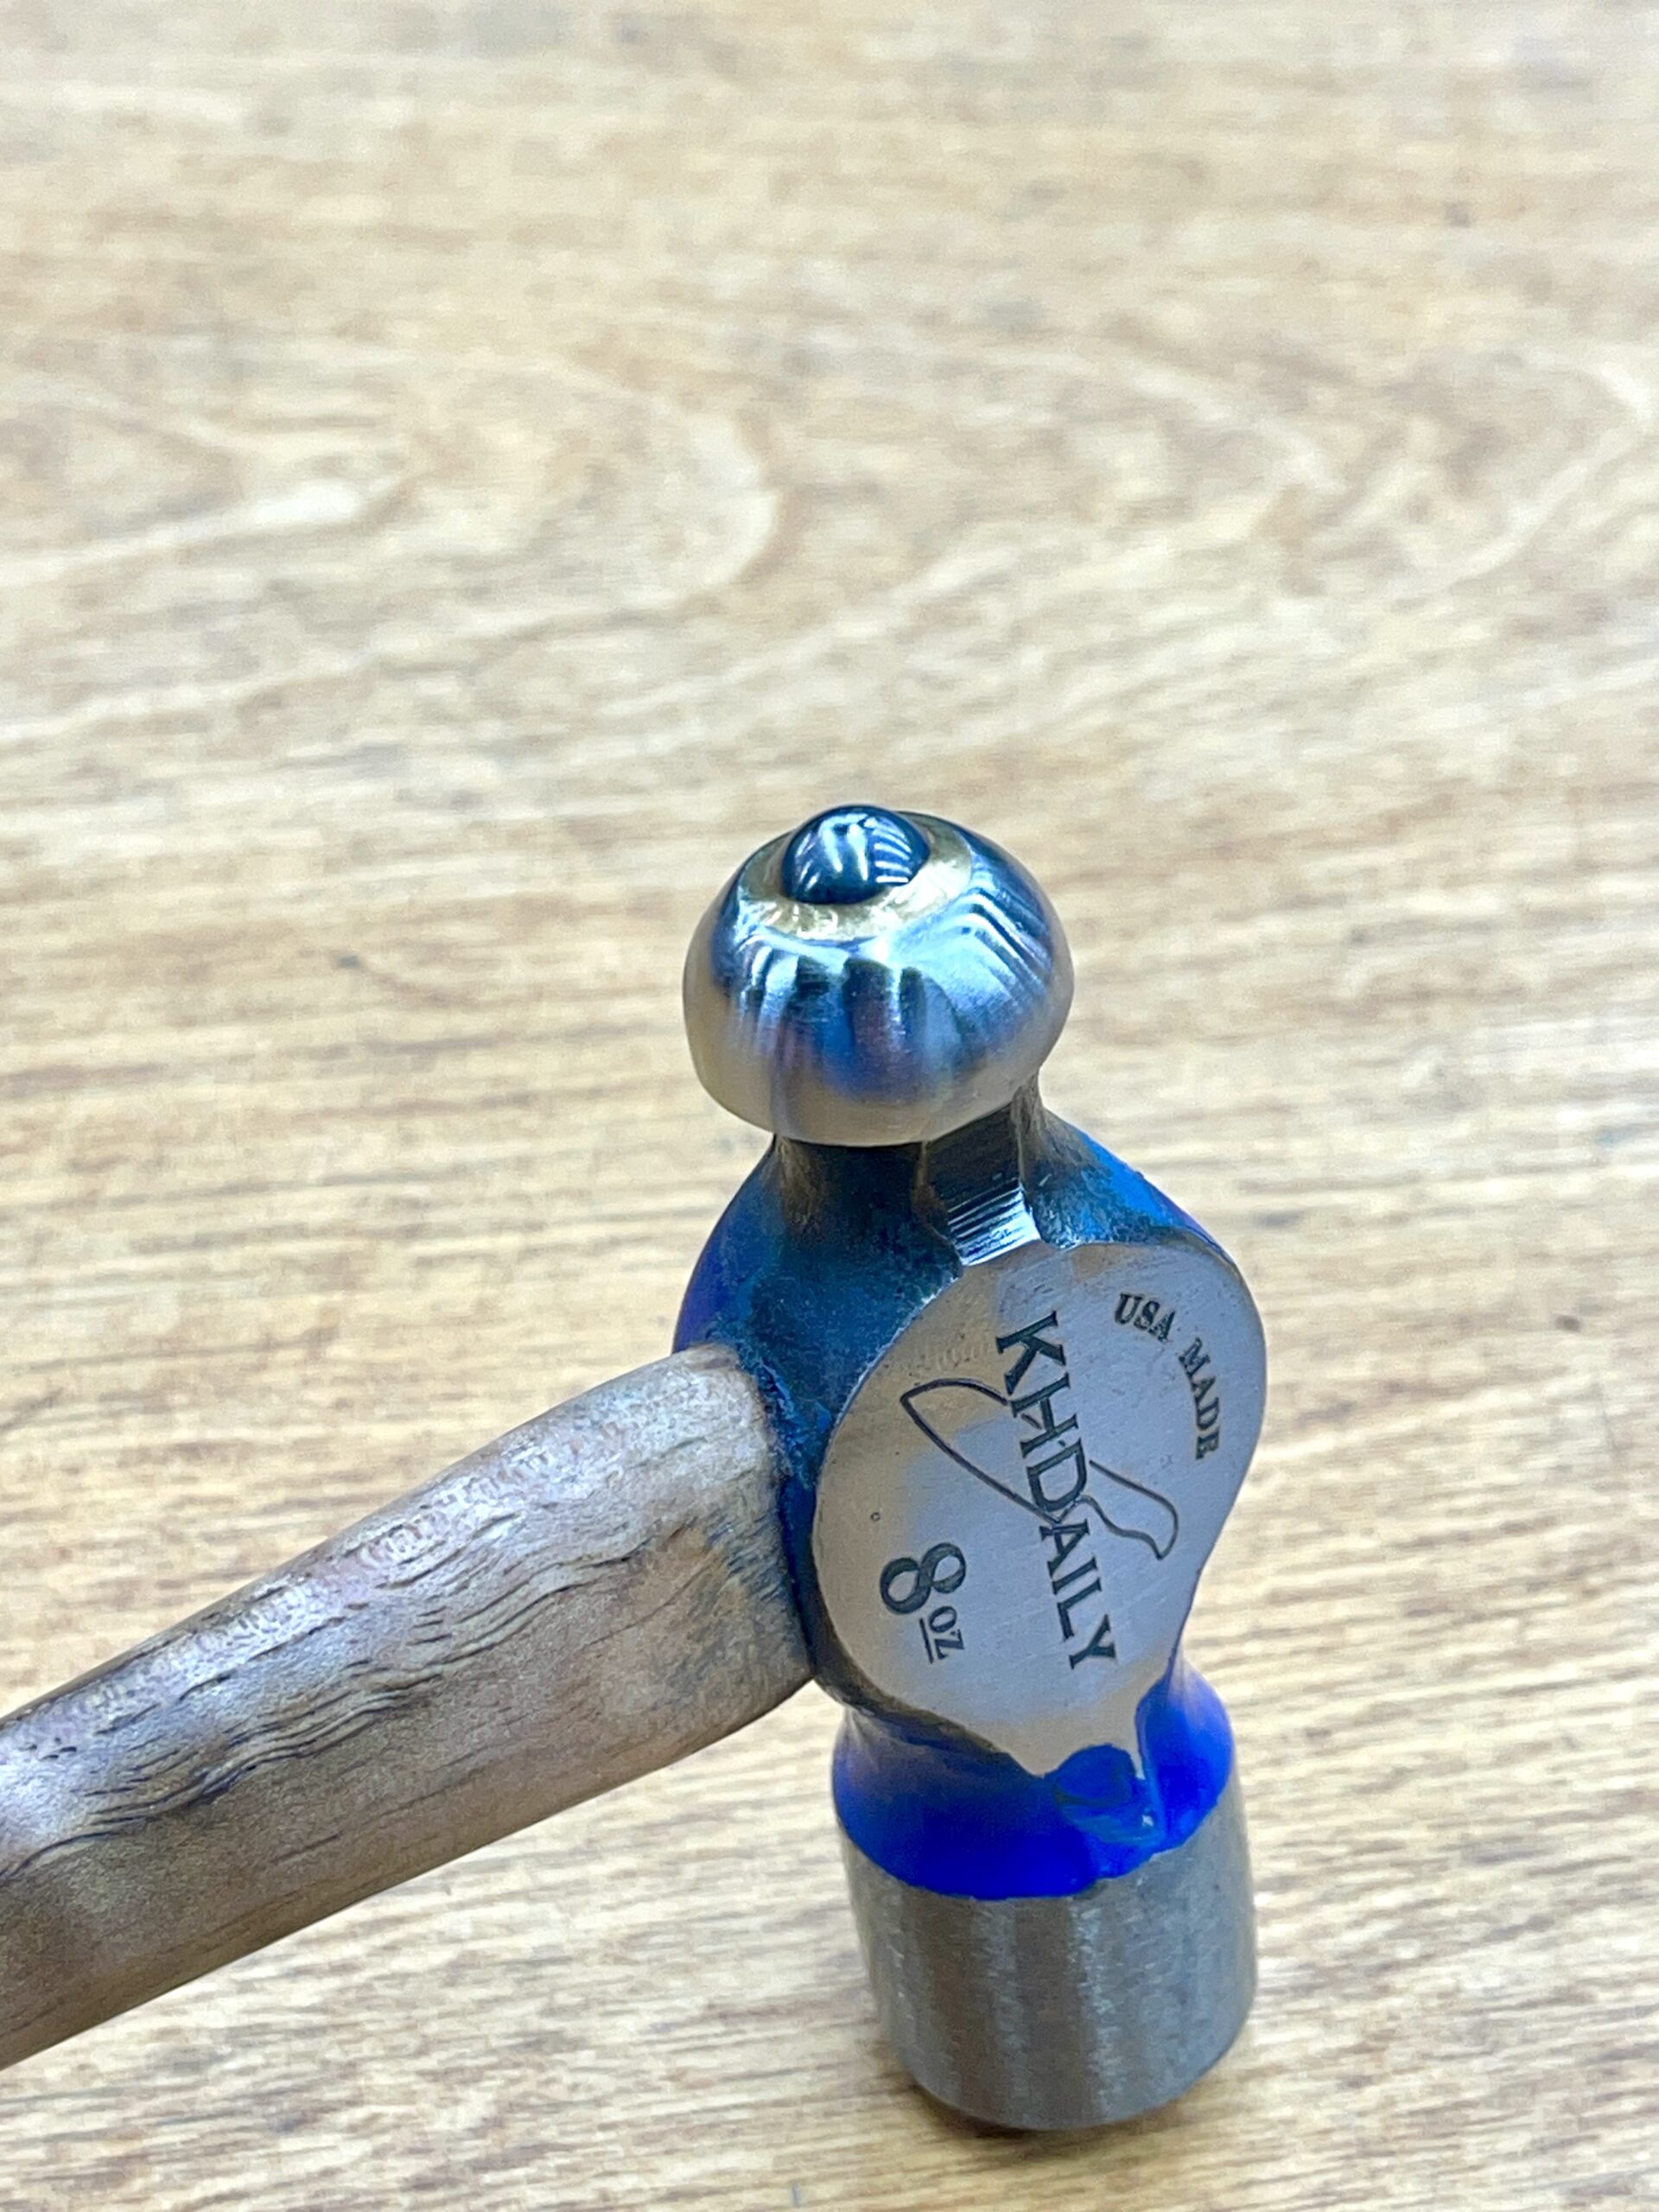
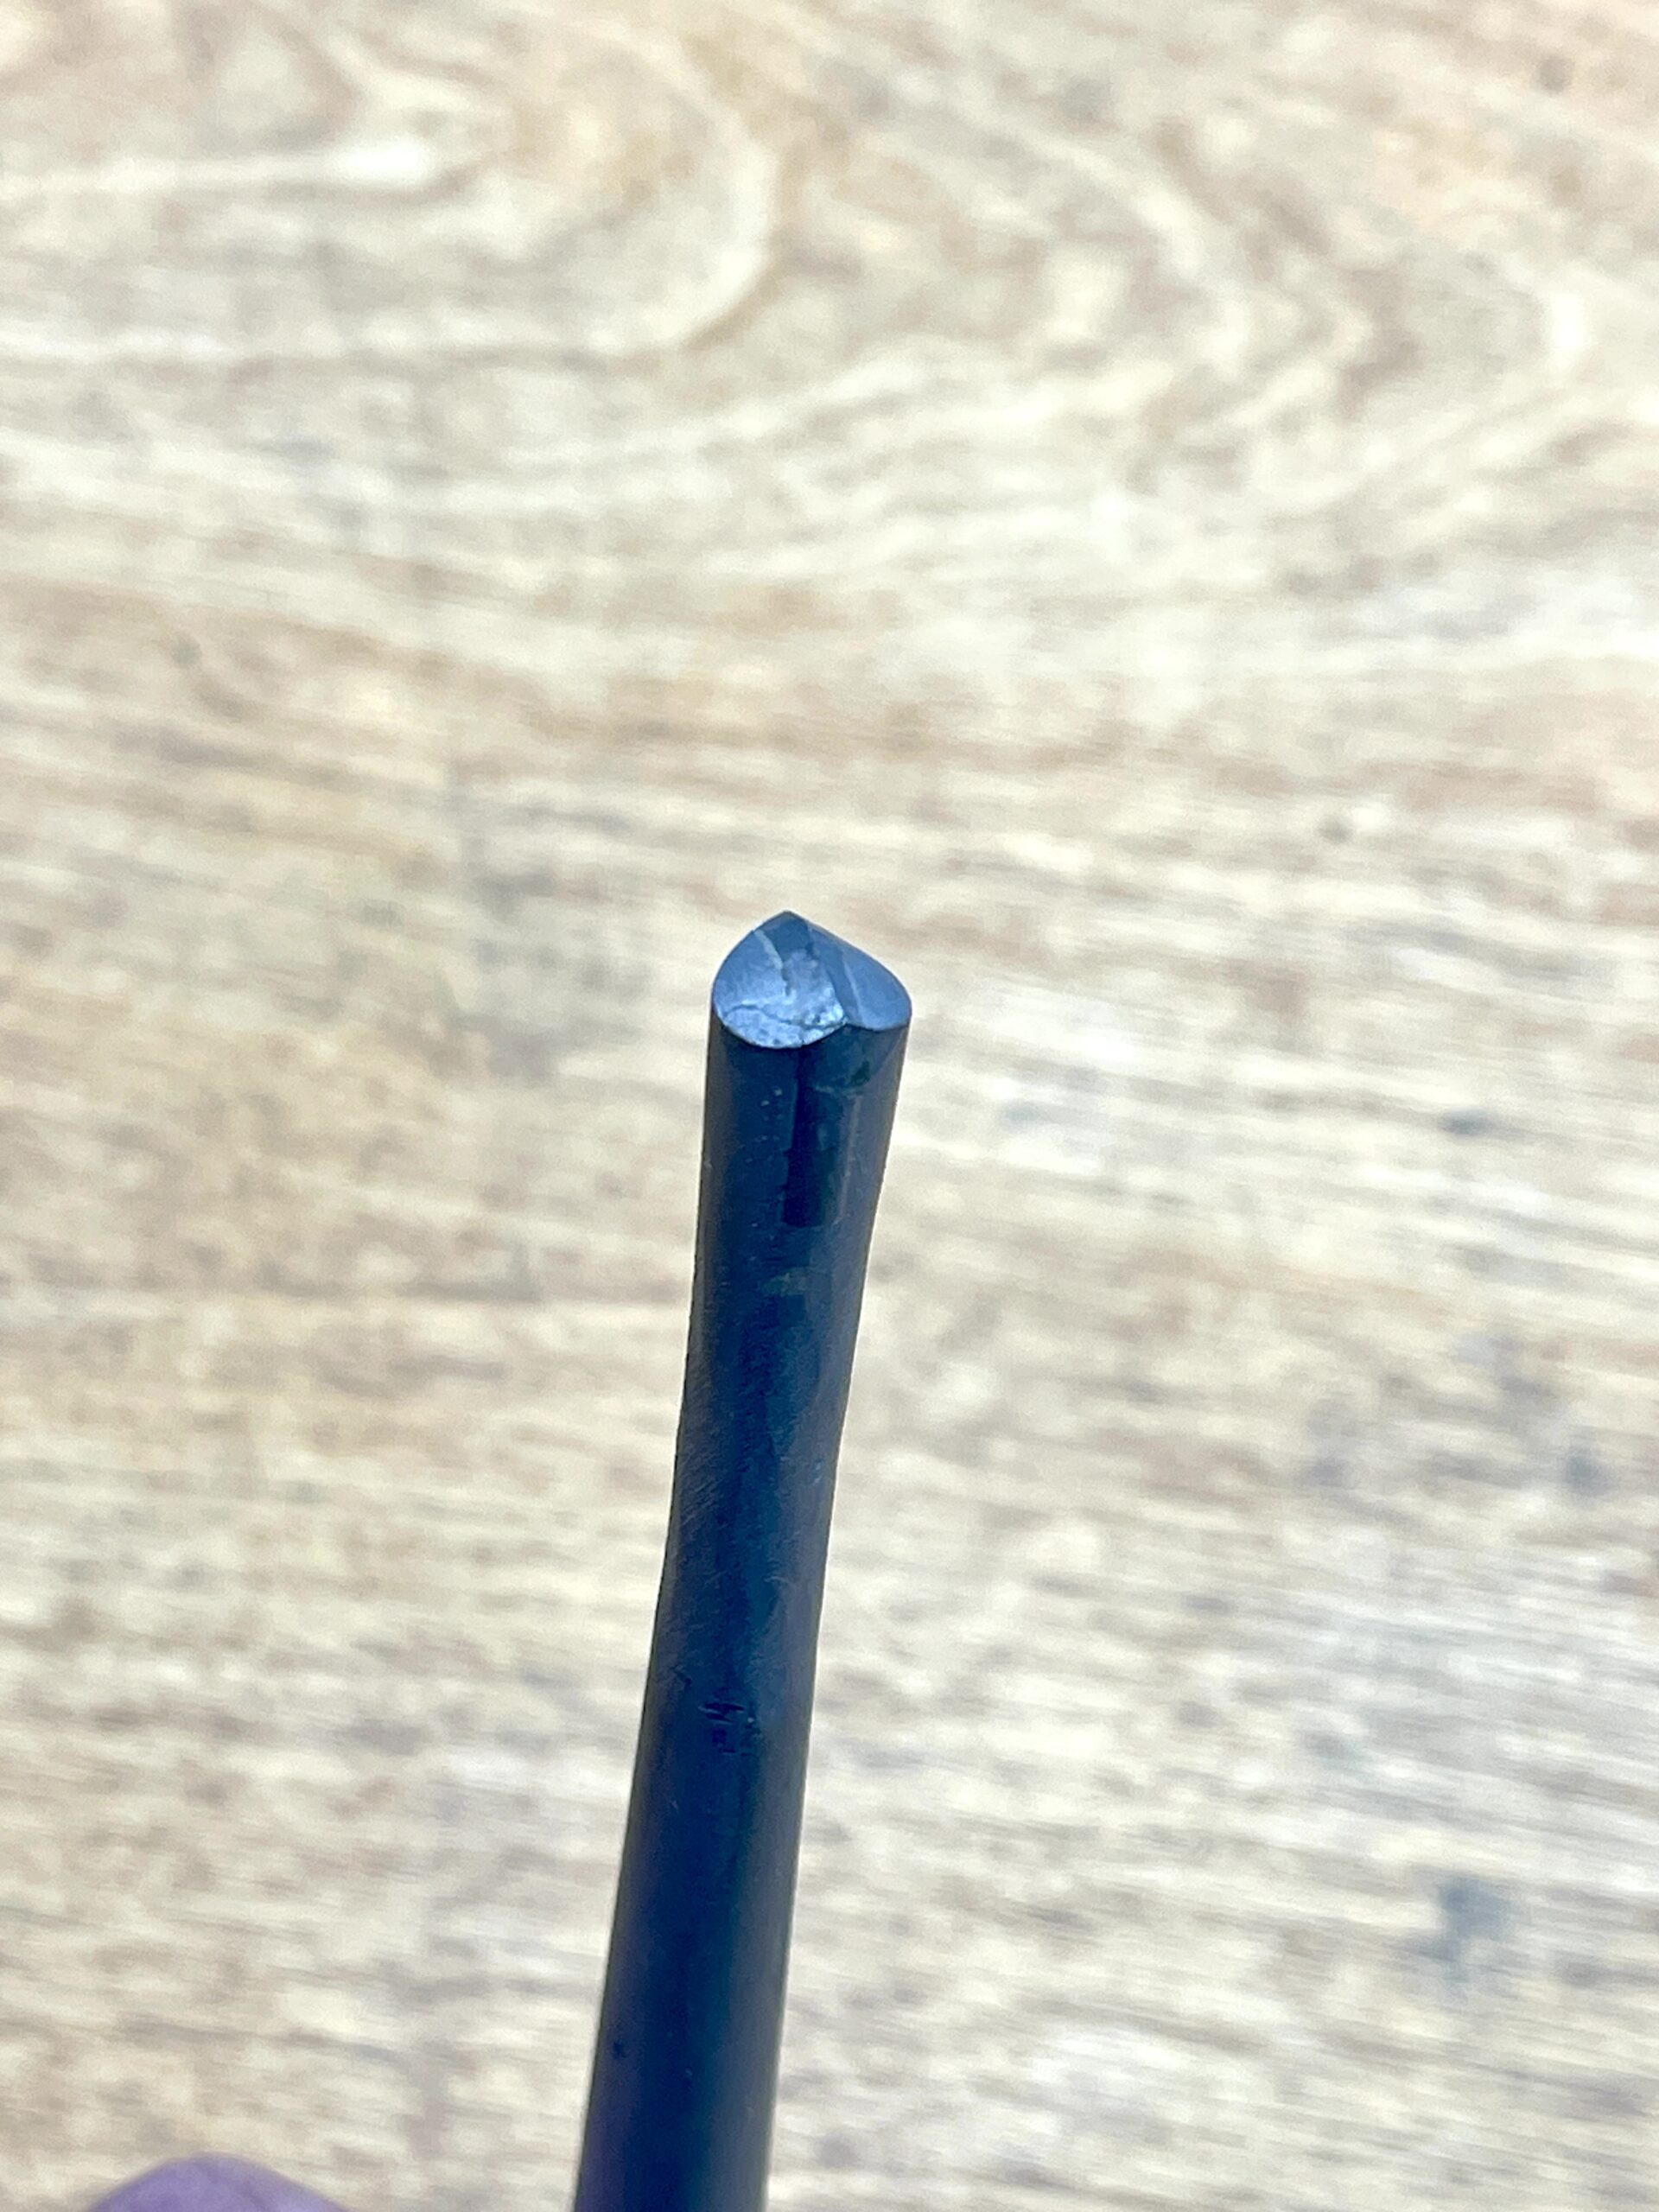
Image of carbide ball hammer and chisel from Kyle Daily
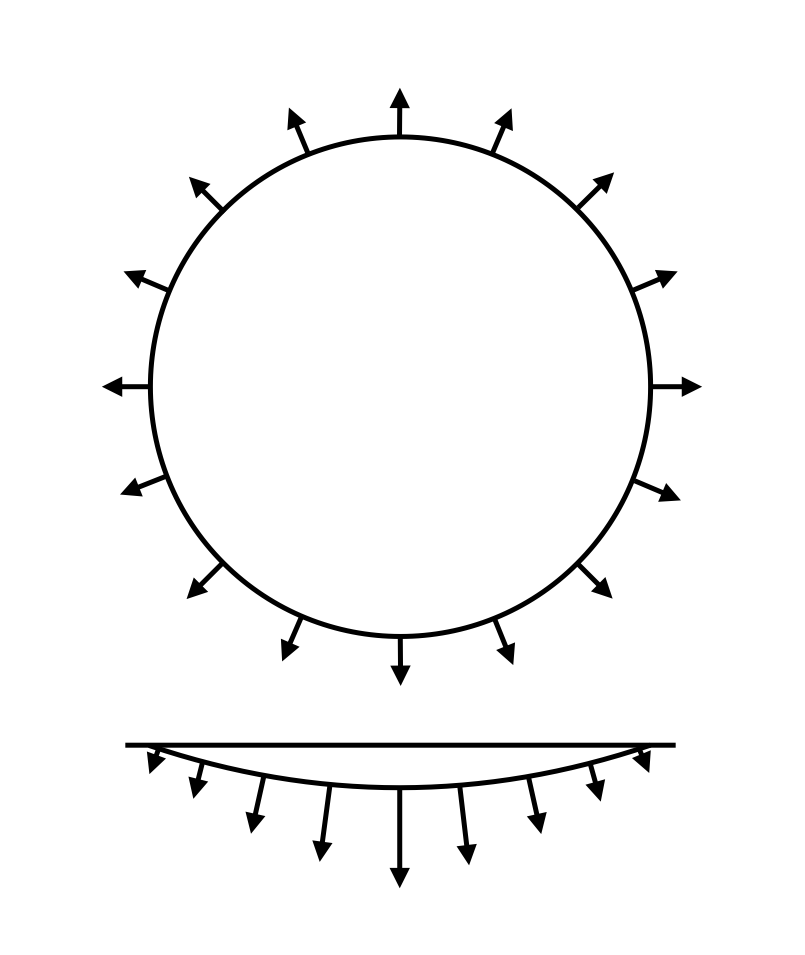
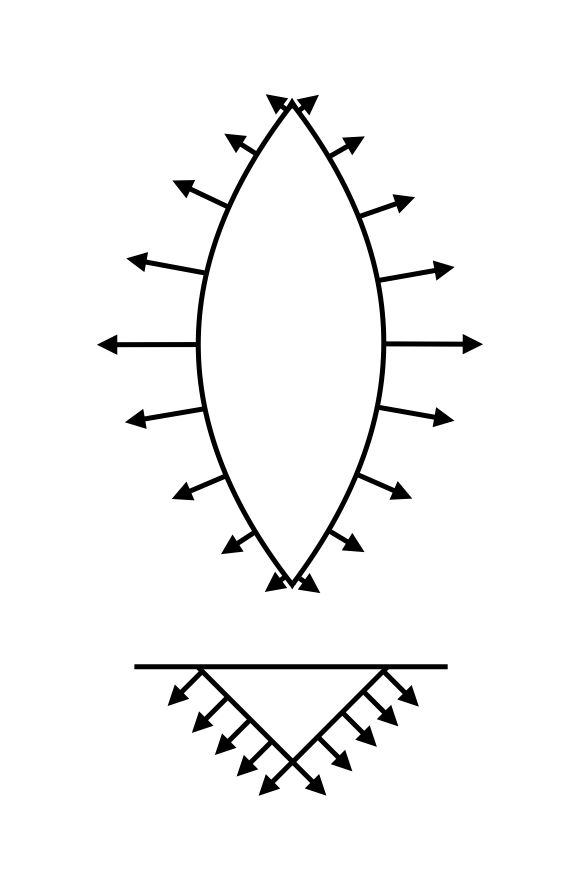
The chisel and carbide ball lead to somewhat different behavior when it comes to stretching the material. The chisel leads to more “vertical” stretching while the ball leads to even stretching around each impact:
Schematic illustration of the movement of material around a carbide ball impact on the knife. Image from Kyle Daily.
Schematic illustration of the movement of material around a chisel impact on the knife. Image from Kyle Daily.
The chisel is preferential in some ways because generally for straightening you only want material moving in the direction of the curve you are trying to straighten. However, the stress from a chisel can be more dangerous because of how concentrated it is, potentially leading to overpeening. Kyle Daily recommends using a carbide ball hammer (which he makes and sells) and he uses a method where he makes vertical lines of the carbide ball impacts to create the directionality instead.
Image of straightening a knife from Kyle Daily.
Kyle has a YouTube video where he shows his method:
Tests with Peening
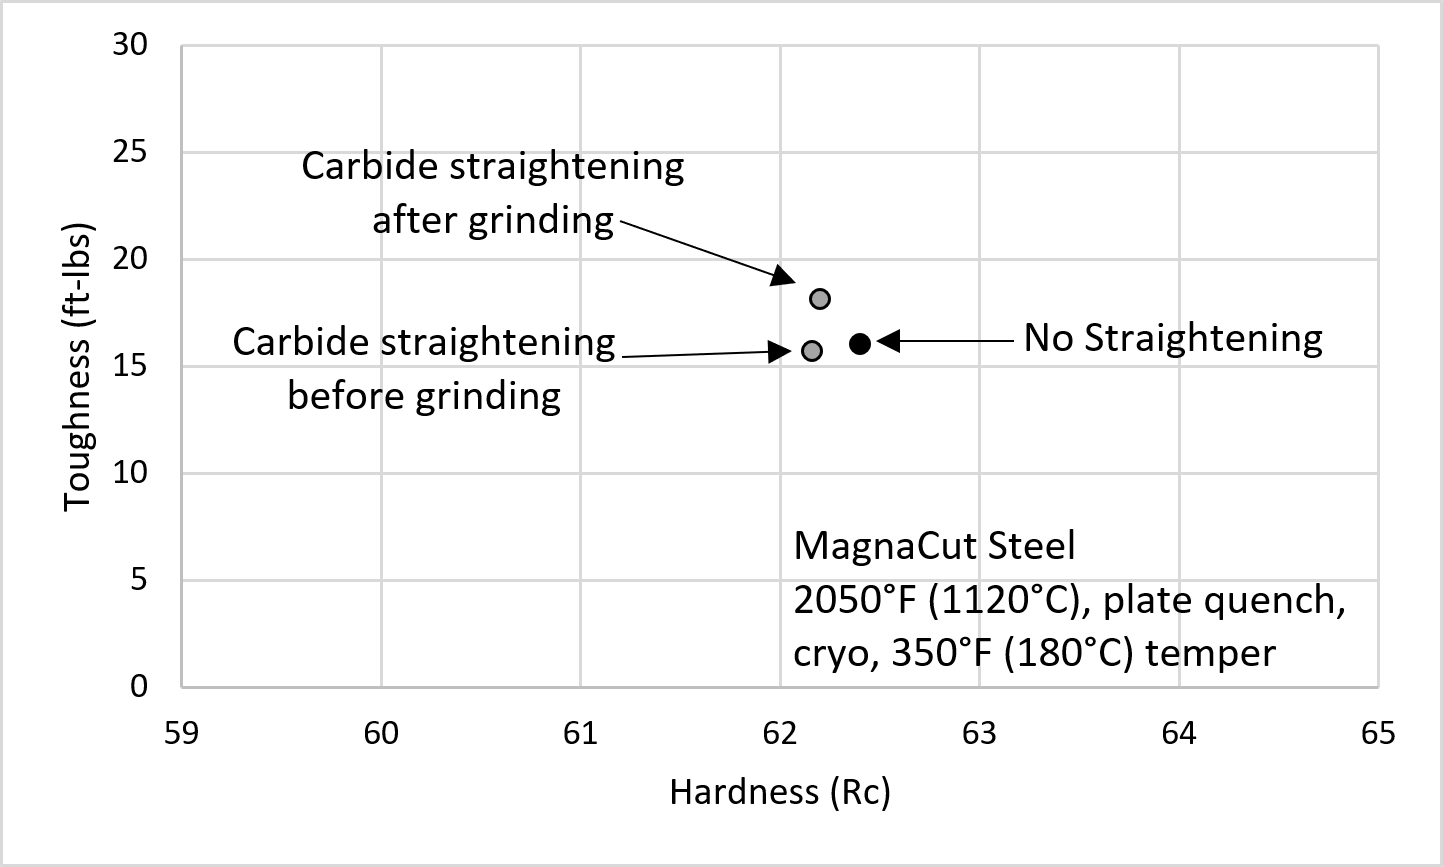
I have gotten many questions from knifemakers the past few years asking if straightening by peening is leading to microcracks that are embrittling the steel. As described above, peening, does not mean cracks are forming. It is a cold work process, and as long as the steel is not overly cold-worked there are no negative effects on properties. To test this, I used a carbide ball straightening hammer on some toughness coupons of heat treated MagnaCut. For one condition, I hit the pieces in many places before grinding and finishing both sides (the peened surface was removed). On the other coupon I ground and finished the coupons first and then I hit it many times with the straightening hammer after. With these three different conditions (with three samples of each condition) I measured the impact toughness. This test measures the energy required for breaking the steel. So if there were any pre-existing cracks we would expect to see a reduction in the measured impact toughness. The results in comparison with samples that saw no carbide hammer blows are shown below:
All of the specimens performed very similarly to each other. The one that was straightened after finishing did have slightly higher toughness. I am not sure if this is due to improvement from the peening or if it is just from statistical variability from testing. It isn’t impossible that the surface peening did help a little bit but the improvement was small in either case.
Dangers of Peen Straightening
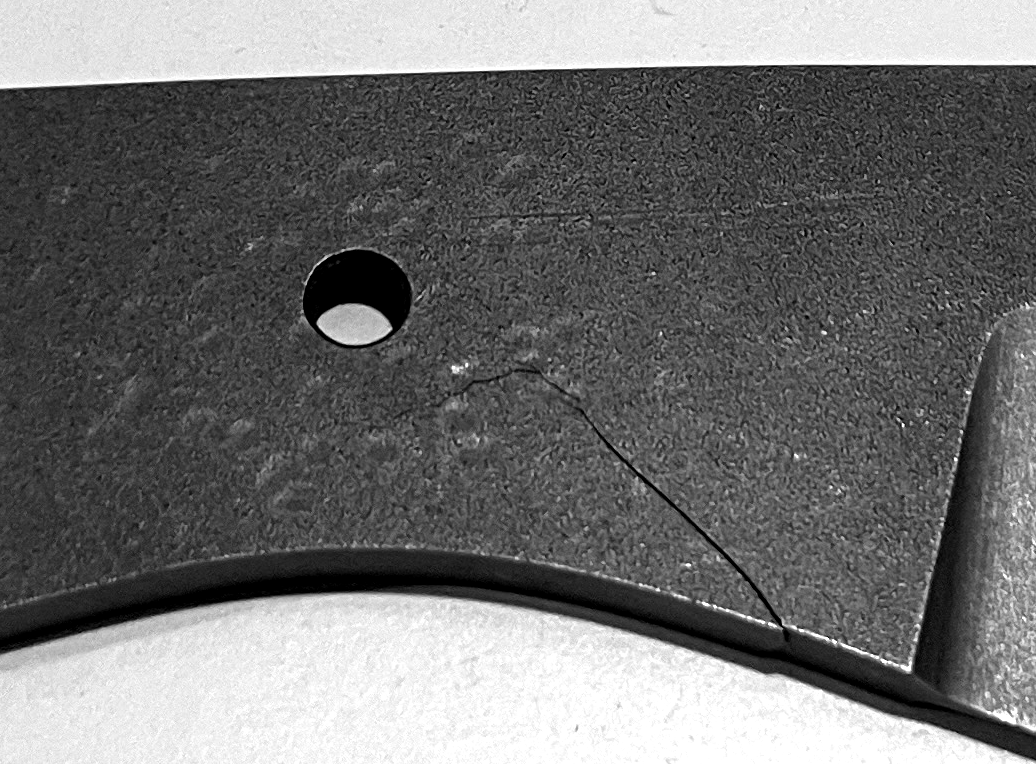
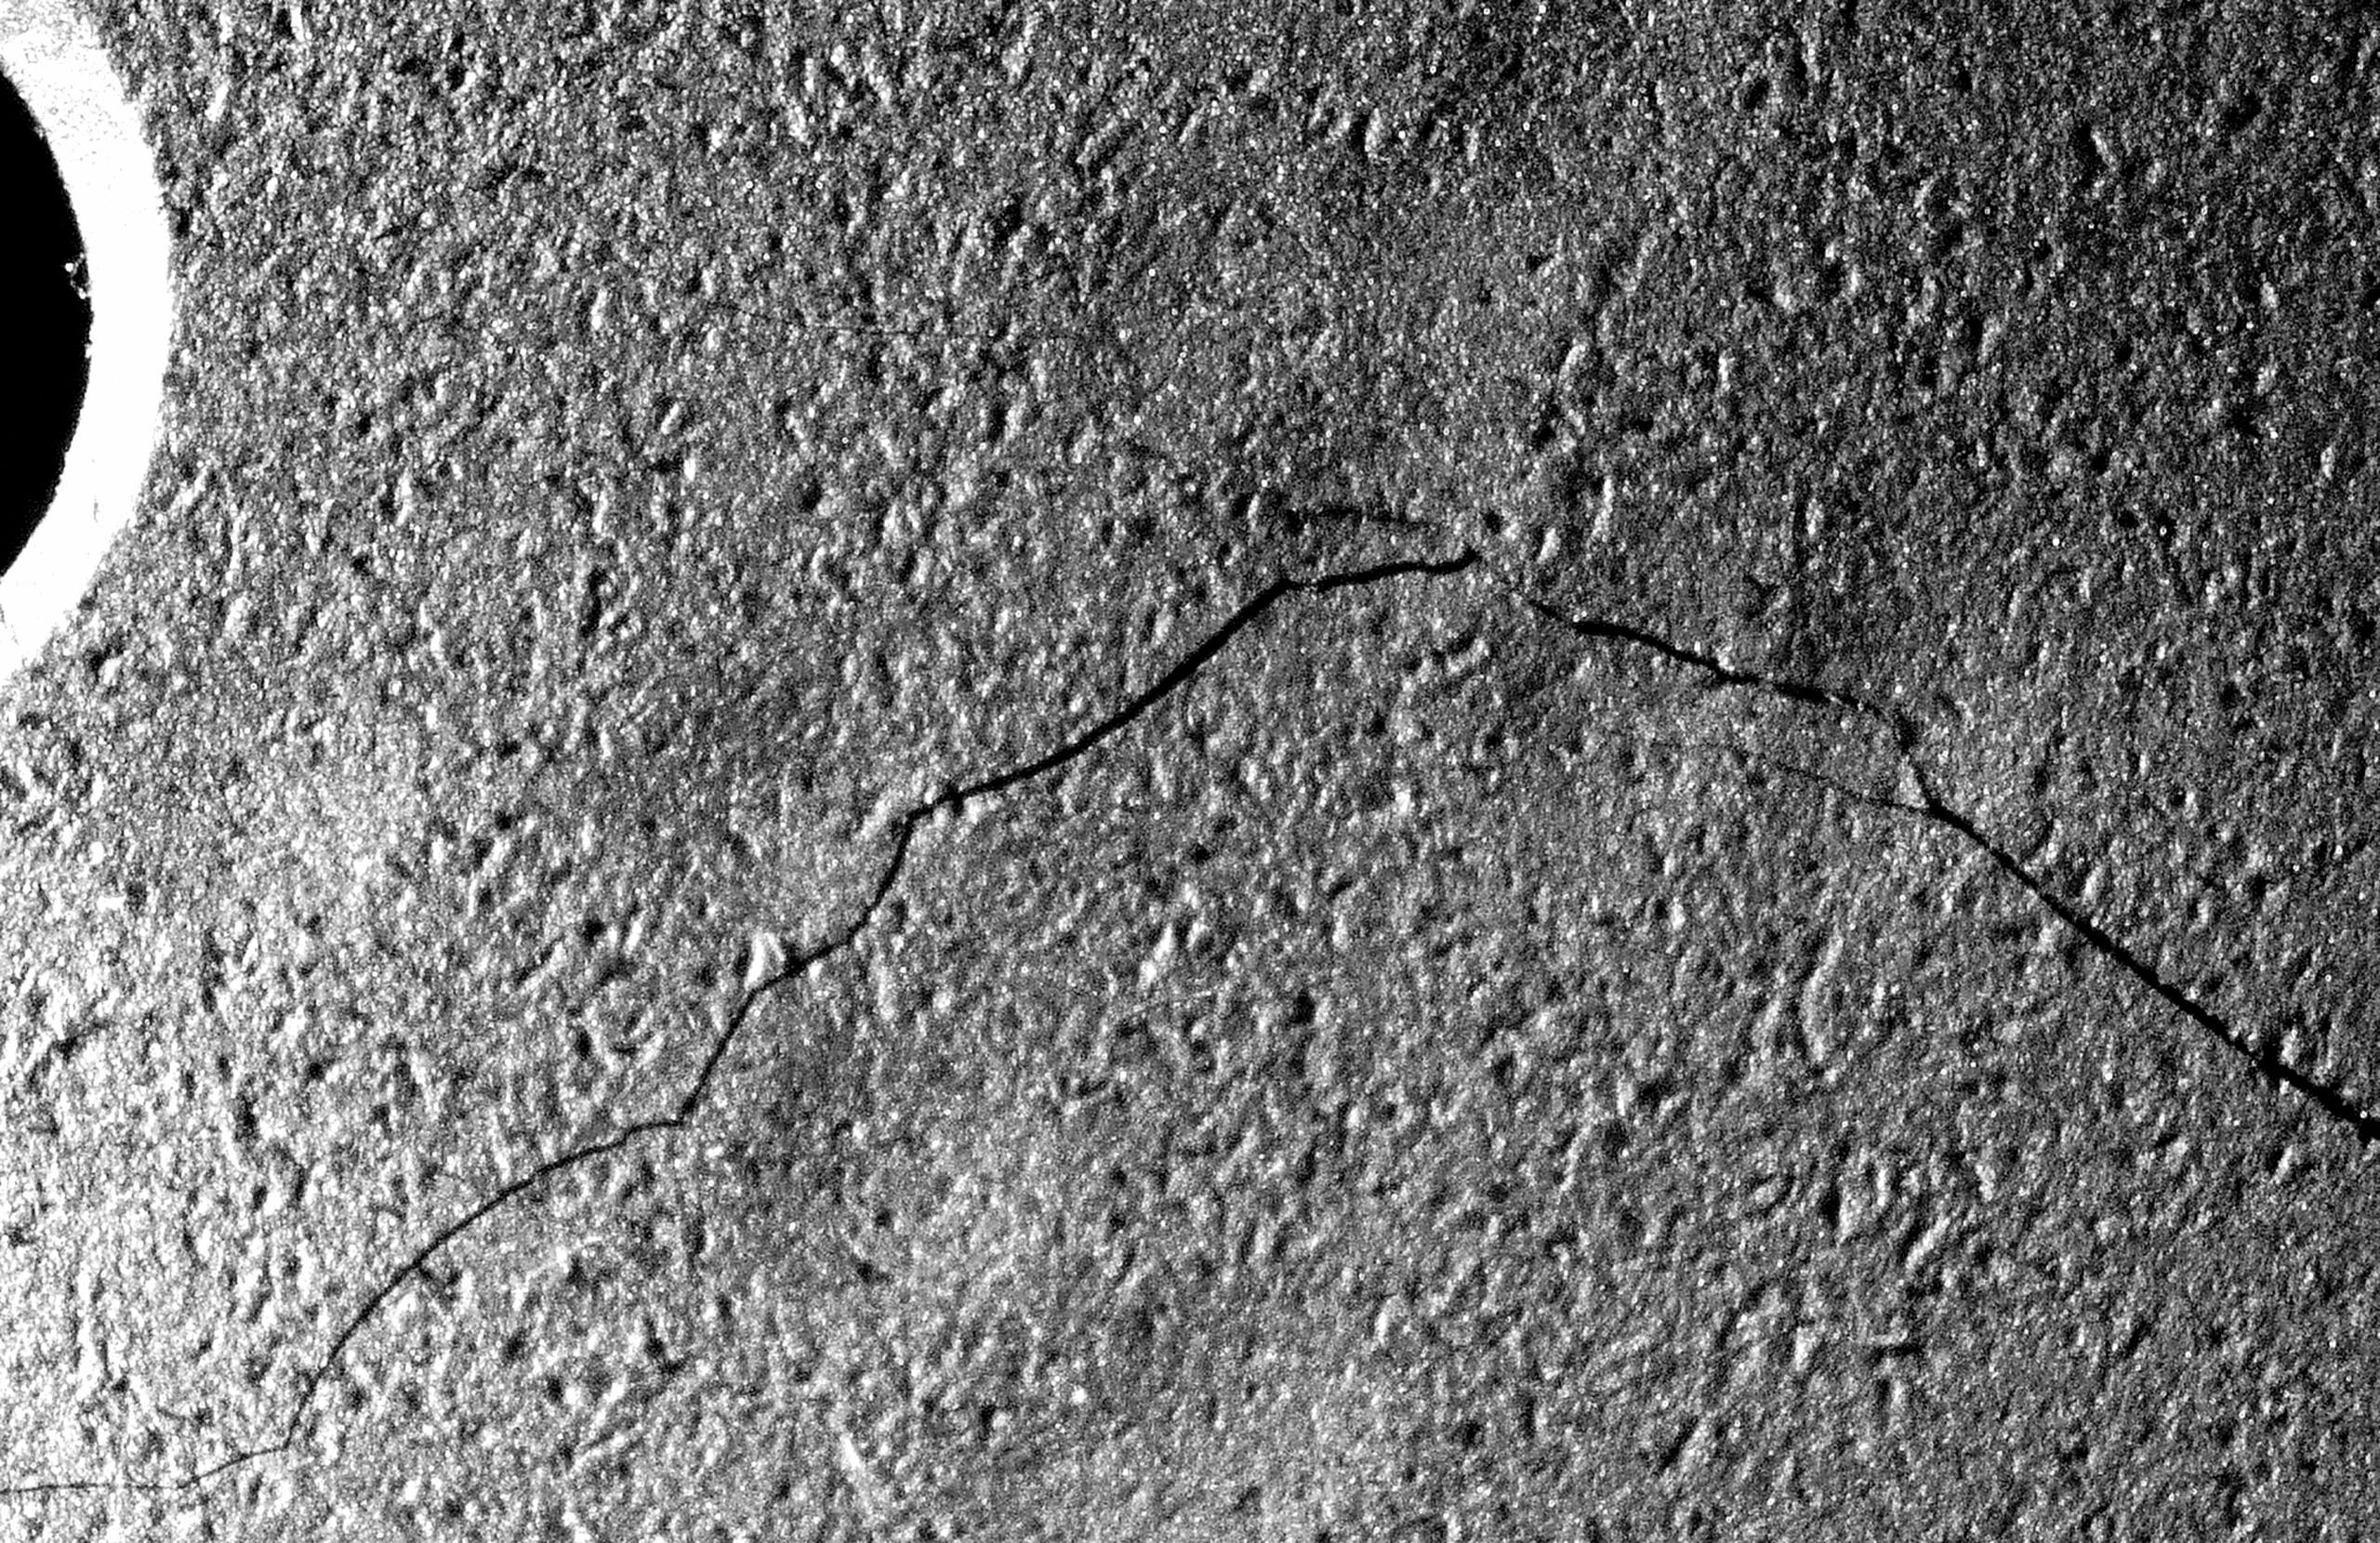
While my tests showed no negative effect of hammer peening, there are still dangers to the practice. A knifemaker previously sent me a knife that had a crack in the handle. When the handle scales were removed it was found that the crack had initiated within the peening dimples:
It is a bit hard to tell in the pictures but these were relatively deep peening marks. It appears that this steel was “over peened” and thus cracks were formed in the surface of the steel and grew from there.
Summary
Peening is a surface cold working process to create a residual compressive stress in the surface. A compressive residual stress can be beneficial, especially in parts that fail to high cycle fatigue (knives do not generally fail in this way). Peening is an effective way to straighten thin curved pieces of metal, such as warped steel knives. Peening does not negatively affect steel when done properly. However, cracks can be formed if the steel is “over peened.”
[1] Maleki, Erfan, Okan Unal, and Auezhan Amanov. “Novel experimental methods for the determination of the boundaries between conventional, severe and over shot peening processes.” Surfaces and Interfaces 13 (2018): 233-254.
[3] Smith, Robert Henry. Text-book of advanced machine work: prepared for students in technical, manual training, and trade schools, and for the apprentice and the machinist in the shop. Industrial education book Company, 1910.
Still working on getting an update to everyone about the status of knife steel after Crucible’s bankruptcy and the sale of many of the assets to Erasteel. Still more i’s to dot and t’s to cross.
If you would like to support future knife steel research then please come join us at Patreon.com/KnifeSteelNerds. You can get access to articles and videos early!
Video
Here is the video version of the following information:
History of CPM-3V
The thing most don’t know about CPM-3V is that it is a powder metallurgy version of an older conventional steel called Vasco Die. Vasco Die was patented by Harry Johnstin of VASCO in 1964 [1]. This was the first popular “8% Cr die steel” which created a new category. The most popular cold work die steels were (and are) A2 and D2. D2 is used for higher wear resistance and A2 is used for higher toughness. The 8% Cr is right in the middle between D2 (12%) and A2 (5%). And with the 2.5% vanadium for wear resistance and the relatively low carbon of 0.8% it has an interesting combination of properties, better overall than either A2 or D2. The steel was advertised as twice as tough as D2 while have ten times the wear resistance of A2. This created a new category of cold work die steel which is still seen today in steels like DC53 and Sleipner. You can read more about the history of Vasco Die and all of the developments that led up to it in my book The Story of Knife Steel. Vasco Die was never really used in knives, though the higher carbon version, Vasco Wear, did get used by some knifemakers, and by Gerber in some production knives. And of course CPM CruWear, the PM version of Vasco Wear, has also developed some popularity in recent years.
In the mid-1990s, Kenneth Pinnow and William Stasko of Crucible were looking to make a high toughness powder metallurgy tool steel. Up until that point, powder metallurgy steels had focused on high hardness high speed steels and creating new steels with higher wear resistance than was possible with conventional steelmaking like CPM-10V. Crucible’s highest toughness PM steel was CPM-M4 and that was basically an accident. Uddeholm had released Vanadis 4 in the late 1980’s to be a more balanced steel and its toughness didn’t even match CPM-M4. Uddeholm would later redesign this steel and call it Vanadis 4 Extra. Pinnow and Stasko realized they needed a steel with lower carbide volume. Powder metallurgy leads to higher toughness because it keeps the carbide size small, but to achieve the highest levels of toughness they needed to have less overall carbide. They experimented with a few compositions and found that a PM version of Vasco Die had excellent toughness and wear resistance.
It is somewhat surprising to me that they managed to patent this steel in 1997 [2] since Vasco Die had already previously been patented (though the patent had expired). It seems their claim was that the powder metallurgy process significantly changed the steel, and in more ways than just making the carbides smaller. With conventional casting of steel there is significant segregation of elements, and this led to relatively large chromium carbides which couldn’t be dissolved in Vasco Die. With powder metallurgy, the heat treated microstructure is free from chromium carbide and has only vanadium carbide instead.
Images from 3V patent showing CPM-3V (Fig. 1) and Vasco Die (Fig. 2). The larger carbides labeled “C” are chromium carbides. 3V is only small vanadium carbides.
CPM-3V became Crucible’s go-to steel for applications requiring high toughness; they released it around 1999. Surprisingly this steel didn’t really take off in knives. And I would argue it never really has. Jerry Hossom was the first custom knifemaker I noticed using it regularly. In more recent years perhaps the best known user of the steel is Nathan Carothers with his “Delta” heat treatment. I don’t mean to suggest no one is using 3V, I see currently available knives from a range of manufacturers including Bark River, ESEE, Cold Steel, and others, but it never seems like there are as many 3V knives as there could be. I think it being non-stainless has held it back as knife manufacturers tend to stick with stainless steels.
Heat Treating and Hardness
I did a new set of heat treating coupons for CPM-3V as I wanted to go a bit higher on austenitizing temperature than coupons I had done for the book Knife Engineering. The hold time at 1850°F was 45 minutes, 1950°F was 30 minutes, 2050°F was 20 minutes, and 2150°F was 10 minutes. While CPM-3V is typically heat treated in the 58-62 Rc range because of its excellent toughness, it can be heat treated to higher hardness if desired. This is significantly higher than the 61 Rc the datasheet shows the steel maxing out at. This is because I used the low temper range (300-500°F), rather than the datasheet recommended high temper range (1000-1050°F).
Microstructure
CPM-3V has about 5% vanadium carbide, and is free of chromium carbide despite the relatively high chromium content. This is in contrast to Z-Tuff which has about 3% chromium carbide and only 1% vanadium carbide. CPM-1V also has about 1% vanadium carbide but about 2% M6C (molybdenum/tungsten carbides found in high speed steels). So 3V has only a bit higher carbide volume than those two steels but it is all the hard vanadium carbide type which should mean more balanced properties.
3V (1925°F) – 5% carbide volume
Z-Tuff (1925°F) = 4% carbide volume
CPM-1V (2050°F) – 3% carbide volume
Toughness
One mystery about CPM-3V toughness comes from a patented Crucible steel that was never released commercially, a modified version of 3V. The steel was patented in 2006 by Alojz Kajinin and Andrzej Wojciesczynski. I actually wrote about this modified steel in my very first article on Knife Steel Nerds in February 2018. I didn’t even advertise the article because it was a test before I wrote a series on austenitizing that I did promote with the announcement of the website. The modified 3V was designed by partially replacing vanadium with niobium, which made the carbides smaller. They showed experiments in the patent that the longitudinal toughness of 3V was much higher than the transverse toughness. With transverse toughness the crack grows along the rolling direction, and carbides and impurities are aligned along the rolling direction giving easier paths for crack growth. However, with the modified 3V they found the transverse toughness to be roughly equal to the longitudinal toughness.
So for a new experiment on CPM-3V I decided to test both the longitudinal and transverse toughness and see if the transverse toughness was really as bad as it was shown in the 3V mod patent. I used an austenitizing temperature of 2000°F, plate quench, cryo, and a temper at 400°F. This resulted in about 61.5 Rc, which is significantly higher in hardness than our original 3V toughness tests. Those coupons were heat treated by Warren Krywko who heat treated a whole bunch of toughness coupons that I tested early on. I think maybe the cooling rate in quenching he was performing was somewhat slower than what I did, maybe because he was doing many specimens at the same time in the plate quench. That is significant because a slower cooling rate leads to both lower hardness and lower toughness, as I wrote about in last month’s article. All of the coupons we heat treated were tempered at 400°F rather than the 1000°F temper the datasheet recommends, because of our earlier findings with CPM-CruWear/Z-Wear.
Comparing the hardness-toughness to the previous CPM-3V tests I found significantly better properties. The transverse toughness I measured was only ~7% worse than the longitudinal, which is quite impressive. The transverse toughness reported in the 3V mod patent looks like an anomaly, I have never seen such a large difference between longitudinal and transverse toughness. Though I have to say, the very small drop between longitudinal and transverse toughness I measured here is quite impressive.
With the improved toughness measurements 3V nearly rivals the results of Z-Tuff and CPM-1V which both have lower carbon and vanadium. This actually does make some sense, as the carbide volume is similar between the three steels. To me the composition designs of Z-Tuff and CPM-1V are not totally optimal because they have a significant amount of non-vanadium carbides. The best toughness-wear resistance balance is generally achieved by having all vanadium carbides. Perhaps in the future we could explore higher hardness heat treatments like in the 62-64 Rc range.
Wear Resistance and Edge Retention
I tested the CATRA edge retention of 3V way back in my giant CATRA study. It did exceptionally well for its level of toughness at 463 mm cardstock cut, significantly higher than CPM-1V and CD1/Z-Tuff. Looking back I do think the heat treatment used was cheating a bit, as the tempering temperature was only 300°F. If the tempering temperature was a more appropriate 400°F, the austenitizing temperature for the same hardness would be higher and thus there would be a bit less carbide in the steel. However, this would only marginally affect the final result.
Edge Retention-Toughness Balance
The combination of wear resistance and toughness of 3V is quite impressive. I added a new datapoint for 3V with its newly higher toughness test. I had to adjust up the CATRA edge retention based on the predicted change with hardness for the chart since the CATRA knife was 1.4 Rc lower than the toughness coupon. CPM-3V is really in a class of its own for the level of toughness it has for the level of edge retention. Of course it doesn’t do anything too crazy when it comes to edge retention, but it is sufficient for many knives and has excellent toughness to go with it.
Corrosion Resistance
I have never tested the corrosion resistance of CPM-3V. With its 7.5% Cr and no chromium carbide its corrosion resistance can be quite good for a non-stainless. Some people talk about “semi-stainless” steels and if any steel were to fit in this category it would be 3V. It actually has more chromium in solution than D2, which is perhaps the best known “semi-stainless” steel. Z-Tuff and CD#1 also have a similar chromium content but because they have some chromium carbide in the heat treated condition we would expect 3V to have somewhat better corrosion resistance. In a corrosion test performed by Scott Larimore and Kelly W., CPM-3V was found to survive “in the elements” without rust. However, this was only the case with the low temper condition (<750°F) but not the high temper condition (>750°F). This is expected, though the stark difference never fails to surprise me. The low temper condition is labeled “3VL” and the high temper condition is labeled “3VH.”
Corrosion test by Scott Larimore and Kelly W.
Summary and Conclusions
I think CPM-3V has an excellent set of properties with very high toughness and decent wear resistance and edge retention for that level of toughness. With the 7.5% Cr and lack of chromium carbides its level of corrosion resistance is also quite good for a non-stainless steel. I don’t see anyone out there criticizing the steel, but somehow it seems to never quite get the recognition and popularity it probably deserves.
[1] Johnstin, Harry G. “Alloy steels and articles thereof.” U.S. Patent 3,219,442, issued November 23, 1965.
[2] Pinnow, Kenneth E., and William Stasko. “Wear resistant, powder metallurgy cold work tool steel articles having high impact toughness and a method for producing the same.” U.S. Patent 5,830,287, issued November 3, 1998.
Thanks to Roman Kasé for donating the K888 and Niagara Specialty Metals for donating the CPM-1V. Thanks to my Patreon supporters for funding this study, those dollars went toward metallography and CATRA blade grinding. You can support knife steel research by visiting Patreon.com/KnifeSteelNerds
Video Version
There is also a YouTube video of the following information:
History of Matrix Steels
Matrix high speed steels were developed in the 1960’s by VASCO. I previously wrote about historical and current matrix steels in this article. The original steels came out of improved techniques for measuring the composition of the “matrix” of the steel. Some of the carbon and alloying elements go toward forming carbides, what remains is in solution in the “matrix” of the steel. Carbides help with wear resistance but are detrimental to toughness, so the metallurgists decided to make high toughness steels by taking the measured matrix composition of the best high speed steels and using that composition instead. The first was a matrix version of M2 high speed steel called VASCO-MA, and they followed that up with Matrix II, a matrix version of M42 high speed steel.
Jumping ahead to the year 2002, Crucible released CPM-1V, which is a powder metallurgy version of VASCO-MA. The steel was released to offer the highest toughness of any of their available powder metallurgy steels, even CPM-3V. In 2005, Bohler released K890, advertised as a competitor to CPM-3V, it sort of looks like a cross between CPM-1V and CPM-3V, with elevated carbon, vanadium, and cobalt when compared with CPM-1V. K888 was released at the beginning of 2024, and it is essentially CPM-1V with a cobalt addition. Cobalt is added to many high speed steels for higher hardness (with a decrease in toughness). You can read more about the effects of cobalt on steel in this article.
One intriguing thing about K888 is that Bohler is advertising that it has higher toughness at 64 Rc than their prior K890 has at 62 Rc, and that K888 sees only a small drop in toughness between 62 and 64 Rc.
Bohler’s chart of toughness for K888
Toughness drops significantly with higher hardness so the claim that K888 maintains its high toughness at such a high hardness value is exciting. For example, in testing by Hitachi of their tool steels they found that above 62 Rc the toughness of their steels drop significantly:
Hitachi toughness chart for their steels
Experiments
So I was interested to compare K888 and CPM-1V to see the effect of the cobalt addition, and I had not yet tested CPM-1V so this was a good excuse. Knifemaker Roman Kasé was able to obtain a couple small pieces of K888 for me and I got CPM-1V from Niagara Specialty Metals. CPM-1V is also now available at Alpha Knife Supply. I tested the steel for hardness, toughness, and edge retention.
Microstructure
The big benefit of matrix steels is the lower volume of carbide. Carbides are brittle particles so the less carbide found in the steel the greater the toughness. Shawn Houston did the metallography for the two steels:
CPM-1V 2050°F austenitize – 3% carbide volume
K888 2050°F austenitize – 4% carbide volume
K888 has somewhat more carbide as expected, ThermoCalc predicts 1.15% MC (vanadium carbide) and 1.84% M6C (tungsten/molybdenum carbides) in K888; CPM-1V it predicts 0.87% MC and 1.34% M6C. But the big surprise is how much bigger the carbides are in the K888. We will see if this affects the measured toughness later in the article. I have some comparable grades below such as Z-Tuff and CPM-3V, two high toughness powder metallurgy steels, as well as the conventionally produced matrix steel Caldie. CPM-1V has the finest carbides of any powder metallurgy steel I have looked at so far. You can see even more micrographs here.
Z-Tuff
CPM-3V
Caldie
Hardness
Bohler shows that K888 can be heat treated as high as 64 Rc if you use the high end of the austenitizing temperature and temper within the recommended window (blue shaded region):
I made full tempering curves for both K888 and CPM-1V. I don’t typically do full tempering curves (it takes forever), but I thought it would be useful for comparing the effect of the slightly higher carbon in the K888 as well as the cobalt addition.
The hardness I measured for K888 is roughly equal to what was shown in Bohler’s datasheet. You can see that the potential hardness is higher for K888, which is due to the cobalt addition and slightly higher carbon. However, CPM-1V is still capable of relatively high hardness. To get a better feel for the two grades, I have a comparison between the two steels on one plot:
The K888 curve is for an austenitizing temperature of 2000°F and CPM-1V is 2050°F. With the lower carbon in CPM-1V it needed a higher austenitizing temperature to have equivalent as-quenched hardness, and here the CPM-1V was slightly higher as-quenched. However, K888 saw a bigger jump in hardness with a 300°F (150°C) temper than CPM-1V did. This is “precipitation strengthening” due to small carbides coming out during tempering. The same effect happens in the high temperature range around 900°F. You can read more about precipitation strengthening, also called secondary hardening, in this article on tempering. The higher hardness after tempering is then maintained across the tempering range in K888. This is a result of the cobalt addition, which is an alloy that slows the kinetics of tempering. This is what makes cobalt useful for high speed steels, which are designed to hold their hardness at high temperature.
Toughness
I used a few different combinations of austenitizing and tempering to compare CPM-1V and K888. For K888 I compared the low and high temperature tempering with 2050°F (1120°C) along with 1000°F (540°C) and 350°F (175°C). Based on the K888 tempering chart from Bohler, the 2050-1000 combination is presumably the one they used for the 64 Rc toughness datapoint, so it was an important one to test. I also tried a lower austenitizing temperature, 2000°F (1095°C) with 400°F (200°C). For CPM-1V I used all low temperature tempering with 2000-400, 2050-300, and 2050-350. The resulting hardness and toughness is below:
The first thing that sticks out is that the CPM-1V tested significantly better than the K888. The 2050-300 treatment led to 64 Rc and 22 ft-lbs, an excellent combination of hardness and toughness. 2050-350 led to 62.5 Rc with 36 ft-lbs, again an impressive combination. The 2000-400 heat treatment, however, did not lead to an improvement in toughness when compared with 2050-350 despite the lower hardness.
For K888 the 2050-1000 heat treatment, which is presumably the heat treatment used for the 64 Rc toughness datapoint in the datasheet, had the best toughness, but it was still below the result for CPM-1V at comparable hardness. The other interesting thing was that the low temperature tempering at 350-400°F did not seem to be high enough to give the steel good toughness. This may be from the cobalt addition delaying tempering.
K888 does not look particularly impressive on the chart, though it did manage to have somewhat higher toughness than CPM-CruWear at comparable hardness. The CPM-1V was again somewhat higher than K888 around 64 Rc, showing a clearer improvement in toughness at that high hardness. At 62.5 Rc, the CPM-1V continues to look impressive, having comparable toughness to high toughness steels like Caldie, CPM-3V, and A8 mod when they are at significantly lower hardness. Z-Tuff still remains alone at the top of the chart since the 2000-400 heat treatment of CPM-1V did not lead to an improvement in toughness. However, if the CPM-1V is extrapolated to lower hardness we would expect similar toughness to Z-Tuff:
It would be interesting to test other heat treatments to see if this extrapolation to lower hardness could be achieved. Such as a 2050°F austenitize with a higher tempering temperature such as 400-500 or 1000°F to see if the toughness could be further improved in the 60-62 Rc range. Because the low tempering range was not successful for K888, modified heat treatments for lower hardness would explore lower austenitizing temperatures with the same 1000°F, or increased tempering temperatures beyond 1000°F (540°C). Presumably the toughness would remain below CPM-1V due to the larger carbides. Alternatively it would also be fun to test Z-Tuff with a lower tempering temperature of 300-350°F and see what its toughness is like at higher hardness. So far I have only tested it after tempering at 400°F.
To show how good the toughness of CPM-1V is compared to low alloy steels and stainless steels I created charts with 1V overlaid on those:
Edge Retention
I tested one CATRA knife each, Shawn Houston ground the blades after I heat treated them. Each were heat treated using an austenitizing temperature of 2050°F (1120°C) and a tempering temperature of 350°F (175°C). This resulted in 63.1 Rc for CPM-1V and 63.9 Rc for K888.
As expected the two steels are near the bottom of the chart, following the approximate edge retention of AEB-L and ApexUltra. If compensating for hardness, the two steels also approximately match CD#1 (nearly identical to Z-Tuff) and A8 Mod. So I think overall the two steels did about as well as could be hoped for high toughness powder metallurgy steels with low carbide volume and only 1% vanadium.
Summary and Conclusions
These are two matrix high speed steels based on the original matrix steel VASCO-MA, though K888 has slightly higher carbon plus a cobalt addition. The cobalt addition led to somewhat lower toughness in the K888 when compared with CPM-1V. The cobalt did lead to more tempering resistance and higher hardness, though that tempering resistance also affected its toughness, especially in the low temperature tempering range (350-400°F). CPM-1V has an excellent combination of hardness and toughness in the 62-64 Rc range, though it may be possible to achieve higher toughness in the 60-62 Rc range if we try higher tempering temperatures. K888 and CPM-1V have similar edge retention, close to AEB-L, ApexUltra, and Z-Tuff/CD#1. Overall after testing these steels CPM-1V is my preference for a steel that maintains very good toughness at high hardness. I don’t know of any knife supply companies offering K888 yet, and is apparently difficult to obtain from Bohler right now, though CPM-1V is currently available at Alpha Knife Supply.
Thank you to my Patreon supporters who help make these studies happen. Patreon funds were used for purchasing two ultimately useless knives, and some steel. Patreon supporter Marcus Ho even sent me some steel all the way from China which also ended up not working out. And I used Patreon funds to pay Shawn Houston (also a Patreon supporter) to do microscopy and grind two CATRA knives for me. So when I say that Patreon makes the study happen I don’t mean in an abstract sense. If you want to help fund more knife steel research please come join us on Patreon where you can get articles and videos early. Or if you sign up for the highest tier you can even get a sweet Knife Steel Nerds mug.
Video
Video version of the following information:
History of 8Cr13MoV/8Cr14MoV
To cover the history of 8Cr13MoV we have to go back to Japan, or even further back to Europe. Hitachi in Japan came out with their own stainless tool steels called “Gingami” meaning “silver paper” with three different designations. All three of these steels were copies, or nearly so, of stainless steels available in Europe. They were released somewhere in the 1933-1951 time period. In 1960 Fukami Steel Company was founded in Japan and they introduced AUS-4 and AUS-6 in 1968. AUS-4 was a 420/420HC type steel and AUS-6 was similar but with higher carbon and a small molybdenum and vanadium addition. AUS-6 was very similar to Gingami 2, and also other European steels such as Sandvik’s 12C27. AUS-8 was introduced in the 1970s which was AUS-6 with increased carbon up to ~0.8%. AUS-6 and AUS-8 became very common in Japanese factory knives, such as Kershaw’s imported knives introduced in the late 1970s. You can read more about all of this history (including citations) in my book The Story of Knife Steel.
8Cr13MoV, also called 8Cr14MoV, is a generic Chinese designation for AUS-8. They have identical composition. The naming scheme is pretty self-explanatory, I think, but maybe it makes sense to describe it explicitly. The first number designates the carbon content, so “8” refers to ~0.8% carbon, Cr13 means 13% chromium, Mo means a small molybdenum addition, and V means a small vanadium addition. So 7Cr17 means 0.7% carbon and 17% chromium, 9Cr18 means 0.9% carbon and 18% chromium, and 9Cr18MoV is the same with molybdenum and vanadium. Another steel that seems to be building in popularity is 10Cr15CoMoV which is 1% carbon, 15% Cr, plus cobalt, molybdenum, and vanadium; a copy of Takefu’s VG-10. I have heard these designations sometimes referred to in a derogatory way as “Chinese alphabet soup” though I think it should be known that these designations are a slight modification of an earlier European designation system. For example, 9Cr18MoV has existed for a long time in Europe as X90CrMoV18, also referred to by another European designation system as 1.4112. This is the European version of 440B which has some small differences with the American AISI 440B, such as higher chromium (18 vs 17%) and molybdenum (1-1.3% vs <0.75%). 7Cr17 is the same as AISI 440A. To the average consumer I’m sure all of the numbers are somewhat mystifying and steel names tend to be more memorable.
I don’t know when 8Cr13MoV was first used, but it was first advertised in knives by Spyderco in 2005 with their new “byrd” line of knives produced in China. Spyderco had requested their new knives be produced in 440C and tests of the knives were positive. However, Sal Glesser requested they check the composition of the steel and found it to be identical to AUS-8, not 440C as the factory told them. They learned the steel was designated as 8Cr13MoV in China and advertised the knives as such [1]. There is no distinction between 8Cr13MoV and 8Cr14MoV, all published compositions I have been able to find are the same, apart from Spyderco’s composition table which lists the chromium content only as 13.0%, rather than other published ranges I have found which show 13-14.5% chromium.
My History with 8Cr13MoV/8Cr14MoV
Because of how common AUS-8 and 8Cr13MoV knives are, I was interested in testing the steel for some time. However, despite how common it is in factory knives, obtaining individual bars of it was actually pretty difficult. Japanese and Chinese steels are pretty difficult to obtain in the USA to begin with, as most of it is sold directly to knife companies in their respective companies. Furthermore, because they are known as “budget” or even “low end” steels custom knifemakers in the USA are not exactly clamoring for it so the knife steel supply companies were not trying to get any.
My first solution was to purchase two “Schrade Leroy” choppers made in 8Cr13MoV which have large flat areas. This would allow me to anneal (soften back to the steel factory state) the steel and then heat treat it how I want. The flat areas mean I could make steel coupons for testing such as toughness coupons and potentially CATRA knives. That gives me control over the heat treating and geometry of the steel so I am not limited to available knives.
The knife had easily removable handles so I annealed one of them and posted to my Patreon that I would soon be testing the steel. One of my Patreon supporters, Marcus Ho, contacted me and offered to purchase some 8Cr13MoV bar stock so I wouldn’t have to use my more complicated method for obtaining the steel. Marcus is a knifemaker in Hong Kong so he had experience with sourcing steel in China. You can follow him on instagram under his company name HK.Knifeworks. He sent me a bar of steel along with a very official composition certification.
So I set the Schrade knife aside and started working with the new bar of steel. I started with developing hardness curves with different temperatures, which looked about where I expected them to be. But then I tested the toughness and it was worse than I expected, being more in line with 1% carbon stainless steels like 154CM or 440C. I then looked at the microstructure and it had too much carbide in it, looking again like 154CM or 440C. So I tested the composition of the bar and it was indeed 440C. This was an ironic reversal of the situation that Spyderco saw with their byrd knives. I was so disgusted with this whole debacle and all of the time I had wasted on a bar of 440C that I stopped working on the steel altogether.
More recently I learned that Aus Maker Supplies in Australia had obtained some 8Cr14MoV to sell to knifemakers and I asked if they could send me some. This time I actually got a bar of real 8Cr13MoV/8Cr14MoV and I am happy to report that I have actually tested the real thing.
Hardness
I tested the heat treatment of 8Cr14MoV with a range of austenitizing temperatures after soaking for 15 minutes, plate quenched, and tempered at 300 or 350°F. For half of them I used a cryo step in liquid nitrogen after the quench but before the temper. I didn’t find any published information on heat treating the steel, but Aichi has a recommendation for AUS-8 of 1050°C austenitize and 180°C temper (1925°F/350°F).
As with any steel, cryo led to higher hardness, and a higher austenitizing temperature from which peak hardness was obtained. Without cryo peak hardness was from 1950°F, so the recommendation for AUS-8 of 1925°F is good I think. It is dangerous to heat treat close to the peak hardness, because austenitizing above the peak means that there is excess “retained austenite” dropping the hardness which leads to worse performance. These are small coupons so in an industrial environment with slower quenching speeds the hardness may be somewhat lower. 61 Rc with the 1925-350 heat treatment is pretty good. Also the steel can achieve relatively high hardness, up to 64.5 Rc with a low 300°F temper. A more conservative 350°F you can still get into the 62.5-63.5 Rc range.
Microstructure
8Cr13MoV has a generally fine carbide structure but has many larger carbides mixed in. Sandvik and Uddeholm razor steels 13C26, 14C28N, and AEB-L seem to have about the limit in terms of carbon and chromium content before large carbides become unavoidable without more expensive manufacturing such as powder metallurgy. I have AEB-L below as a comparison to see what I am talking about, along with the higher carbon 440C and VG10 which have even larger carbides.
8Cr13MoV 1925°F-350°F Area 1
8Cr13MoV 1925°F-350°F Area 2
8Cr13MoV 1950°F-350°F Area 1
8Cr13MoV 1950°F-350°F Area 2
AEB-L
440C
VG10
In terms of grain size we also did an etch to reveal prior austenite grain boundaries. It is notoriously difficult to reveal grain boundaries so they are somewhat difficult to see. However, it is apparent that there was some grain growth with 1950°F when compared with 1925°F.
8Cr13MoV 1925°F-350°F
8Cr13MoV 1950°F-350°F
We also observed broader “segregation” and carbide stringers on a macro scale, especially in the 1925°F CATRA knife, which is shown below with two different angles. We also had a surface defect from the carbide stringers, which is seen as a shadow in the darker of the two. This happens when a carbide stringer is big enough that it breaks out during grinding. Segregation and carbide stringers are not unique to 8Cr13MoV, they are relatively common with ingot cast steels (as opposed to powder metallurgy). This is especially the case with higher carbon conventional steels like 440C and 154CM. The carbide stringers are parallel to the edge, perpendicular to the “grind lines.”
Toughness
For toughness tests I heat treated two conditions: 1925-350°F without cryo (roughly matching factory knife heat treatments), and 1950-350°F with cryo (higher hardness and closer to a custom heat treatment). These resulted in about 60 Rc and 62 Rc, respectively.
As expected based on the presence of some larger carbides, the toughness of 8Cr13MoV is significantly lower than AEB-L, 14C28N, LC200N, and Nitro-V. However, the toughness of 8Cr13MoV is still better than most other conventional high carbon stainless steels like 440C, VG10, and 154CM. It is also better toughness than most powder metallurgy stainless steels, even Vanax, XHP, and S35VN (though not MagnaCut). So overall 8Cr13MoV/8Cr14MoV has pretty good toughness despite its reputation as a low end steel. AUS-8 would also be similar.
CATRA Edge Retention
For CATRA edge retention coupons I used the same heat treatments, though they both came out slightly harder at about 61 and 62.5 Rc. However, one interesting thing is that the 1925-350°F heat treatment, the softer of the two, measured higher for edge retention, with an average after four tests of 395 mm of cardstock cut in the CATRA test. The 1950-350°F instead measured 376 mm. The 1950 coupon tested very consistently with values of 370, 382, and 377 mm. The 1925, however, seemed to do better the more I retested it with 357, 399, 389, and 429 mm. After puzzling over this I think the reason is that we had more carbide stringers near the edge with the 1925-350°F CATRA coupon, as discussed in the microstructure section. So perhaps what happened is that I was sharpening into a more carbide-rich region leading to the higher values. This is part of the inconsistency of conventionally cast steels, leading to more variable microstructure and therefore properties. Powder metallurgy steels are typically more consistent. To be kind to 8Cr13MoV I plotted only the higher 1925 coupon on the chart below:
The steel tested about where it was expected to fall, a bit above the lower carbon AEB-L and Nitro-V, but below higher carbon steels like 440C, VG10, and 154CM. When compensating for hardness it did very similar to LC200N and 14C28N. Both of those steels (LC200N and 14C28N) tested a bit better than I expected based on their composition, as I expected them to be closer to AEB-L and Nitro-V. So I am curious if I were to test three knives if they would still end up where they did (as opposed to resharpening the same knife), or if there are other features of those steels that cause them to test a bit higher. But we are talking relatively small differences, it’s not as if the steels were competing with S30V.
Comparison with My Original Ratings
I had been running Knife Steel Nerds for a few years before I finally did my ratings of knife steels. I wanted to have experimental results before rating them. One of the few steels I gave a rating for without testing it was 8Cr13MoV/AUS-8, in part because it is so common and many people asked me to rate it. So I gave my best guess in the table which I reproduced below:
I guessed that the toughness would be a “6,” in between 5’s like Vanax and S35VN and the 7 of MagnaCut. And indeed the steel ended up in between those. The edge retention I gave a “3,” the same as AEB-L, LC200N, and 14C28N, and it tested similarly to those steels. So I pointed all that out to pat myself on the back for my predictive abilities based on educated guesses and everything I’ve learned about steels over the years. It’s fun to brag sometimes. I didn’t test corrosion resistance of the steel, it gets a 7 because it is largely a carbon-chromium steel (with a little Mo and V), and so should fall in line with other steels of similar carbon-chromium ratio. If everyone is really clamoring for corrosion resistance tests of these types of steels I will think about doing another round of salt spray tests.
Summary and Conclusions
8Cr13MoV started as a copy of the Japanese steel AUS-8. I told the complicated and boring story of why I have had such a hard time getting this steel so I could actually test it. I think the obtainable hardness of the steel is pretty good, it can be heat treated up to 64 Rc or so, and is very easy to heat treat into the 60-61 region without cryo and 62-63 Rc region with cryo. The 1925-350°F (1050-180°C) heat treatment recommended by Aichi for AUS-8 is a good starting point for a cryo-free heat treatment. With cryo you can austenitize up to the 1975-2025°F range for high hardness if desired. 300°F is as low as I typically recommend tempering, though 350°F gives more balanced properties. The microstructure is disappointing if you are comparing to AEB-L and 14C28N though looks pretty good when compared with higher carbon conventional steels like 440C, VG10, and 154CM. The toughness was better than those 1% carbon steels but not as good as the fine AEB-L and 14C28N, but quite respectable either way. The edge retention wasn’t much better than AEB-L for the toughness deficit, but with the good hardness 8Cr13MoV can have it isn’t too bad. Luckily for me I didn’t have to modify the ratings I had already given the steel in each category because my predictions were pretty good. If you are in Australia 8Cr14MoV/8Cr13MoV is a good low cost steel to purchase from Aus Maker Supplies. And if you are buying knives in the steel you don’t need to worry about the steel itself being “junk,” there are a lot worse choices. Of course that assumes the knife company is heat treating it properly.
I already have a video and article about the history and properties of K390, which you can see here. K390 is a powder metallurgy non-stainless steel with high wear resistance due to very high vanadium, 9%. It is in a similar category to CPM-10V and Vanadis 8.
Since that article and video were published, new samples were heat treated by Svetlozar Chaushev; funding and logistical help was provided by K390 enthusiasts Manuel Meyer and Othman Fahim. I finished machining the samples and tested them for hardness and toughness. The main additions to the previous information we had is a comparison of tempering temperatures. My samples were tempered at 400°F (205°C) but these new ones were tempered at 500°F (260°C) or 1000°F (538°C). Some steels that we have tested in the past showed a reduction in toughness by tempering at 500 rather than 400°F, despite the reduction in hardness. An example of this behavior was seen with CPM S35VN. This is referred to as tempered martensite embrittlement. However, the temperature range of tempered martensite embrittlement is different for different steels and can be suppressed to higher temperatures than 500°F, so it is worthwhile to test.
Datasheets for many non-stainless tool steels recommend a “high temper” in the range of 1000-1050°F. This high temper gives the steel more heat resistance so that it doesn’t lose hardness during grinding, applying coatings, or high temperature operation. High temperature tempering also helps with reducing retained austenite even without cryo. However, in previous comparisons we have made between tempering at 400 and 1000°F we found higher toughness with the 400°F temper. You can read about these comparisons in articles about heat treating CPM CruWear/Z-Wear and CPM-10V.
Heat Treating Experiments
Below is a table of the heat treating experiments that were performed:
The time at the high austenitizing temperature was fixed at 20 minutes for the tests that I did (bottom of the table), but Chaushev used 15 minutes for 2050°F/1120°C and 10 minutes for 2100-2150°F (1150-1175°C). The K390 datasheet recommends 20-30 minutes for 1030-1150°C (1885-2100°F) and 10 minutes for 1180°C (2150°F). Shorter hold times are used at high temperature because carbides dissolve more rapidly at high temperature, and grain growth can be a concern. Chaushev used an oil quench while I did a plate quench in my tests; both are relatively fast quenching methods.
Hardness
I combined the hardness data from the toughness coupons with some small hardness coupons I heat treated a couple years ago with a 300°F temper. Perhaps the two different datasets helps explain why the hardness of the 300 and 400°F specimens are quite close together, only about 0.5 Rc where I would normally expect about 1 Rc. Or maybe K390 just has good tempering resistance at that low temperature range, as evidenced by there only being a ~0.5 Rc difference between 400 and 500°F when austenitizing at 1950 and 2100°F. Different “heats” of steel can have somewhat different ranges of carbon and other alloying elements which can lead to small differences in hardness, and my two different heat treatment studies were with two different bars that would likely have been different heats. You can also see in the chart that the 1000°F leads to significantly lower hardness for a given austenitizing temperature.
I pulled hardness points off the datasheet and compared against the results of these newly heat treated coupons and found that we had higher hardness than the datasheet showed:
With the datasheet they used a nitrogen quench with 5 bar of pressure, which is likely slower than the quench Chaushev performed. The datasheet also did not use cryo which may explain the hardness difference. The difference in hardness increased with austenitizing temperature, which would be expected from cryo because there would be more retained austenite after quenching from high austenitizing temperatures.
Toughness
Below shows the resulting toughness values for different austenitizing and tempering temperature combinations:
400-500°F tempering led to similar toughness with a small edge given to the 500°F temper, especially at the lower austenitizing temperature of ~1800°F (980°C). The 1000°F temper led to similar toughness for a given austenitizing temperature, though there was a significant drop in toughness up to the 2150°F austenitize. This is despite the reduced holding time of 10 minutes used with 2150°F. With the 400-500°F temper, there was a significant drop in toughness from 1800 to 1950°F, but the toughness stayed basically flat between 1950 and 2100°F. So for high toughness heat treatments, sticking to a relatively low temperature of 1800°F or perhaps even lower leads to the best toughness. If going to higher hardness it appears best to go up even higher than 1950°F for more hardness as the toughness largely didn’t change up to 2100°F.
We must remember, however, that the 1000°F temper led to lower hardness for a given austenitizing temperature, so it can be better to plot toughness against hardness instead so that we can see which heat treatments led to the best balance of hardness and toughness:
The 400-500°F tempering led to a similar hardness-toughness balance (blue dots and line), while the 1000°F temper led to a lower hardness-toughness balance. So we found a similar result to the prior comparisons we have made between low and high tempering with CPM-CruWear and CPM-10V where a low temper at 400°F led to better toughness for a given hardness.
Summary and Conclusions
The low tempering temperature from 400-500°F (205-260°C) led to superior toughness to using a high temperature temper from 1000°F (538°C). Given that the high temperature range such as 1000°F also leads to a reduction in corrosion resistance I think it is safe to say that 400-500°F is preferred. No evidence of tempered martensite embrittlement was observed by tempering at 500°F and doing so can give somewhat improved toughness at the cost of 0.5-1 Rc. Good toughness was observed across the range of 1800-2150°F austenitizing (980-1175°C).
How to heat treat K390:
Austenitize for 20 minutes at 1800-2100°F (980-1150°C). Use 10 minutes for 2150°F/1175°C. Large pieces of steel may need a longer soak time.
K390 should be relatively insensitive to quenching, especially with the thin cross section of knives. However, a plate quench or rapid gas quench would be recommended.
We didn’t test without cryo treatments, the maximum recommended austenitizing temperature is likely lower without cryo (when using the recommended 400-500°F temper).
Temper at 400-500°F.
Set the desired hardness by selecting the appropriate combination of austenitizing and tempering temperature using the chart earlier in this article. Of course your batch of K390 and your furnace, cooling rate, etc. may yield slightly different results.

 Login
Login