Normal view

strawberry chiffon shortcake, perfected

By: deb
17 June 2026 at 18:02

In 2007, when this website was still in its infancy, I shared a recipe for a layered strawberry chiffon shortcake. I’d never made a chiffon cake before, but I brought it to a friend’s rooftop birthday BBQ, correctly assuming that no one would be unhappy with a towering, featherweight cake sandwiched with whipped cream and fresh strawberries, however inexpertly made.

Read more »

banana chocolate chip cake

By: deb
23 February 2026 at 19:33

Somehow, despite how impossible it seems (to me, a person who has neither aged nor matured a day), it’s been almost twenty years since I first told you about my family’s favorite coffee cake. It’s tall, plush, crisp with a flaky layer of cinnamon sugar on top, studded with a quilt of chocolate chips and is downright, well, adorable when cut into cubes because they’re a little wobbly. When one tumbles, it shakes off a little pfft of cinnamon sugar, like a pup coming in from today’s blizzard. It’s perfect. It needs no changes or updates.

Read more »

Orange-Glazed Polenta Cake

By: David
9 January 2026 at 16:28

Orange-glazed polenta cake

Apparently I’m not the only one who loves polenta cake. The Italians like it so much that it’s called Amor Polenta. Which means “Polenta Love.”

Well, at least that’s what I thought it meant, because amour in French means “love.” And I assumed that it was the same in Italian. (Another reason for finally getting on that life-long ambition to live in Italy and learn Italian.) But for now, checking in an Italian dictionary, I found out that “amor” means “sake.” (As in, for the purpose of.) So I’m not sure how it got its name, but this cake makes a pretty good argument for the sake of whisking polenta into a cake.

Orange-glazed polenta cake

I’m one of those people who is completely crazy for anything with cornmeal, from corn bread to even a kind of kooky polenta ice cream that I’m sure no one else has ever made, because I used a completely obscure polenta that very, very few people can get their hands on. But I felt compelled to make it, for the sake of using up a little bag of that polenta that I had.

Orange-glazed polenta cake

Fortunately, polenta is available just about anywhere. I like to buy stone-ground polenta, which has a crunchier flavor. But you could use instant polenta for this cake, normally something I avoid. But I found myself with a bag of it and was looking for ways to use it up. And here’s where the rest of it landed.

Like many Italian cakes, which are unlike American cakes, this is not a buttery bomb of richness. True, there is butter and a few eggs in there. But the great flavor comes from ground almonds, which tend to make the cake much moister the following day as the nut oils soak the crumb, which is one of those baking terms (unlike amor) that pretty much seems to be what it is talking about. The polenta adds a bit of a savory quality to desserts, which draws me to use it a lot when baking.

Orange-glazed polenta cake

This cake is a great snacking cake and I tend to walk around my apartment several times during the day, somehow landing frequently near the cake, where a serrated knife just happens to be stationed alongside. Ready and waiting to lop a slice off.

Orange-glazed polenta cake

In addition to a collection of polentas, I found myself with a collection of eaux-de-vie on hand. Some were gifts, others were picked up on my travels. A few are anise-based, which pair nicely with polenta, and chocolate. I have a ginger one that is great when summer fruits are in season, like peaches, nectarines, and apricots. And the long bottle in the front right, the eau-de-vie of lees that I got in Switzerland, after I found out how good raisins in lie (eau-de-vie made from leftover grape yeast, and other stuff that falls to the bottom of wine vats post fermentation) was, after gorging on cauldrons of fondue.

As astute readers can see from the fill line of the bottle, that project never came to fruition. (I’m too busy trying organize my polentas and eaux-de-vie. And plotting a way to live in both Italy, and France.) But I did add a few shots of orange liqueur (not shown), which gave it a little boost of flavor. Not enough to be perceptible. But like that bag of instant polenta I’ve had for a few months, I was always conscious that it was there. You can use any kind of liqueur that you want – maraschino, limoncello, absinthe, kirsch, or even anise liqueur.

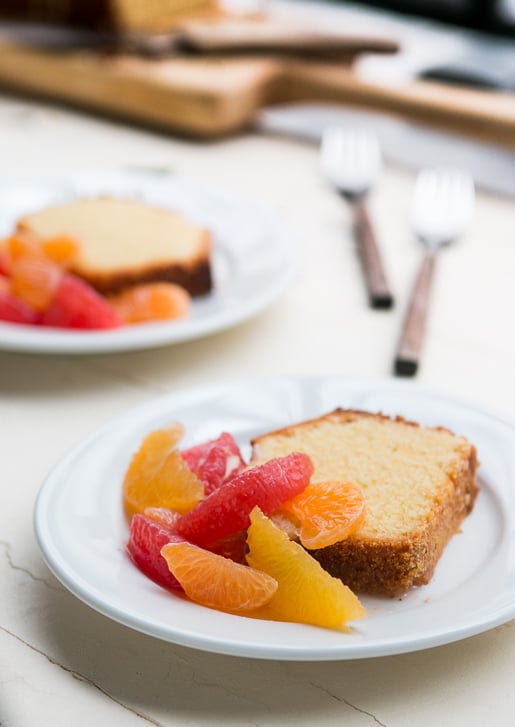
As much as I like this as a snacking cake, it can be dressed up with a fruit compote. I sectioned some tangerines, navel oranges, and pink grapefruits, drizzled a little honey over them, and served them alongside the cake. I had planned to spoon some warm sabayon over the cake and fruit, but decided that I had too many other things to do. Namely, get cracking on using some of those bottles of liqueur that I’ve been hoarding.

Polenta cake recipe

Print

Orange-Glazed Polenta Cake

For this cake, using fine-ground polenta or instant polenta will result in the smoothest texture, although whatever is available will work. I’ve made it with coarse polenta too, and enjoy the crunch. Almond flour is available at specialty stores, Trader Joe’s, and online. If you can’t find it, grind 7 1/2 ounces (215 grams) sliced blanched almonds in a food processor with the flour until the almonds are pulverized. Although cakes like this don’t always need adornment, I did glaze it with a dribbly orange glaze that firms up and gives the top a citrus-scented fruity crunch. For those wanting to skip the liqueur in the cake, you can leave it out and increase the almond extract to 1 1/4 teaspoon. For the glaze, you replace the liqueur with orange juice.

Ingredients

For the cake

  • 8 ounces (225g) unsalted butter cubed, at room temperature
  • scant 1 cup (180g) sugar
  • zest of 1 lemon
  • 3 large eggs at room temperature
  • 2 tablespoons liqueur or eau-de-vie such as orange liqueur (Grand Marnier or Cointreau), kirsch or grappa
  • 3/4 teaspoon pure almond extract
  • 3/4 cup (125g) finely ground polenta plus additional for preparing the pan
  • 2 cups (215g) almond flour
  • 6 tablespoons (55g) all-purpose flour
  • 1 1/2 teaspoons baking powder preferably aluminium-free
  • 1/2 teaspoon salt

For the glaze

  • 1 1/4 cups (170g) powdered sugar
  • 1 tablespoon orange juice
  • 4 teaspoons orange liqueur (such as Grand Marnier or Cointreau)

Instructions

  • Butter a 9-inch (23cm) loaf pan. Dust the inside with polenta, and tap out any excess. (Note: The pan I used has a nonstick finish. If you want to make sure the cake comes out nicely you may want to cut a rectangle of parchment paper and fit it into the bottom of the pan after you prepare it, especially if using an unfinished loaf pan.) Preheat the oven to 350ºF (180ºC).
  • In the bowl of a stand mixer fitted with the paddle attachment, beat the butter, sugar and lemon zest at medium-high speed, until it’s light and fluffy, about 3 minutes. (You can also make this in a large bowl, beating the butter and sugar by hand.)
  • Add the eggs one at a time, stopping the mixer after each addition to scrape down the sides of the bowl. Mix in the liqueur and almond extract.
  • In a medium bowl, whisk together the polenta, ground almonds, flour, baking powder, and salt, until there are no lumps. Gradually mix the dry ingredients into the creamed butter mixture, just until well-combined. Do not overmix.
  • Scrape the batter into the pan, smooth the top, and bake the cake until it is golden brown on top and a toothpick inserted into the center comes out almost clean, perhaps with just a few crumbs attached, 45 to 50 minutes. Let cool on a rack for about 30 minutes, then run a knife along the outside of the cake to loosen it from the pan and tip the cake onto the rack. Let the cake cool completely before icing.
  • To glaze the cake, mix the powdered sugar with the orange juice and orange liqueur until the glaze is thick, but still runny – not too watery, but as thick as a milkshake. If necessary, add a bit more sugar if it’s too thin, or add a bit more liquid if it’s too thick. You can try smoothing a bit over the cake to see if it’s the right consistency for drizzling and dripping down the sides before glazing the entire cake.
  • Spoon the glaze over the cake, encouraging the glaze to run down the sides by nudging it towards the edges with the back of the spoon or a metal spatula.

Notes

Serving: When the glaze has firmed up, serve slices of the cake with a favorite fruit compote, such as fresh citrus segments, caramelized pineapple, poached pears, or sliced and sugared peach slices (peeled) or nectarines.
Storage: The cake will keep for up to five days, if well wrapped, at room temperature. The cake will be noticeably moister the day after baking due to the oil in the nuts. It can be frozen for up to two months.

Related Recipes and Posts

Baking Ingredients and Substitutions

Cornbread with Harissa Butter

Polenta Crisp Topping

Simple Polenta

Cornmeal Cookies

Cornmeal Biscotti

opera cake

By: deb
6 October 2025 at 22:35

Welcome to the cake that has terrified me the most. You see, I have two favorite cakes. The first is my Strawberry Summer Stack Cake, the layered strawberry, cream, and butter cake version of the Strawberry Summer Cake in Smitten Kitchen Keepers. The second is the Opera Cake (Gâteau Opéra), a stacked and striped dessert with thin almond cake layers soaked in espresso syrup, chocolate ganache, and a rich espresso buttercream. The difference between the first cake and the second is that the second recipe was never going to happen.

Read more »

Apple Pancakes

9 September 2025 at 19:35
apple pancakes

Let’s celebrate the cooler weather with a stack of warm apple pancakes! These apple-flavored pancakes are the perfect autumnal breakfast treat. They’re a simple weekend breakfast project that keeps well for quick weekday mornings (they freeze and thaw well, too).

This apple pancake recipe is made from scratch with freshly grated apple, which is enhanced by a touch of ground cinnamon. Tart apples like Honeycrisp or Granny Smith offer the most impactful flavor. You’ll see that I used Honeycrisp apples in this batch—they’re our family’s favorite, and they yield terrific pancakes.

You might already have everything you need to make these pancakes in your pantry. Let’s make some.

Continue to the recipe...

The post Apple Pancakes appeared first on Cookie and Kate.

double chocolate zucchini bread

By: deb
20 August 2025 at 20:27

Oh you wanted a chocolate zucchini bread recipe? Don’t you know this is a food blog? I’m contractually obligated to tell a meandering and infuriatingly irrelevant story in each headnote, keeping you from the recipe as long as possible for nefarious, possibly witchy, purposes, and I don’t want to disappoint. Next week, I’ll be celebrating my 20th wedding anniversary with a guy I met because I wrote some rambling things on a blog about, like, dating and New York City and funny things that had happened, he read it, we went for a drink, I stopped dating, needed a new subject to fill the void, and Smitten Kitchen came to be one year later. [Some people have honeymoon babies, I, uh, had you.]

Read more »

chipwich ice cream cake

By: deb
25 July 2025 at 20:15

High on the list of cooking things that I’ve got far more opinions on than anyone has ever asked of me (and may have even, at times, prayed I’d stop yapping about), are homemade ice cream sandwiches. Why? Because it’s devastating when you realize something that should bring us nothing but incandescent summer joy — ice cream! cookies! — rarely work as well as promised. Most cookies become so hard once frozen, you feel like you’re breaking a tooth with each bite. Unyielding cookies also squeeze the ice cream out the sides, leading to drips down your arms and an immediate bad mood (for adults; kids, naturally, love it). While writing Smitten Kitchen Keepers, I became obsessed with creating a deeply nostalgic homemade chipwich-style ice cream sandwich that did everything right and I had three big a-ha moments along the way:

Read more »

Gluten-Free Pancakes

17 June 2025 at 20:07
gluten-free pancakes recipe

Pancake lovers, this recipe is for you, whether you’re gluten-free or not! This easy recipe calls for one wholesome flour—oat flour—and basic ingredients like Greek yogurt, maple syrup, butter and eggs. (If you don’t have oat flour on hand, you can easily make your own by blending old-fashioned or quick-cooking oats in a food processor or blender.)

These golden pancakes are fluffy and delicious, with a subtle oatmeal flavor. The yogurt offers a light tang similar to buttermilk, along with some extra protein, and the maple syrup is more flavorful than plain sugar.

You could certainly say that these pancakes are healthier than your average stack of pancakes, especially when you choose wholesome toppings to go along with them. Above all, though, they’re a fun treat to serve on the weekends, and they reheat beautifully for quick weekday breakfasts.

Continue to the recipe...

The post Gluten-Free Pancakes appeared first on Cookie and Kate.

Pumpkin Cheesecake with Pecan Praline Sauce

By: David
16 November 2024 at 21:56

It’s that time of year again. And that only means one thing: time to start thinking about the holiday baking. In Paris, bakery windows fill up with Bûches de Noël (Yule log cakes) and bourriches (wooden crates) of oysters are piled up at the markets. The chocolate shops are crammed with people, buying multiple boxes as gifts, and people splurge on caviar and Champagne, one of the few things that go on sale in France during the holidays.

One thing you don’t see is the use of pumpkin in desserts. A tart or pie (or ice cream) made of squash might sound funny, especially to non-Americans, but helps to remember that pumpkins, and other squash, are technically fruit. One could also point out the classic Swiss Chard Tart from Provence (which is in a whole other category), and Melanzane al cioccolato, eggplant with chocolate sauce, which I like. (Which one could argue is good because it’s smothered in dark chocolate.) But I don’t think everything goes with chocolate: A friend tried the hot chocolate with oysters at a famed chocolate shop in Paris, and after her description, I wasn’t rushing over there to try a cup.

To get that last image out of your mind, I present pumpkin cheesecake with a pecan praline sauce, that has nothing not to like about it. Cream cheese and sour cream, a buttery cookie crust, and a brown sugar and bourbon-tinged sauce loaded with crunchy pecans. I’m in.

DIYers may raise an eyebrow at using canned pumpkin. I’ve got a few reasons for using it. (And as many of you perhaps know, it’s not made from pumpkin, but a variety of squash similar to butternut squash.) One, is that when writing a recipe, it’s easy to get consistent, similar results when we’re all using the same ingredient. And two, it’s a heckuva lot easier, which is appreciated around the holidays when all of us have enough on our plates, and in our ovens, and it’s  fewer dishes to wash to boot.

If you want to go the other route, you can also make your own cream cheese and Graham crackers, grow your own pecans, churn up your own butter, and make your own cake pan. If you do go that route, let me know when your cheesecake is done ; )

In the meantime, I’m standing over my stove, stirring warm, just-toasted pecans into my praline sauce before lacing it with a dash of bourbon.

The praline sauce is decidedly on the sweet side. But that didn’t stop me (like, at all…) from dipping my spoon into it over and over and over again. Be sure to toast the pecans before using them. My pet-peeve in restaurants is when they don’t toast nuts. Toasting any nut usually improves it by at least 99%, if not more, so if you’re not consistently toasting your nuts before using them on salads, sauces, and in ice creams, start doing it now. It’s not too late.

But I can’t imagine this cheesecake being served without it. Although I could imagine eating the sauce without the cheesecake. And if you’re anything like me, you might find yourself spooning it over ice cream, ladling it over pumpkin pie (without the marshmallow topping), or even spooning it right into your mouth, like I do.

Print

Pumpkin Cheesecake with Pecan Praline Sauce

If using canned pumpkin, make sure that you don't use canned pumpkin pie 'filling' (which is sweetened and spiced); use canned pumpkin that is 100% pumpkin puree. If you want to make sugar pumpkin puree yourself, you can split a sugar pumpkin (or butternut squash) in half and scrape out the seeds. Butter the cut side of the pumpkin and bake cut side down on a parchment-lined baking sheet in a 375ºF/190ºC oven until very tender, about 35 to 45 minutes. When cool enough to handle, scoop out the flesh and puree in a blender or food processor, or pass it through a food mill. If you want to balance the sweetness of the sauce, you could add a scant teaspoon of apple cider vinegar or lemon juice to it, or to taste. Conversely, adding more liquor will take the edge off as well. Outside of the U.S., I often use speculoos cookies in place of the Graham crackers for the crust. If you go that route, you might want to reduce the butter in the crust by about 20% since speculoos cookies tend to be more buttery than Graham crackers. I use a glass-bottom springform pan for cheesecakes, which makes serving them much easier.
Servings 12 servings

Ingredients

For the crust

  • 1 1/2 cups (180g) Graham cracker crumbs
  • 4 tablespoons (60g) melted butter
  • 2 tablespoons sugar
  • 1/4 teaspoon ground cinnamon

For the pumpkin cheesecake filling

  • Three 8-ounce (680g) packages cream cheese at room temperature
  • 1 1/4 cups (250g) sugar
  • grated zest one lemon preferably unsprayed
  • 4 large eggs at room temperature
  • One 15-ounce (425g) canned pumpkin puree
  • 1/2 cup (125g) sour cream or whole-milk plain yogurt
  • 1 tablespoon cornstarch or 2 tablespoons flour
  • 1 teaspoon vanilla extract
  • 1 teaspoon ground cinnamon
  • 3/4 teaspoon dried ground ginger
  • 1/4 teaspoon ground nutmeg
  • 1/4 teaspoon ground cloves
  • pinch of salt

Pecan praline sauce

  • 3/4 cup (105g) packed light or dark brown sugar
  • 1/2 cup (125ml) heavy cream
  • 6 tablespoons (85g) unsalted butter
  • 1/4 cup (60ml) maple syrup
  • 1/2 teaspoon kosher or sea salt
  • 1/4 cup (60ml) bourbon
  • 1 1/2 cups (160g) pecans toasted and coarsely chopped
  • 1/2 teaspoon vanilla extract

Instructions

  • To make the crust, in a medium bowl, mix the Graham cracker crumbs together with the melted butter, sugar, and cinnamon until the crumbs are thoroughly moistened. Butter a 9-inch (23cm) springform pan then press the crumbs evenly across the bottom of the pan. Refrigerate until ready to bake.
  • Preheat the oven to 350ºF (180ºC). Bake the crust until it feels set in the center, 10 to 12 minutes. Let cool on a wire rack. Turn the oven down to 325ºF (165ºC).
  • To make the filling, in the bowl of stand mixer fitted with the paddle attachment (or by hand, in a large bowl), beat together the cream cheese, sugar, and lemon zest, until smooth. Add the eggs one at a time, stopping the mixer between each addition to scrape down the sides of the mixing bowl, then add the pumpkin puree, sour cream, cornstarch or flour, and vanilla extract, along with the spices and salt.
  • Line the outside bottom of the springform pan with foil so it reaches all the way up to the top of the outside of the pan. If you have to use several pieces, I recommend triple-wrapping it to prevent leaking or water getting in the cake pan. (Better yet, use extra-wide foil, so you only need one sheet.) Scrape the mixture into the prepared springform pan and smooth the top. Place the cheesecake in a larger pan, such as a roasting pan, then add very warm water to the larger pan until it reaches halfway up the outside of the cake pan.
  • Bake the cheesecake in the oven until the center looks just slightly set, but not wet and sloshy in the center when you jiggle the pan. I start checking the cheesecake at the 50 minute mark, as it usually takes about 50 minutes to 1 hour, but may take up to 1 hour and 15 minutes. Remove the cake from the oven, then remove the cake from the water bath and let cool completely on a wire rack. Refrigerate for at least 4 hours before serving.
  • Make the pecan praline sauce by heating the brown sugar, cream, butter, maple syrup and salt in a medium saucepan over medium-high heat, until it comes to a boil, stirring frequently. Let boil for 1 minute without stirring. Remove from heat and add the bourbon, pecans, and vanilla.

Notes

Serving: Run a sharp knife around the outside of the cheesecake to release it from the springform pan, then remove the sides of the pan. Dip the knife in warm water, wipe it dry, and use it to cut clean slices from the cheesecake. Serve with a ladleful of warm sauce poured over it. If the sauce gets too thick upon standing, you can thin it with milk or water.
Storage: The baked or unbaked crust can be made up to three days ahead and stored at room temperature (if baked), or refrigerated (unbaked). It can also be frozen either baked or unbaked for 2-3 months. The baked cheesecake will keep for up to 4 days in the refrigerator.

Related Recipes and Links

Dulce de leche cheesecake

Ingredients for American Baking in Paris

Pumpkin Ice Cream

Cheesecake

Maple Pumpkin Flan

Homemade Graham Crackers (Smitten Kitchen)

Homemade bourbon (Bourbon of the Day)

Homemade salt (Ruhlman)

French Apple Cake

By: David
11 November 2024 at 15:42

It’s interesting how many views of Paris there are, which you notice if you follow the variety of voices that write about life in the City of Lights. (A mistake some writers make is to call it the City of Light, and ‘lights’ in actually plural.) I tend to find all the quirks and report on the sardonic side of things, which for some reason, always find their way into my life. But the main reason is that I live in Paris full time and don’t just get to sampe my way through the lovely pastry shops and meet chocolatiers, but like most Parisians, I also spend a fair amount of time wrestling with perplexing bureaucracy and other idioms of life in the City of Fight Light.

For example, last week I went to the largest fabric store in Paris where I always buy étamine (cotton gauze), which I couldn’t locate so I asked a salesperson to direct me there. He was having a nice chat with his co-workers but was kind enough to take a moment to tell me “Non”, they didn’t carry it…and went back to his conversation. After I raised an eyebrow and asked a few more times, just be sure, he and all the others in the group shook their heads, confirming with absolute certainty that they definitely did not have that in stock.

Because I was absolutely certain that they did, I went down one level and, of course, found a huge bolt of it right on top of the pile of other rolls of fabric. C’est comme ça

Having a French partner helps, and he also helps me in the kitchen, like when Romain arrived with a bag of apples from a friend’s farm in Burgundy. Some were dinged up a bit, as they weren’t from the supermarché, but French apples are delicious for baking, where bumps and bruises magically disappear.

So to keep things in perspective (as best I can…) I like to read other voices from Paris, such as Dorie Greenspan, whose book, Around My French Table, is a hefty collection of her favorite recipes and stories about Paris. She lives on the opposite side of the city, in a different neighborhood. And where I am sometimes defeated by city life, as a “part-time Parisian,” as she often calls herself, she manages to see the good in everything.

This is a very typique French recipe for home cooks, made with not a lot of ingredients, relying on no special techniques or hard-to-find equipment, and loved by all. The cake is easily mixed up in a bowl, scraped into a cake pan, and in less than the time it takes to run to the pâtisserie for a store-bought cake—or a seemingly simple length of fabric—you can have an authentic French cake…right from your own oven.

When a journalist interviewed me for an article about her, she ended the interview with; “So David, what is it like to sit around Dorie’s French table?”

I sat there for a few moments scratching my head to remember, then not sure of what to say, I finally replied, “I’ve not sat around Dorie’s French table.” Which was true. When she comes to Paris, we generally go out exploring. The idea of sitting indoors while Paris awaits just isn’t as interesting to me as sharing pastries on a park bench or hitting an outdoor market with her.

If you want to sit at Dorie’s table, the line starts here. However while you wait, you can feast on her recipes, just as I’m doing.

Print

French Apple Cake

Adapted from Around My French Table by Dorie Greenspan
Dorie doesn’t specify any type of apple but instead advises that you should use a mix of them. I don’t know what kind mine were since Romain brought them to me. The rum is really a great flavor in this cake, but if you’re avoiding alcohol, you could double or triple the vanilla to compensate. I also like this recipe because you can make it with ingredients easily on hand. Being American, I was tempted to add a dusting of ground cinnamon to the apples, but then it wouldn’t be authentically French. Hence I often decide to add a dollop of crème fraîche alongside, but it's wonderful just as it is.
The original recipe uses a springform pan but if you don't have one, you can use an 8-inch (20cm) cake pan, buttering it well and lining the bottom with a circle of parchment paper before adding the batter. I've also make it in a 9-inch (23cm) cake pan and it works well, although it won't be a high.
Course Dessert
Cuisine French
Servings 8 cake

Ingredients

  • 3/4 cup (110g) flour
  • 3/4 teaspoon baking powder
  • pinch of salt
  • 4 (about 2 pounds, 1kg) large apples a mix of varieties
  • 2 large eggs at room temperature
  • 3/4 cup (150g) sugar
  • 3 tablespoons dark rum
  • 1/2 teaspoon vanilla extract
  • 8 tablespoons (115g) butter salted or unsalted, melted and cooled to room temperature

Instructions

  • Preheat the oven to 350ºF (180ºC) and adjust the oven rack to the center of the oven.
  • Heavily butter an 8-inch (20cm) springform pan and place it on a baking sheet.
  • In a small bowl, whisk together the flour, baking powder, and salt.
  • Peel and core the apples, then dice them into 1-inch (3cm) pieces.
  • In a large bowl, beat the eggs until foamy then whisk in the sugar, then rum and vanilla. Whisk in half of the flour mixture, then gently stir in half of the melted butter
  • Stir in the remaining flour mixture, then the rest of the butter.
  • Fold in the apple cubes until they’re well-coated with the batter and scrape them into the prepared cake pan and smooth the top a little with a spatula.
  • Bake the cake for 50 minute to 1 hour, or until a knife inserted into the center comes out clean. It may take less time, depending on the apples, so check the cake 5 or so minutes before the recommended baking time. Let the cake cool for 5 minutes, then run a knife around the edge to loosen the cake from the pan and carefully remove the sides of the cake pan, making sure no apples are stuck to it.

Notes

Serving: Serve wedges of the cake just by itself, or with crème fraîche or vanilla ice cream.
Storage: The cake will keep for up to three days covered. Since the top is very moist, it’s best to store it under a cake dome or overturned bowl.

Related Posts and Recipes

Sauce Gribiche, Au Pif

Tuesdays with Dorie

WTF

French Tart Dough

American Baking Ingredients in Paris

Apple Spice Cake

L’enfer

Apple Jelly

glazed apple cider doughnut cake

By: deb
22 October 2024 at 18:51

Confession time! As someone with more opinions than I can fit in three cookbooks, one audiobook, and even 18 years of archives on this website, sometimes when I want to grumble about something food-related but it’s not the time or place, I tuck it in a little document called “rants” that is so full of cringe, you only have my permission to publish posthumously. But I can’t write a headnote for this particular cake without first owning up to #23 on the list in advance: “Apple cider cakes are lies.” Which begs the questions: Who hurt you, Deb? What gives? Essentially, my quibble is that you can put all of the wonderful fresh-pressed apple cider you want in a cake, but it rarely comes through to actually taste like apple cider. The flavor is not robust enough. I’m not saying it can’t be wildly delicious with all of the cinnamon spice we also put in these cakes, but it rarely, to me, tastes like an accurate representation of its name.

Read more »

Caramelized Peanut Coffee Cake

By: David
20 January 2024 at 15:27

Whenever I’m looking through a new cookbook, what never fails to make me bookmark a recipe is when I come across something that has caramelized nuts on it, or in it. Whether it be Honey-Almond Squares or Swedish Almond Cake, you can be sure you’ll find me in my kitchen within the next 24 hours, and baking it. This Caramelized Peanut Cake that takes very little effort to make, but yields big rewards. Big, crunchy, peanutty ones, with a bonus of moist, buttery cake underneath, holding it all together.

The good thing about this cake (aside from it being covered with a generous pile of caramelized salted peanuts, as if it can get any better than that) is that you likely have most of the ingredients already on hand. That was my case, so I was able to make it right away. The only ‘technique’ you need to master is boiling butter, honey, cream and sugar, then stirring in the roasted peanuts. The topping couldn’t be easier.

This recipe is adapted from The Joys of Baking, an unabashedly sweet ode to baking by Samantha Seneviratne that riffs off stories and situations in her life, ones that inspired the recipes. Gingered Cashew Nut Brittle showered with sesame seeds, a Roasted Plum Cloud Cake topped with swirls of snowy meringue, bittersweet Amaro Stracciatella Ice Cream, and Salted Chocolate-Covered Chocolate Caramels are the kinds of things that I’d agree are a joy to bake, and to eat.

So how could I resist cake topped with SALTED CARAMELIZED PEANUTS? Sorry for shouting, but this cake is something to shout about. I mean, just look at it…

The only difficulty you might encounter is getting the cake neatly out of the pan. Mine got a little dark around the edges (why, oh why, wasn’t I born a food stylist, to make mine as neat as the one in the photo in the book?) I found that letting the cake rest for about 5 to 10 minutes after it comes out to the oven, then using a sharp paring or utility knife that’s either sprayed with a bit of non-stick spray, or lightly greased, to separate the sides from the cake pan while it’s still warm, is your best bet for easy (or easier) removal of the ring of the springform pan. Any pieces that fall off can be reaffixed to the cake.

Or let them cool…and eat them yourself.

Which is what I did with the missing chunk in the photo, above. (Why, oh why, wasn’t I born with photo editing skills?) But honesty is the best policy, and I hope you’ll trust me when I say this cake is as good as it looks. And if a few pieces go missing, here and there, well – you only have yourself to blame. But unlike me, you don’t have to tell anyone about it.

Print

Caramelized Peanut Coffee Cake

Adapted from The Joys of Baking: Recipes and Stories for a Sweet Life by Samantha Seneviratne
One tip: If you have low-fat milk on hand, you don't need to go out and buy whole milk just to make this cake. Since the topping only calls for 1/4 cup (60ml) of cream, you'll likely have some leftover cream if you've gone out and bought a carton or bottle. So you can mix some of that cream in 50:50 proportions with low-fat milk to approximate whole milk. Another tip from a reader, who used a silicone cake mold (which I don't own) and said the cake slipped out of the mold easily and the sides didn't get too dark.
Servings 8 servings

Ingredients

For the peanut topping

  • 6 tablespoons (3 ounces, 85g) unsalted butter cubed
  • 1/3 cup (65g) sugar
  • 3 tablespoons (60g) honey
  • 1/4 cup (60ml) heavy cream
  • 1 1/2 cups (7 ounces, 195g) roasted, salted peanuts

For the cake

  • 6 tablespoons (3 ounces, 85g) unsalted butter cubed, at room temperature
  • 2 cups (280g) flour
  • 2 teaspoons baking powder preferably aluminum-free
  • 1/2 teaspoon kosher or sea salt
  • 1 cup (200g) sugar
  • 1 large egg at room temperature
  • 2 teaspoons vanilla extract
  • 3/4 cup (180ml) whole milk at room temperature

Instructions

  • Butter the sides and bottom of a 9-inch (23cm) springform pan very well. Preheat the oven to 350ºF (180ºC).
  • To make the peanut topping, warm the unsalted butter, sugar, honey, and heavy cream in a small saucepan, stirring occasionally until the butter is melted. Bring the mixture to a boil and let it cook at a low, but steady boil, for 3 minutes. Remove from heat and stir in the peanuts. Set aside, stirring every once in a while to cool it down, while you make the cake batter.
  • In a small bowl, sift or whisk together the flour, baking powder, and salt.
  • In the bowl of a stand mixer fitted with the paddle attachment, or in a large bowl mixing by hand with a spatula or wooden spoon, beat the butter and sugar until light and creamy, about 3 minutes. Reduce the speed to low and add the egg and vanilla extract, stirring to combine. (You may want to stop the mixer during the step, and scrape down the sides if using a stand mixer, to make sure all the ingredients are well incorporated.)
  • Stir half of the flour mixture into creamed butter (with the stand mixer set on low speed), then add the milk, then mix in the rest of the dry ingredients.
  • Scrape the batter into the prepared pan and smooth the top. Spoon the peanut mixture over the top of the cake. It will have thickened up but do your best to make sure it's relatively even, and avoid pushing it right up to the sides of the pan, as it'll stick to the pan and make it a little difficult to release later.
  • Bake the cake for 50 to 55 minutes, until a toothpick inserted into the center of the cake comes out clean. Do not touch the top of the cake to check for doneness as the caramel is hot and sticky, and it can burn. (Trust me...) Let the cake stand 5 to 10 minutes, then lightly grease a paring or utility knife and run it around the outside of the cake to release it from the sides of the pan. Then remove the outside ring of the springform pan. If any bits of caramelized peanuts stick or come off when removing the outside ring, either reunite them with the cake, or let them cool and eat them yourself.

Notes

Serving: Serve the cake just as it is, or with lightly whipped cream or a favorite flavor of ice cream.
Storage: The cake is best the day it's made but can be kept at room temperature for up to three days either well-wrapped or under a cake dome.
❌