❌

Normal view

Your soup needs a little vinegar

5 October 2026 at 16:30

There comes a point in the life of many soups when they get a little sleepy.

This happens especially often with soups that are creamy, starchy or β€” blessedly β€” both. Everything is humming along just fine. The onions are soft. The garlic is fragrant. The spices have bloomed. You taste a spoonful and think, Hmm. So you add another pinch of seasoning. You taste again. Still: Hmm.

At this point, most of us instinctively reach for the salt.

But I’d like to gently intercept your hand on the way there and redirect it toward wherever you keep your vinegar. Some swear by the pantry, others insist upon the refrigerator; we will not allow ourselves to be distracted from our soup scholarship by these sectarian squabbles (at least not this week).

Because sometimes your soup doesn’t need more salt. It needs acid.

A small splash of vinegar at the end of cooking can give a tired pot an almost startling jolt. Vegetables taste brighter. Herbs seem greener. Starchy soups feel less pasty on the tongue. Spices that had faded into the background suddenly become legible again. Depending on how much you add, you might even get a delectable little Oh, what is that? pucker at the end of each bite.

I love lemon in soup, too. Sometimes I want the lemon flavor to be the whole point: a lemony avgolemono, for instance, or a chicken stew that tastes unabashedly citrusy. But lemon can announce itself loudly. Same with lime.

Vinegar can be more like a gentle wake-up than a glass of water to the face.

I first really understood this while making Alison Roman’s dill-packed potato-leek soup, published originally a little over five years ago, which finishes with white wine vinegar. Roman writes that the vinegar makes the soup taste β€œalmost like a pickle.” I went into the recipe expecting exactly that, was delighted to find it delivered and started experimenting with the same trick in soups of my own.

The key here is finishing with vinegar. There are, of course, soups where acidity is built in earlier: Chinese hot-and-sour soups, borscht and various Eastern European sour soups all have their own traditions and techniques. But that’s a different lesson.

For our purposes, cook your soup until it’s essentially done. Then, before making the final salt adjustment, add about 1/2 teaspoon to 1 teaspoon of vinegar. Stir it in thoroughly and give it a moment. I actually like to step away from the stove at this point. Get some water. Wash a spoon. Pop my head out the kitchen window like a dog on a road trip. Then come back and taste again.

Vinegar is firmly in the category of ingredients that are easier to add than subtract. You’re not necessarily trying to make the soup taste vinegary. You’re waiting for everything else in the pot to suddenly taste more like itself.


Want more great food writing and recipes? Sign up for Salon’s free food newsletter, The Bite.


Different vinegars naturally play better with different soups. Red wine vinegar is wonderful with hearty lentil, bean and farro soups, and I love it in beef stew. It can also rescue a tomato soup that’s drifted too far toward sweetness.

White wine vinegar β€” or even plain distilled white vinegar β€” is excellent with potatoes, creamy chicken soups and corn chowders. Think of the logic of salt-and-vinegar potato chips: starch loves that sharp little counterpoint.

For sweeter, earthier soups made with squash or root vegetables, I tend toward vinegars with a little fruitiness of their own, like apple cider vinegar or my current favorite, white balsamic.

There are exceptions. I probably wouldn’t start splashing vinegar into a delicate seafood bisque. And broccoli-cheddar soup, for me, remains a no-fly zone. Not every pot requires intervention.

But many do.

I learned to cook thinking that β€œfinishing” a dish meant adding enough salt and pepper. Then fresh herbs were a revelation. Acid was another one: a reminder that a finished dish doesn’t necessarily need more flavor so much as it sometimes needs contrast.

That’s especially true of this week’s soup: a hot honey carrot and sweet potato number built with garlic, onion, coriander, paprika, cumin, red pepper flakes and miso, then rounded out with savory stock and coconut milk.

Before the vinegar, it tasted good β€” but a little too sweet and a little too earthy. The white balsamic changed the geometry of the whole bowl. The sweetness of the vegetables became more nuanced instead of landing like a sledgehammer. The spices emerged. The stock tasted more savory. And instead of registering immediately, the hot honey left a gentle warmth at the back of each bite.

So that’s your homework for week two of Soup School: When your next pot tastes fine but somehow unfinished, don’t automatically add another shower of salt.

Add a little vinegar.

Let it sink in.

Then taste again.

Hot Honey Carrot and Sweet Potato Soup

Building on last week’s lesson, this soup starts in the oven, where carrots, sweet potatoes, scallions, miso, hot honey and a deliberately assertive amount of spice get deeply caramelized before ever meeting the stockpot. Coconut milk softens the edges.Β 

Then, incorporating this week’s lesson, white balsamic or apple cider vinegar keeps the root vegetables’ sweetness from becoming cloying.

A note on the spices: There are a lot of them. That’s intentional. Sweet potatoes and carrots can take it, and the coconut milk mellows everything considerably. If you’re particularly sensitive to heat, though, feel free to scale back the red pepper flakes and hot honey.

Yields
4Β servings
Prep Time
10 minutes
Cook Time
50Β  minutes

Ingredients

  • 2 medium carrots, roughly chopped

  • 1 cup diced sweet potato, fresh or frozen

  • 2 tablespoons sliced scallion greens, plus more for serving

  • 1 tablespoon olive oil

  • 3 teaspoons garlic powder

  • 3 teaspoons onion powder

  • 3 teaspoons ground coriander

  • 3 teaspoons smoked paprika

  • 3 teaspoons ground cumin

  • 3 teaspoons red pepper flakes, or less to taste

  • 1 tablespoon white miso paste

  • 3 teaspoons hot honey, plus more to taste if desired

  • 1 cup chicken or vegetable stock, divided

  • 1 cup full-fat canned coconut milk

  • White balsamic vinegar or apple cider vinegar, as needed

  • Kosher salt, to taste

  • Coconut cream, for serving

  • Crusty bread, for serving

Β 

Directions

  1. Heat the oven to 425 F.
  2. Add the carrots, sweet potato and scallions to a Dutch oven. Drizzle with the olive oil, then add the garlic powder, onion powder, coriander, smoked paprika, cumin, red pepper flakes and miso. Drizzle the hot honey over everything and toss thoroughly to coat.
  3. Transfer the uncovered Dutch oven to the oven and roast for about 25 minutes, until the vegetables are tender and beginning to caramelize around the edges.
  4. Remove the pot from the oven. Transfer about half of the vegetable mixture to a blender and blend until smooth, then return it to the Dutch oven. Alternatively, use an immersion blender directly in the pot, stopping while plenty of texture remains.
  5. Set the Dutch oven over medium heat and add 1/2 cup of the chicken or vegetable stock. Cook, stirring occasionally, until the mixture becomes thick and deeply aromatic. Add the remaining 1/2 cup stock and the coconut milk.
  6. Bring to a gentle simmer and cook for about 20 minutes, allowing the flavors to meld and the soup to thicken slightly.
  7. Remove the soup from the heat. Add 1 teaspoon of white balsamic or apple cider vinegar and stir well. Give it a moment, then taste. Continue adding vinegar, 1 teaspoon at a time, until the soup tastes bright and the sweetness, spice and savoriness feel balanced.
  8. Only then, add salt to taste.
  9. Ladle into bowls and finish simply with fresh scallions and a small swirl of coconut cream. Serve with crusty bread.

This story originally appeared in β€œThe Bite,” my weekly food newsletter for Salon. If you enjoyed it and would like more essays, recipes, technique explainers and interviews sent straight to your inbox, subscribe here.

Β 

The post Your soup needs a little vinegar appeared first on Salon.com.

simple chicken tacos

By: deb
30 September 2026 at 23:00

Twenty years ago, I started this website because I wanted a place to share recipes I was excited about, as it’s practically coded into my DNA to be an unfettered yap about the things I love. [This is me.] The larger context was that upon reaching so-called adulthood, I’d found that while I knew how to cook, there were still so many things I hadn’t figured out, such as: how to turn a can of tomatoes into not just an okay pasta sauce, but a spectacular one; how to make really good meatballs; perfect hummus; and a crumb cake I’d want to make forever.

simple chicken tacos-01
simple chicken tacos-02

You’d think that 20 years and more than 1400 recipes later, I’d be closing this chapter. What could there possibly be left to know? Haven’t we kale salad-ed and tomato soup-ed and apple pie-d our way to fulfillment yet?

Well no, absolutely not. In fact, most days, I feel like I’m just getting started.

Read more Β»

For better soups, start in the oven

28 September 2026 at 16:30

For a while, I kept a soup journal.

Not a recipe journal, exactly. More like field notes. If I ate a soup I liked out in the world, I’d jot down what was in it, what the broth tasted like, sometimes sketch the bowl. I just adore the form.

Especially when I lived alone, it was not unheard of for all three meals in a day to be soup. One particularly triumphant day started with congee in Washington, D.C., continued with enchilada soup at an airport Chili’s and ended with pastina back home in my pajamas.

So, in honor of soup season, I’ve decided to spend the next few weeks of β€œThe Bite,” Salon’s food newsletter, teaching what I’ve started referring to in my notebook at Soup School: a loose little series about the patterns that make soup better. We’ll talk about the ingredient your soup is probably missing β€” vinegar! β€” plus better soup toppers and, eventually, how to host a soup party.

But lesson one is the foundation for a lot of the soups I make at home: Start in the oven.

I don’t mean every soup. Some soups depend on freshness, delicacy or a particularly clean broth, and I’ll get to those. But when I want depth, sweetness, browning and the kind of flavor that tastes like something has been cooking much longer than it actually has, I start by roasting.

Here’s the method.

Roast what’s in the pot

Tomato soup was the one that made this click for me.

Mine started with garlic, red onion, sun-dried tomatoes, cherry tomatoes, fennel, olive oil, spices and an anchovy or two, all piled into a Dutch oven and roasted together.

The oven transformed every ingredient differently. The onion and fennel softened, browned and grew sweeter. The anchovy sizzled itself into the oil coating those browned alliums. The cherry tomatoes burst, their skins turning silky and their juices almost pasty around the edges. The sun-dried tomatoes somehow became even more concentrated. The spices perfumed absolutely everything.

By the time the pot came out of the oven, most of the flavor was already there.

That, to me, is the whole appeal of the method. You can build a similar kind of depth on the stovetop, of course, but the oven does a lot of the work for you. Dry heat browns, evaporates and concentrates while you go do something else.

And when you roast, push things a little farther than may initially feel instinctive.

Your vegetables should not be pretty anymore. I want onions slumped and browned at the edges. Tomatoes wrinkled and burst. Mushrooms dark. Carrots blistered. Bits sticking to the bottom of the pot. If everything still looks ready for a glossy farmers market photo shoot, give it another few minutes. This works beautifully with fresh vegetables, but frozen vegetables are welcome, too. So are drained canned beans.Β 

Douse whatever you have in oil, season it well and let it get ugly.

Roast your flavor boosters, too

This is also when I deploy what I lovingly think of as my potions and powders: anchovy, tomato paste, miso, soy sauce, fish sauce, bouillon paste or cubes, mushroom and brown gravy powder.

Not all at once, obviously, though I respect the chaos.

The point is to let those deeply savory ingredients spend some time in the heat rather than simply dissolving them into broth at the end. Tomato paste darkens. Anchovy melts into the oil. Spices bloom. Everything has a chance to mingle before the soup gets diluted.

Deglaze before you add the broth

Once everything is properly roasted, I add just enough broth to loosen the browned, sticky bits from the bottom of the pot. Not a carton. Not even close. At this point, the broth isn’t there to create the flavor. It’s there to capture what the oven already made.

Scrape thoroughly. Those dark little bits on the bottom are part of the soup now.

Blend only part of it

For a lot of vegetable, bean and chowder-style soups, I blend about half of what’s in the pot.That gives you body without turning the whole thing into purΓ©e. The blended vegetables thicken the broth, while the rest keep enough texture to remind you what you’re eating.

You can do this in a blender or with an immersion blender (though I tend to like the control of scooping part of the mixture into a blender and leaving the rest alone.)

Reduce it again

Here is the part that feels a little counterintuitive: after going to the trouble of deglazing the pot, I often cook everything back down again. I let the blended and unblended mixture simmer until it gets thick, concentrated and almost sticky. Then I add my final stock, cream or coconut cream until the soup reaches the consistency I actually want.

This is one of my strongest soup opinions: don’t drown the thing you just concentrated.

You can always add more broth. You cannot easily take it back out (though, if you do, it’s not the end of the world: just let the soup reduce longer.)Β 

Add a little. Stir. Taste. Add more if you need it.


Want more great food writing and recipes? Sign up for Salon’s free food newsletter, The Bite.


Finish last

Once the texture is right, I finish with whatever gives the soup its final bit of life: herbs, citrus zest, salt, black pepper, maybe cream. Those ingredients don’t need half an hour in the oven. They need to stay bright.

Once I noticed this pattern, I realized it’s how I make most of my favorite soups: tomato soup, corn chowders, vegetable soups, bean soups and even chicken soup.

For chicken soup, I roast thighs on a bed of onion, garlic, carrot and celery with big lemon slices, garlic powder, onion powder and plenty of black pepper. Once the chicken is cooked, I pull it out to shred later, while the vegetables underneath β€” softened in chicken fat, lemon and all those browned juices β€” become the base of the soup.

I am certainly not claiming to have invented roasted chicken soup. Italian penicillin nonnas have been several centuries ahead of me on that front. But the example stands.

Roast first. Deglaze. Blend some. Reduce. Reconstitute. Finish.

Know when not to do any of this

There are plenty of soups I would never subject to this treatment.

If I want something fresh, delicate or particularly clean-tasting, I stay on the stovetop. A clear miso broth with beautiful soft cubes of tofu doesn’t need caramelization. Neither does a simple cream of potato or parsnip soup (more on those next week!), or a bright, stewy pozole verde.

My spring pea soup β€” peas, stock, cream, dill, black pepper and lemon zest β€” absolutely does not belong in the oven. She is delicate. Leave her alone.

But if the goal is depth, browning and concentration, this is the pattern I come back to over and over.

Take the vegetables you have. Fresh or frozen. Add some canned beans if you’ve got them. Douse the whole situation in oil and spices and roast until things get a little ugly. Deglaze. Blend some of it. Reduce it. Add broth carefully. Finish it with whatever makes sense.

It is not a precise science. It is not particularly pretty.

It is, however, delicious.

Garam Masala–Roasted Tomato Soup with Coconut Cream

This is a current variation on roasted tomato soup I’ve been making a lot recently: warmly spiced with garam masala, fennel and coriander, rounded out with miso and coconut cream. Garam masala is an Indian spice blend whose exact makeup varies, but it commonly includes warming spices like cumin, cardamom, cinnamon, cloves and black pepper.

Yields
4Β servings
Prep Time
15Β minutes
Cook Time
55 minutes

Ingredients

  • 2 large beefsteak tomatoes, roughly chopped

  • 1 medium white onion, roughly chopped

  • 4 to 5 garlic cloves

  • 1 tablespoon minced fresh ginger

  • 3 tablespoons olive oil

  • 1 tablespoon white miso

  • 1 tablespoon tomato paste

  • 1Β½ teaspoons garam masala

  • 1 teaspoon fennel seeds

  • 1 teaspoon ground coriander, or lightly crushed coriander seeds

  • Β½ to ΒΎ cup chicken stock, for deglazing, plus about 1 cup more to finish

  • β…” cup coconut cream, plus more for serving

  • Kosher salt and freshly ground black pepper, to taste

  • Sliced scallions, for serving

  • Fresh cilantro, for serving

  • Toasted bread, for serving

Β 

Directions

  1. Heat the oven to 375Β°F.
  2. Add the tomatoes, onion, garlic and ginger to a Dutch oven or other oven-safe pot. Add the olive oil, miso, tomato paste, garam masala, fennel and coriander and toss everything together until thoroughly coated.
  3. Roast for 30 minutes, then take a look. The tomatoes should be collapsing and the onions should be well softened and beginning to brown. Give everything a toss and return it to the oven for about 10 minutes more, or until the vegetables have achieved sufficient ugliness: deeply softened, browned around the edges and sticky in spots.
  4. Set the pot over medium heat and add Β½ cup chicken stock. Scrape up all the browned bits from the bottom, adding another splash of stock if needed.
  5. Transfer half the mixture to a blender and blend until completely smooth.
  6. Return the blended soup to the pot and let it simmer until it once again becomes quite thick and concentrated. Stir in about 1 cup additional stock and the coconut cream, adding the liquid gradually until the soup reaches the consistency you like.
  7. Taste and season with salt and black pepper as needed; remember that the miso and stock will already bring some saltiness.
  8. Ladle into bowls and finish with a drizzle of coconut cream, sliced scallions and plenty of cilantro. Serve with toasted bread for dragging through the bowl.

This story originally appeared in The Bite, my weekly food newsletter for Salon. If you enjoyed it and would like more essays, recipes, technique explainers and interviews sent straight to your inbox,Β subscribe here.

The post For better soups, start in the oven appeared first on Salon.com.

Don’t meal prep. Make yourself one nice thing

22 September 2026 at 16:30

Last Sunday night, my grocery order arrived without my usual breakfast sandwiches.

This ordinarily would not constitute a crisis. Except my little freezer stash of homemade breakfast burritos had also dwindled to nothing, and I knew exactly what Monday morning would look like without some intervention: Wake up. Realize there was nothing easy to eat. Debate whether I had enough time to stop somewhere. Get annoyed that breakfast had somehow become a decision I needed to make before coffee.

On busy weeks, I hate busy mornings.

Breakfast is consequently my most brainless meal. Give me something I can put in a 350-degree oven for a few minutes while I shower and become a person, and I am delighted. Weekends are different. On a Saturday, I will happily get up at 6 a.m. with coffee to babysit yeasted cinnamon rolls or start whisking hollandaise. The fuss is part of the pleasure.

Wednesday morning? Absolutely not.

So, standing in my kitchen Sunday night, I decided to give myself one nice thing.

I had two sourdough heels, two eggs and some cream, which meant I had the beginnings of either a sweet or savory strata. Savory sounded more like Monday, so I did what I think of as reverse-shopping: opened the refrigerator and started looking for ingredients that wanted to know each other. Half a can of diced tomatoes. Half a white onion. Four strips of bacon. A little shredded cheddar left from chili night. A jar of roasted red peppers.

Scrappy, yes. But coherent.

I whisked the eggs and cream with garlic powder, onion powder, dried thyme, oregano, red pepper flakes, salt and pepper, plus a little drizzle of soy sauce. Trust me. Then I added the tomatoes directly to the custard because I wanted the bread to soak up their sweet-savory juices rather than simply sit alongside them. In went the torn sourdough, which I thoroughly dunked in the custard, followed by crisped bacon, a small drizzle of bacon fat β€” sue me β€” cheddar, roasted peppers and minced onion. You could soften the onion first if you prefer, but I liked the little bit of bite it retained after baking.

The whole thing went into a greased 8-inch baking dish and into the refrigerator overnight.

Before bed, I also chopped one slightly wilting scallion and tucked it into a little bowl for morning.

This is perhaps the detail that best explains what I mean by β€œone nice thing.”

The next morning, I drizzled a little olive oil over the strata, put it into a 350-degree oven and went to shower. About 25 minutes later, I gave it another few minutes to brown, scattered my already-chopped scallions over the top and sat down to a breakfast that felt vaguely cafΓ©-quality on a Monday morning.

It felt cafΓ©-quality on Tuesday, too.

I’ve written before about my general resistance to rigid weekly meal prep. I’m much happier with an occasional Big Seasonal Prep Day β€” fill the freezer with soups, sauces, breakfast burritos and other useful things β€” and then let the ensuing weeks fall where they will.

But this fall, β€œone nice thing” has become something of a guiding star. It is a season in which a lot of energy is flowing out: two family weddings back-to-back, seven family birthdays between August and November, the usual work, a cookbook project, a documentary. When that much is going out, it feels especially good to do something small that preserves a little energy for me.

Importantly, β€œnice” is doing a lot of work here.

This isn’t about optimizing every meal, spending three hours prepping identical containers or constructing the sort of Sunday routine that makes you feel behind when you inevitably skip it.

It starts with a different question: What would make me disproportionately happy to discover already done tomorrow?

Maybe the answer is waking up and realizing you don’t have to hit the drive-thru for breakfast. Maybe it’s knowing you won’t have to pull out another knife for three days. Maybe it’s just opening the refrigerator and finding something cold and lovely to drink.


Want more great food writing and recipes? Sign up for Salon’s free food newsletter, The Bite.


Here are a few of my current β€œone nice things,” roughly in ascending order of effort:

  • Put tea bags in a jug of cool water and refrigerate overnight. Cold-brewed green tea the next day feels disproportionately fancy for something that took approximately 45 seconds.

  • Make one dip or dressing. For me, this is often cottage cheese ranch or a punchy vinaigrette β€” mostly because Future Me is considerably more enthusiastic about eating vegetables when there is something good to drag them through.

  • Make one big batch of Very Simple Soup. I’ll be sharing some of my favorites over the coming weeks, but a pot of soup in the fridge can quietly carry several lunches without asking much of you.

  • Put on a podcast or an episode of whatever you’re watching and chop the vegetables. I set up my cutting board at the bar in front of the television, clean and chop everything, then stash it in labeled deli tubs. Yes, in my personal estimation, making an entire batch of soup is easier than a dedicated vegetable-chopping session. Your mileage may vary.

  • Make something that gets better while you ignore it. Chili. Curry. Baked pasta. A strata like this one. Something that can sit in the refrigerator for a day or two and somehow become more itself.

The point isn’t to prepare yourself perfectly for the week.

It’s just to put one small pleasure into motion.

Tomato-Cheddar Strata with Bacon

Yields
4-6Β servings
Prep Time
15 minutes, plus overnight chilling
Cook Time
25Β  minutes

Ingredients

  • 2 to 2 1/2 generous cups torn sourdough bread

  • 2 eggs

  • 1/4 cup heavy cream

  • 1/2 can diced tomatoes, with their juices

  • 3 teaspoons garlic powder

  • 3 teaspoons onion powder

  • 3 teaspoons dried thyme

  • 3 teaspoons dried oregano

  • 3 teaspoons red pepper flakes, or to taste

  • A small drizzle of soy sauce

  • Salt and black pepper, to taste

  • 4 strips bacon, cooked crisp and crumbled

  • A little reserved bacon fat, optional

  • 1/4 cup shredded cheddar

  • 1/2 small white onion, finely minced

  • 1/4 cup chopped roasted red pepper

  • Olive oil, for the baking dish and finishing

  • 1 scallion, thinly sliced, for serving

Β 

Directions

  1. In a large bowl, whisk together the eggs, cream, garlic powder, onion powder, thyme, oregano, red pepper flakes, soy sauce, salt and black pepper. Stir in the diced tomatoes and their juices.
  2. Add the torn bread and toss well, pressing and turning the pieces so they thoroughly absorb the custard.
  3. Fold in the bacon, a small drizzle of reserved bacon fat if using, cheddar, onion and roasted red pepper.
  4. Transfer to a greased 8-inch baking dish. Cover and refrigerate overnight.
  5. The next morning, heat the oven to 350 degrees. Drizzle the top of the strata lightly with olive oil and bake for about 25 minutes, or until hot throughout and beginning to brown. Give it another 2 to 5 minutes if you’d like a little more color.
  6. Top with sliced scallions and eat immediately β€” or directly from the refrigerator tomorrow. I can confirm both are quite nice.

Β 

The post Don’t meal prep. Make yourself one nice thing appeared first on Salon.com.

tomato risotto with frizzled red onions

By: deb
16 September 2026 at 17:28

If you’re one of those people who gets irritated by the specter of pumpkin spice β€” or, gasp, Halloween decor β€” on an 85-degree week in September; if you understand that there are what will feel like infinite months left to spend shivering and longing for stew, and there’s no reason to beckon them any sooner; if you find yourself gritting out β€œbut there’s another week of summer!” at your screen when confronted with ads for wool coats and other things you simply refuse to acknowledge before you must, come sit down. You’re among friends.

Read more Β»

Moelleux of Summer Fruits

By: David
12 September 2026 at 16:32

This may or may not happen to you, but sometimes when I’m a guest in someone’s home, where everyone pitches in to make dinner, all eyes (or just the host’s eyes) fall on me to make dessert. Gulp. I happy to pitch in with the cooking or bringing along a few baked goodies for the weekend, but I’m not always prepared to bake on the spot.

If you’re lucky, there may be a scale, a cake pan, a sharp knife, and hopefully sugar, butter, eggs, and flour. If you’re really lucky, there might be a whisk and a spatula, too. But if you’ve ever tried to peel a dozen apples with a steak knife because it’s the only one that’s even close to sharp, or eyeball 1 cup/140g) of flour, you know what I’m talking about. I once did a post on Things I Bring When I’m a Guest for the Weekend, which raised the ire of some, but I require a minimum of a knife, a spatula, a bowl, and a cake pan if I’m going to bake something, like a cake.

You’re likely familiar with the Moelleux au chocolat, the soft warm individual melting cakes that everybody loves. (If you have the kind of friends that have six to eight ramekins, well, that’s great.) I recently saw French food writer and journalist FranΓ§ois-RΓ©gis Gaudy (his book, Let’s Eat France, translated into English, is a lot of fun and pretty amazing) make a Moelleux Γ  la abricotΒ on his Instagram page, which didn’t require a mixer or any special equipment. Not even a whisk!

His Apricot Cake was a very casual affair, baked in a rectangular mold on a sheet of parchment paper, and came out of the oven rather free-form, looking exactly like something that would come out of a French home cook’s kitchen, when baking dessert for friends. I’m fine with that but didn’t know if you were, so I thought I’d tinker with it and make it in a cake pan, which is easier to slice. I also fiddled around with the ingredients, as well as putting the brown granulated sugar on top (rather than underneath), to give the moelleux a nice sheen.

I used a springform cake pan but you can use any similar-sized vessel; an 8-, 9- or 10-square or round cake pan would work, or even a baking dish. The baking time will vary but if your experience with using a variety of ovens in other people’s homes is anything like mine, you’ll find that each one is different, and what one says is 350ΒΊF/180ΒΊC will be different than another whose dial says 350ΒΊF/180ΒΊC. I don’t travel with an oven thermometer but may add that to things I bring when I’m staying with people.

Tip: If you’re staying in someone’s place for the weekend, you can mix the dry ingredients in a container or zip-top bag then put the dessert together when you get there.

I made one cake with apricots first, which was sensational, but knowing fresh apricots are harder to come by elsewhere, I made another one with plums, which came out great as well. It would work with other summer fruits and berries but I really like the tanginess of apricots or plums against the moist cake layer, so stuck with those two. A handful of berries wouldn’t hurt either, but I do recommend keeping it simple.

Print

Moelleux aux fruits d'ete

Inspired by a recipe from French food writer and journalist FranΓ§ois-RΓ©gis Gaudry
The ground almonds are really delicious in the dessert, but if you can't get ground almonds (sometimes called almond meal or almond flour), you can use 1 1/4 cups (175g) of all-purpose flour in place of the mix.
The picture in the post of the batter shows 3 eggs being added, and I took that photo when I first tested the recipe, which I did a few more times after that. The final recipe that I came up with, below, uses 2 eggs.
Course Dessert
Servings 8 servings

Ingredients

  • 1 1/2 pounds (680g) apricots or plums (or another summer fruit, see headnote)
  • 3/4 cup, plus 2 tablespoons (100g) almond flour
  • 1/2 cup (65g) all-purpose flour
  • 1 1/2 teaspoons baking powder preferably aluminum-free
  • 1/4 teaspoon salt
  • 1 cup plus 2 tablespoons (230g) granulated sugar
  • 5 ounces (140g) unsalted butter at room temperature
  • 2 large eggs at room temperature
  • 1 teaspoon vanilla extract (or 1/2 teaspoon almond extract)
  • 1 1/2 tablespoons coarse granulated brown sugar such as tubinado sugar (or granulated white sugar)

Instructions

  • Halve the fruit and remove the pits. Slice the fruit into 3/4- to 1-inch (2-3cm) wedges. Set aside. Preheat the oven to 350ΒΊF (180ΒΊC.) Grease a 9-inch (23cm) springform pan very well with butter or non-stick spray. (If you don't have a springform pan, you can use another cake pan but it may be harder to get the cake out so you may want to also line the bottom with parchment paper.)
  • In a medium mixing bowl, stir together the almond flour, all-purpose flour, baking powder, salt, and sugar. (My preferred tool to use for this step is a silicone spatula.) Add the soft butter and mix it in with the spatula until it's broken up into little pieces, roughly the size of kernels of corn. Stir in the eggs and vanilla extract, until it's almost smooth. It's fine if there are small pieces of butter visible.
  • Scrape the batter into the prepared pan and smooth the top. Arrange the wedges of fruit on their sides in concentric circles over the batter, snugly placing the wedges against each other, pressing them gently into the batter as you go. Avoid putting them right up against the sides of the pan. It's best to leave some room for the batter to rise between the fruit and the pan, to avoid juices from the fruit adhering to the sides of the pan as the moelleux bakes. (It's unavoidable - and natural - if using juicy fruits, like plums, to have juice run out. But placing the slices not right up against the sides of the pan will help you get the cake out of the pan later.)
  • Sprinkle the coarse sugar over the top and bake until the center just feels set; a toothpick inserted into the center should come out free of cake crumbs stuck to it, about 1 hour. Remove from the oven and set on a cooling rack. If any fruit juices have bubbled up and stuck to the sides of the pan, run a knife around the outside of the cake, which will help it release later.

Notes

Notes: If you want to make this gluten-free, I'd go with the almond flour rendition, and use a gluten-free flour substitute in place of the wheat flour. If you want to reduce the sugar in the recipe, you could cut it by 6 tablespoons/75g and skip the sugar on top, although I wouldn't.

cucumber salad with sesame and rice vinegar

By: deb
12 August 2026 at 21:51

It is an error that needs correcting that in the near-20 years of plugging recipes into this url, only a few truly star cucumbers β€” and highly unrepresentative too, given that we are probably eating some format of cucumbers at half the nights of the week with dinner, and snacking on them throughout all of the other days. Crunchy, cold, hydrating, inexpensive, and taking well to any region of ingredients you wish to apply, I don’t need to sell you on their appeal, especially as we slog through our nth heat wave of the summer. I suspect that the lack of cucumber representation in the archives has more to do with the fact that little about cucumber salads brings out my inner obsessive recipe finetuner; usually I’m just throwing it together.

Read more Β»

Cherry Jam

By: David
31 July 2026 at 11:01

One of the first β€œrecipes” on this blog was No-Recipe Cherry Jam, posted in 2005, which wasn’t quite a recipe. Nevertheless, a lot of people successfully used those guidelines to make cherry jam over the last fifteen years. The basis for it was how I’ve been making jam forever, using 3 parts sugar to 4 parts fruit puree. The standard ratio is to use equal parts sugar to fruit puree but I like to use less.

I often make cherry jam with sweet cherries, which are what one usually finds at the market. But if you can find sour cherries, those are wonderful in the mix, but when fresh, they have a short shelf life so should be used, pronto.

So feel free to mix things up, cherry-wise!

Unlike other recipes, making jam can require a bit of using your instincts, rather than relying on set times and temperatures. Checking the jam texture on a chilled plate is the best way to tell you when it’s done. (As an example, jam usually sets between 218-220ΒΊF,103-104ΒΊC, but this one set a few degrees higher.) Because cherries are low in pectin, this one often β€œsets” a few degrees higher, although don’t expect cherry jam to be as stiff as other jams that you might be used to, or buy. It’ll be a bit runny, which is just how it should be.

One tool I do recommend is a cherry pitter. Not everyone has one, and they do fall into the β€œsingle use” category, but come cherry season, mine gets a good workout. I wrote more about why you should get a cherry pitter here.

The biggest question I get about jam recipes is people asking about reducing the amount of sugar in them. Sugar in jam does a couple of things. One, it helps the mixture jell, along with any natural pectin in the fruit. And two, it preserves it. If you use less, the jam will be runnier and won’t last as long.

Europeans tend to like their jams runnier than their American counterparts, so in the morning, you can have a European experience when you spoon some of this jam on your morning toast, as we do.

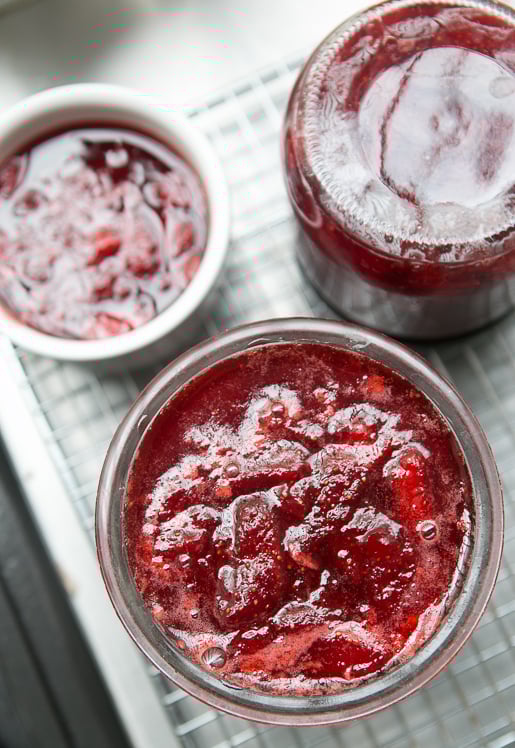
Unlike other jams that wrinkle when you do the wrinkle test (putting a spoonful of jam on a frozen plate, returning the plate to the freezer and when the jam wrinkles with you nudge it, it’s done), this one will be more like thickened syrup. It’s done when it’s thick and sticky and holds its shape for a few moments after you drag a spoon through it (below.) The cherries will be shiny and glossy, like beautiful ruby-colored jewels.

Print

Cherry Jam

If you only have 1 pound (450g) of cherries, feel free to cut the recipe in half. The liqueur is optional but heightens the flavors of the jam. Use only enough so it complements the fruit – you don't want to overwhelm it. As mentioned, this jam will be a bit on the runny side when "set." Sour cherries will produce a softer-set jam than sweet cherries.
Course Breakfast
Cuisine American
Keyword cherries, cherry, jam

Ingredients

  • 2 pounds (900g) sweet or sour cherries or a mix
  • 2 1/2 cups (500g) sugar
  • freshly squeezed juice of one medium lemon plus additional juice if desired
  • 1-2 drops of almond extract or 1-2 teaspoons of kirsch or another liqueur, such as amaretto or vodka

Instructions

  • Remove the stems and pit the cherries. Put them in a large non-reactive pot. If using only sweet cherries, add 2-3 tablespoons of water to the pot. (Sour cherries will exude enough liquid on their own so no need to add additional water.) Put a small plate or saucer in the freezer.
  • Cover the pot and cook over medium heat, stirring occasionally, until the cherries are wilted and cooked through, about 10 minutes.
  • Remove the lid and stir in the sugar and lemon juice. Increase the heat to medium-high and cook, stirring frequently until the mixture thickens. It's hard to say how long it will take, but when the mixture resembles the sixth picture in the post, the one in the pot with the bubbles, turn off the heat and test the jam by putting a small spoonful on the frozen dish. Return the dish to the freezer for a few minutes until the jam on it is cool. Run a spoon through it and if the liquid is very thick and leaves a clear patch, as shown in the photo in the post, it's done. If not, return the plate to the freezer and continue to cook the jam, testing it at various intervals, until it's done. (If you want to use a thermometer to check the jam, it should be ready somewhere between 220ΒΊ and 225ΒΊF, 104ΒΊ-107ΒΊC.)
  • When ready, turn off the heat and stir in the almond extract or liqueur (or both, if you wish). If desired, you could add an extra squeeze of lemon juice to balance the sweetness. Ladle into clean jars.

Notes

Storage: This jam will last several weeks in the refrigerator. If you wish to can it, you can find instructions here.
Β 

spaghetti aglio e olio

By: deb
28 July 2026 at 22:15

Do you ever look around at the ingredients available to you, the energy you have to give to the cooking process β€” or, as I recently explained to a medium-sized child shortly before I got uninvited from future family events, the amount of fudge you have left to give from your, uh, bucket of fudge β€” and decided to boil spaghetti, toss it with garlicky olive oil, and call it dinner?

Read more Β»

Pan-Fried Eggplant (Gaji-gui)

Pan-fried eggplant (gaji-gui) is a quick Korean side dish made with flour-coated eggplant and a savory soy sauce seasoning. Tender, juicy, and wonderfully smoky, it's ready in just 10 minutes.

house lemonade

By: deb
17 July 2026 at 16:23

I realize as far as recipes go, suggesting one needs one for lemonade is questionable. What’s next, a set of detailed instructions for salted water, simple syrup, or buttered noodles? (Whoops!) But it turns out I have opinions on everything and there’s no time like the nth heat wave of the summer to share what I consider the correct, best formula for lemonade and it is β€” who could have ever seen this coming? β€” mine.

Read more Β»

hot dogs with vinegared iceberg and potato chips

By: deb
1 July 2026 at 19:58

In something I never expected to have to clarify, this is a hot dog recipe but it is not a recipe for hot dogs. I know that I have a history of making foods from scratch that most sane people do not feel the need to β€” cream cheese, fig newtons, bagels, vanilla extract, and [coming soon] almond extract too β€” but I do still leave β€œgrinding meat with spices, salt, and curing agents into a smooth, fine emulsion” before being β€œstuffed into casings and smoked” to the experts, usually at Hebrew National.

Read more Β»

Dakgomtang (Korean Chicken Soup)

Dakgomtang is a comforting Korean chicken soup with tender chicken and a light, slightly milky broth. Served with rice, soy sauce relish, and spicy seasoning paste, it makes a delicious and satisfying meal.

strawberry chiffon shortcake, perfected

By: deb
17 June 2026 at 18:02

In 2007, when this website was still in its infancy, I shared a recipe for a layered strawberry chiffon shortcake. I’d never made a chiffon cake before, but I brought it to a friend’s rooftop birthday BBQ, correctly assuming that no one would be unhappy with a towering, featherweight cake sandwiched with whipped cream and fresh strawberries, however inexpertly made.

Read more Β»

Strawberry Jam

By: David
17 June 2026 at 08:22

Strawberry Jam recipe

I was recently gifted an overload of strawberries: I bought four baskets from a vendor at the market, whose booth I shop at often, and he threw in two extra baskets for free, the equivalent of a carte de fidelitΓ© (loyalty card) in Paris. So I’ve spent the past few days washing, hulling, cutting and cooking my unexpected bounty.

I’ve been making a number of things with the gorgeous strawberries. But I also realized that while I have a Strawberry-Rhubarb Jam recipe on the site, I didn’t have a strawberry jam. So here it is.

Strawberry Jam recipe

Although I’m giving you a recipe for the amount of strawberries that I used, you can use the same proportions if you have just a basket…or a bushel. You’ll just need to do a slight amount of math. Only the cooking time will change, so keep an eye on things.

Jam-making is not something you walk away from and you need to rely more on look and feel, rather than exact times. Another thing about jam-making is that fruit and berry jams are always better made in small batches; the shorter the cooking time, the better the flavor. So if you have more than 2-pounds (900g) of strawberries, consider making jam in a couple of batches rather than one big one.

Frozen zabaglione recipe

Print

Strawberry Jam

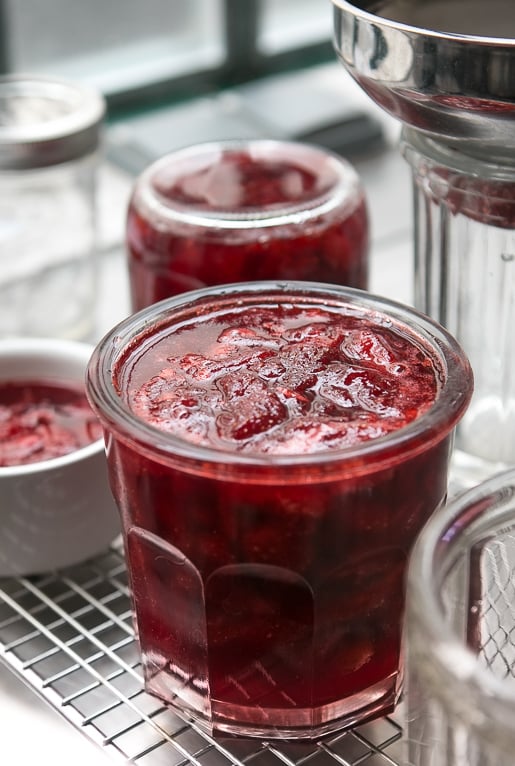
Many traditional recipes use an equal amount of sugar to fruit, by weight, but I find it’s okay to decrease it to these proportions. Sugar is both a thickener and a preservation agent. If you reduce it too much more, your jam may not thicken and won’t keep for a long time. (Which is okay if you want thinner jam, you keep it in the refrigerator, and eat it relatively quickly.) This recipe can be scaled up or down, depending on how many strawberries you have. But if you want to make a lot more, best to make it in a couple of batches. To prepare the jars, pour boiling water into them, as well as into the lids. Let them sit 5-10 minutes, then carefully pour out the hot water and set them upside down on a cooling rack until ready to fill. Since I keep my jams in the refrigerator, I don’t put them up them in a traditional sense. I usually just overturn the jars and let them cool, which provides a reasonable seal, then refrigerate them. I find my jams keep well this way for up to one year. Check the National Center for Home Food Preservation website for instructions on how to can fruit jams. Note: Last season strawberries tend to have less natural pectin than ones that arrive earlier. So your jam may be less jelled. One strategy is the finely grate a green apple into the strawberries before cooking them, which adds pectin. (There are guidelines here for using liquid and powdered pectin.) I don’t mind the slightly runnier jam and it’s terrific on yogurt or served with fresh goat cheese for dessert.

Ingredients

  • 2 pounds (900g) strawberries
  • 1 1/4 pounds (2 2/3 cups, 580g) sugar
  • one lemon organic or unsprayed
  • optional: kirsch (or eau-de-vie, or crΓ¨me de cassis)

Instructions

  • Wash and hull the strawberries and cut them into quarters. If some are larger or smaller, just make sure the pieces all about the same size.
  • 2. Toss them in a large pot, such as a Dutch oven casserole made of a nonreactive material, with the sugar. Cut the lemon in half, squeeze the juice into the pot, and add the lemon halves to the berries. Stir well, cover, and let sit a couple of hours (up to 8 hours) at room temperature, stirring one or two times while they marinate.
  • Put a small plate in the freezer. Turn the heat on under the strawberries to medium-high and cook the strawberries, stirring occasionally, as they reduce and the juices thicken. If a lot of foam rises to the surface, skim it away. When the syrup is the consistency of warm maple syrup – it will take about 10 to 15 minutes or so, depending on the pot and berries, turn off the heat and put a spoonful of the jam on the frozen plate and return the plate to the freezer. Check it in a few minutes; if it wrinkles when you nudge it, it’s done. If not, return the plate to the freezer and cook the jam a little more, testing it again. It may take a few times before you get it to the right consistency.
  • When the strawberry jam is done, remove the lemon and stir in a few drops of kirsch, if using, then ladle the jam into the prepared jars.

Related Recipes and Links

Apricot Jam

No-Recipe Cherry Jam

Pickled Strawberries

Easy Jam Tart

Eggplant Jam

Baking Ingredients and Substitutions

snow pea salad with avocado

By: deb
3 June 2026 at 22:05

One of my most exasperating traits β€” or, perhaps one that makes me ideally suited for this space I invented, coincidentally, to suit my collection of traits β€” is that I have a terrific amount of random ingredient preparation ideas in the overflowing file cabinet of my brain that will spill into conversations the second I hear the triggering keyword.

Read more Β»

chicken salad for celery enthusiasts

By: deb
20 May 2026 at 17:22

I’m not sure if this is a sign of hitting a certain age β€” like a sudden interest in bird feeders (check, and please tell me about yours), or beekeeping (well, in the TikTok sense, not sorry), and animated conversations on the best pillows (I hate mine) β€” but I’ve found over the last year that I have very strong opinions on chicken salad and the correct way to make it, which, naturally, is my way. I hope I’m in the right place to release them into the world.

Read more Β»

raspberry swirl cheesecake bars

By: deb
8 May 2026 at 18:46

While I’m not from a cheesecake family β€” it is never unwelcome, but we are more deeply devoted to things like pastry creams, chocolate pudding, and stellar coffee cakes β€” I married into one, which means that even though this site’s cheesecake archives are very well-populated, not a single peep of protest could be heard as far as my apartment walls reach (to be fair, a short distance) as I tinkered with these bars over the last few weeks.

Read more Β»

sidecar

By: deb
24 April 2026 at 19:56

If there’s anything that’s been consistent about this site in its near-20 years of beaming (babbling?) hypertext to servers and back to you, it’s that I’m very bossy when I get into something new, especially cocktails. When I fell in love with Porch Swings, I wanted you to as well. Ditto for Blood Orange Margaritas (but only when in season), a Perfect Manhattan era that spanned over a decade, Boulevardier that has been woven into almost every year since, and a Slushy Paper Plane phase last year. This past winter and spring still, it’s been Sidecars, 1920s-era cocktails with about as many conflicting stories as my kids regale us with when they didn’t do their homework.

Read more Β»

❌