❌

Normal view

Your soup needs a little drama

12 October 2026 at 15:00

When I was a kid, I absolutely adored Souplantation and Sweet Tomatoes, those sprawling soup-and-salad buffets where, for a certain kind of child (me), the prospect of choosing from several enormous vats of soup constituted a genuinely thrilling night out.

I did, however, have one complaint: I always thought the selection of soup toppings was a little lacking. There was an entire salad bar’s worth of crunchy, salty, fresh and otherwise interesting things just a few feet away. Why weren’t more of them invited to the soup party? Eventually, I began making little trips between the two, returning to my bowl with whatever seemed promising.

I suppose what I’m saying is that I’ve been a soup maximalist for a very long time.

This shouldn’t surprise anyone familiar with my feelings about salads, which I also believe should contain a frankly unreasonable number of interesting things. In fact, my dream remains more or less unchanged from childhood: I’d like a salad bar, please, but for soup.

This is partially a texture thing. Even the most beautifully flavored soup can become a little monotonous after several spoonfuls of softness. Give me something crackly, crispy or crunchy to interrupt the proceedings! But it’s also about flavor, and the small pleasure of making an ordinary meal feel a little special.

One of my favorite lessons to borrow from good restaurant kitchens is that the best don’t treat anything on the plate as an afterthought. Everything has a job to do. I think soup deserves the same consideration. And no, I’m not here to malign crackers (I have a full issue on party crackers, after all!) or croutons, both of which I love. I’m simply suggesting that we give them — and everything else we might put on a bowl of soup — a little more thought.

Lesson 1: Build your bowl in three moves

Over the years, I’ve developed a loose formula for dressing up soup. Think of it as three levels of deliciousness, with full permission to stop whenever you’re satisfied.

First, start with texture. This is my nonnegotiable. Fried garlic or shallots, toasted pepitas, crispy bacon, a handful of crushed Ruffles or Fritos, tortilla strips, lacy rounds of Parmesan frico: All are welcome. The goal is to give your spoon something interesting to encounter beyond the usual soft, silky or brothy textures.

And sometimes the simplest toppings just need a little augmentation. Try tossing croutons in brown butter before scattering them over butternut squash soup, or dusting tortilla chips with ranch seasoning before putting them on chicken-corn chowder.

Next, add brightness or freshness. A little lemon juice or zest, chopped scallions, fresh herbs, a tangy dollop of labneh or yogurt, or something pickled can bring a rich bowl of soup into focus. Think about what would cut through the richness or wake up the flavors already there.

Finally, introduce a plot twist. This is where things can get a little weird, in the best way. Chili crisp, hot honey, an assertive cheese, a little funk, or a hit of unexpected spice. I particularly love cheeses with personality on starchy soups: something smoky, salty or wonderfully soft and bloomy.

You don’t need to hit all three levels every time. Sometimes one perfectly chosen topping does the job. But learning to think about these elements individually makes it easier to build combinations that actually work together.

Lesson 2: Make the toppings your kitchen project

Consider the deli-style creamy chicken-and-rice soup I love unabashedly. It’s one of my favorite soups, period, and I’ve spent an unreasonable amount of time figuring out different ways to dress it up.

One evening, I decided to outsource the soup itself and make the toppings my kitchen project instead.

I cut little quarter-sized rounds of puff pastry, brushed them with butter and seasoned them with dried thyme, onion and garlic powder, and an almost comical amount of black pepper. Into the oven they went. Meanwhile, I muddled together a loose, chermoula-adjacent green sauce of parsley, scallions, lemon zest, lemon juice and good olive oil.

Once the pastry dots were golden and puffed, I scattered them over the hot soup, drizzled everything with the green sauce and finished with shreds of Parmesan.

It was a spectacular dinner. And, importantly, I didn’t have to make the soup. 

Sometimes, of course, I want to spend an entire day making stock and noodles and the bread to go alongside. Other times, I want to spend 15 minutes making something that someone else cooked feel a little more like mine. Both are perfectly good ways to spend an evening in the kitchen.

This is also my favorite trick for reviving leftovers. A big pot of soup might last you three or four days, but that doesn’t mean you need to eat the exact same bowl three or four times. Change the toppings, change the experience.

Lesson 3: Make your own edible confetti

Because I am fundamentally a clever-assembly girl, I’ve begun treating soup toppings almost like spice blends.

I call them edible confetti.

I keep little deli tubs of crunchy things around, some in the pantry and others in the refrigerator, depending on what they contain. Sometimes they’re individual ingredients; other times, once I’ve found a combination I love, I start making it regularly.

Spiced pepitas, fried shallots and tortilla strips, for instance, make an excellent little trio. So do crispy bacon and toasted breadcrumbs, finished with fresh scallions just before serving. Cashews, crispy garlic and fried shallots? Spectacular on congee.

The trick is to find a few combinations that suit the soups you eat most often and keep their components handy. Store dry, crunchy blends separately from fresh or moist ingredients so nothing loses its texture before dinner.

And don’t assume that any of this needs to be made from scratch. The Asian supermarket is a treasure trove of ready-made crispy bits. The snack aisle is full of possibilities. Yesterday’s bread, the last handful of nuts in the pantry or a few slices of pepperoni that could be crisped in a skillet might be exactly what tonight’s soup needs.

Once you’ve found a combination you love, make it again! Give it a name, even. There’s something quite satisfying about having a little house blend you know will make dinner better.


Want more great food writing and recipes? Sign up for Salon’s free food newsletter, The Bite.


Your soup-topper cheat sheet: 30 things to try

If your soup-garnishing repertoire currently begins and ends with a sleeve of crackers, consider this a starting point. Pick a few things that sound good, experiment with combinations, and see what sticks.

For crunch and texture

  1. Crispy fried shallots

  2. Fried garlic chips

  3. Brown-butter toasted breadcrumbs

  4. Lacy Cheddar or Parmesan frico

  5. Black-pepper puff pastry dots

  6. Toasted, spiced pepitas

  7. Crushed Marcona almonds

  8. Crushed ridged potato chips

  9. Ranch-dusted tortilla strips

  10. Crispy pepperoni cups

For brightness and freshness

  1. Thinly sliced scallions

  2. Fresh lemon zest

  3. Quick-pickled red onions

  4. Chopped giardiniera

  5. Fresh dill and minced cornichons

  6. Pickled jalapeños

  7. A muddled parsley-scallion green sauce

  8. A spoonful of kimchi

  9. Fresh mint leaves

  10. A drizzle of chive oil

For richness, heat and unexpected personality

  1. Chili crisp

  2. Hot honey

  3. Tangy labneh

  4. Browned butter with crispy sage

  5. Shredded smoked Gouda

  6. Brie crostini with balsamic reduction

  7. Crumbled blue cheese

  8. Crispy bacon bits

  9. Toasted cashews

  10. Fried capers

My little assignment for you this week: Find two or three toppings beyond your usual bread, crackers or croutons that genuinely delight you. Then start playing with combinations.

Maybe you’ll discover your own favorite edible confetti. Maybe you’ll find that a little chili crisp and a handful of scallions are all you need to look forward to the third consecutive day of the same soup.

Either way, I hope you’ll give your next bowl a little drama.

It deserves it.

This story originally appeared in The Bite, my weekly food newsletter for Salon. If you enjoyed it and would like more essays and recipes — including the puff pastry dots and lemony green sauce mentioned above — sent straight to your inbox, subscribe here.

The post Your soup needs a little drama appeared first on Salon.com.

double chocolate zucchini bread

By: deb
20 August 2025 at 20:27

Oh you wanted a chocolate zucchini bread recipe? Don’t you know this is a food blog? I’m contractually obligated to tell a meandering and infuriatingly irrelevant story in each headnote, keeping you from the recipe as long as possible for nefarious, possibly witchy, purposes, and I don’t want to disappoint. Next week, I’ll be celebrating my 20th wedding anniversary with a guy I met because I wrote some rambling things on a blog about, like, dating and New York City and funny things that had happened, he read it, we went for a drink, I stopped dating, needed a new subject to fill the void, and Smitten Kitchen came to be one year later. [Some people have honeymoon babies, I, uh, had you.]

Read more »

Lemony Quinoa Kale Salad with Crispy Chickpeas

15 July 2025 at 10:00
Lemony Quinoa Kale Salad with Crispy Chickpeas

Simple methods and BIG flavor collide in this Lemony Quinoa Kale Salad with Crispy Chickpeas! It’s zesty and sweet, full of crunch, and packed with wholesome ingredients. With minimal cooking required, it’s the perfect meal for summer or a quick meal prep session.

Just 10 ingredients and 30 minutes stand between you and this satisfying, flavorful, healthy meal!

How to Make This Lemony Quinoa Kale Salad

This quinoa kale salad comes together in a few simple steps that flow seamlessly:

  1. Soak sun-dried tomatoes in hot water if they’re especially dry and hard.

Lemony Quinoa Kale Salad with Crispy Chickpeas from Minimalist Baker →

focaccia with zucchini and potatoes

By: deb
11 July 2025 at 22:27

I didn’t mean to get so carried away making focaccia over the last few months, but don’t I always say that? As if I forget how easily I get consumed with a very specific idea for what a recipe should be and cannot let it go, even when it’s past time to move on. As if it was someone else who made blueberry muffins 25 times one summer until she found what she was looking for. Thus, perhaps I shouldn’t be surprised but I still am: I’ve made an obscene amount of focaccia this spring and summer trying to find the recipe I’ll want to use forever. Here are five things I learned along the way:

Read more »

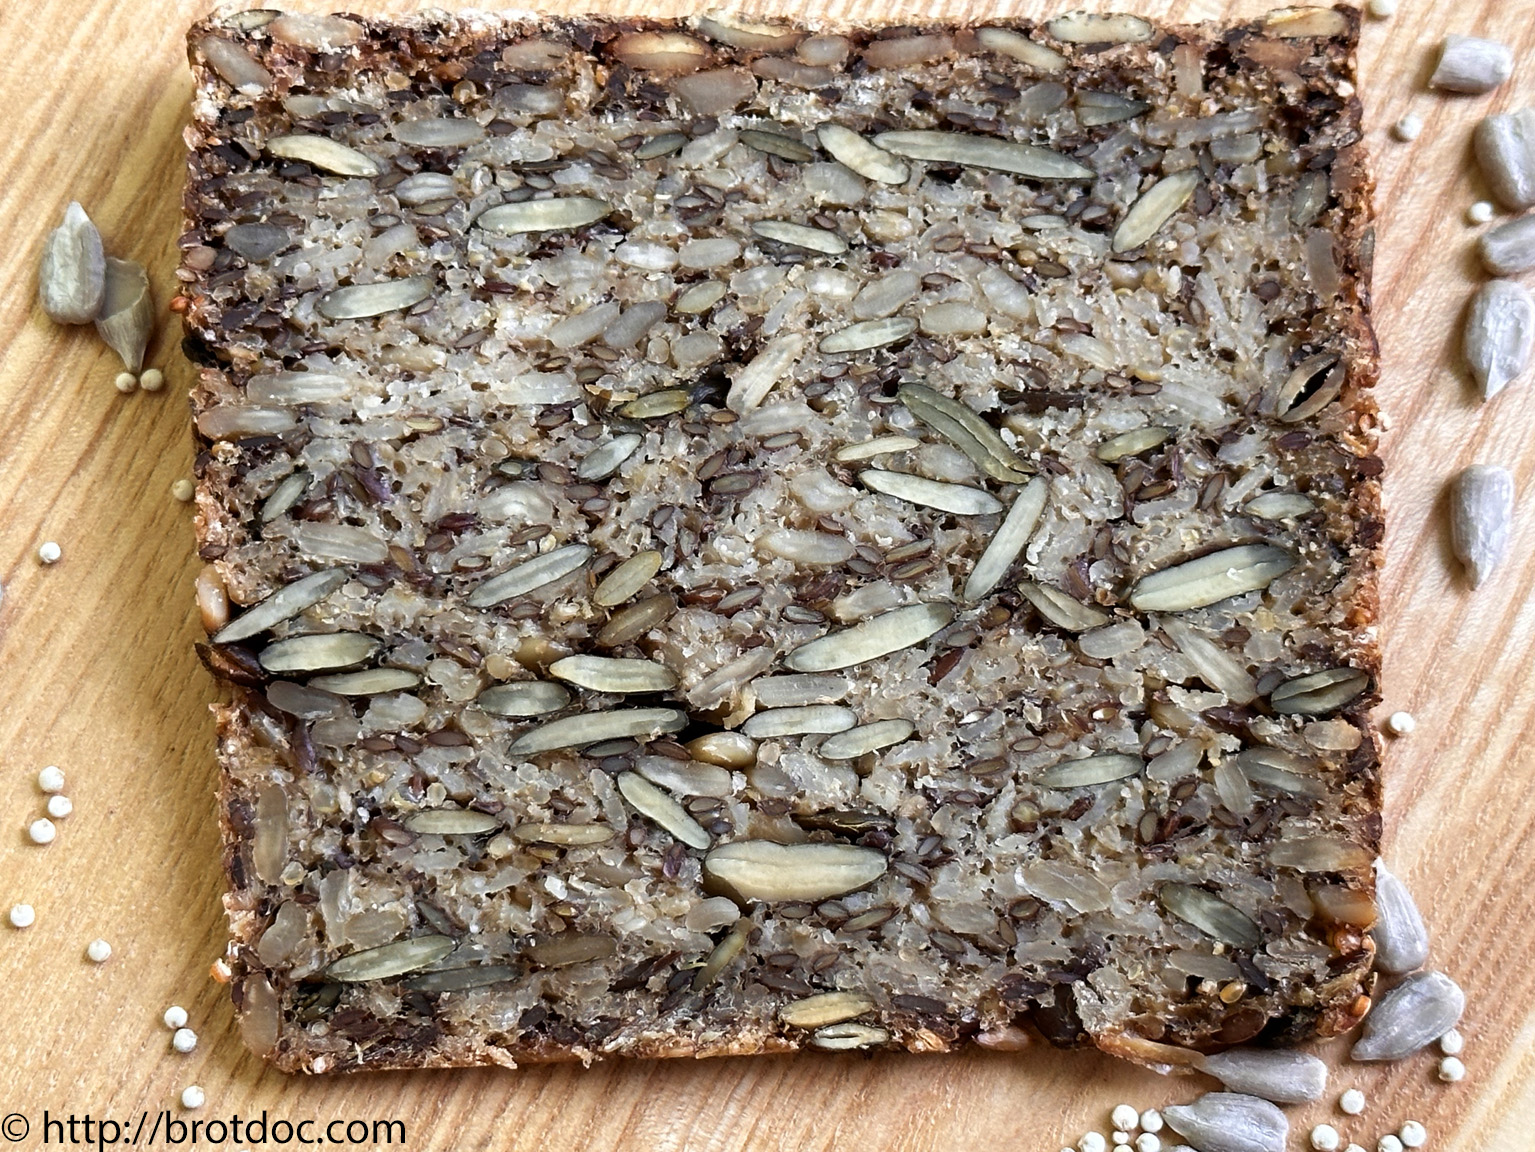
Saatenkraftbrot

8 July 2023 at 21:38

Heute habe ich für Euch ein Brotrezept, das mich schon seit einiger Zeit beschäftigt hat. Durch meine überraschende Erkrankung im Frühjahr ergab es sich, dass ich eine tiefgreifendere Änderung meines Ernährungsverhaltens vornehmen musste. Einer der Hauptfaktoren dabei war die Reduktion der Aufnahme von Kohlehydraten (Stärke) mit meiner Nahrung.

Bekanntlich besteht üblicherweise Brot vor allem aus Kohlehydraten. Somit hat meine Erkrankung gerade mich als „Brot Doc“ etwas auf dem falschen Fuß erwischt. Aber wie sagen die Engländer so schön: I had it coming… Doch man weiß sich ja zu helfen. Neben dem klassischen und einfach umzusetzenden FdH-Prinzip („Friss die Hälfte“) kann der Bäcker ja auch die Zutaten so wählen, dass sich der Gehalt an Kohlehydraten in der Nahrung reduziert.

Nach dem Befüllen der Form
Ein wahrlich schwerer Brotlaib, der es in sich hat

In diesem Fall geschieht das, indem vollständig auf Mehl verzichtet wird. Lediglich ein gewisser Anteil, weniger als 50 Prozent, im Teig besteht aus Getreideflocken. Der Rest ist aus Saaten. Die Bindung des Teiges wird durch Flohsamenschalen gewährleistet, die ja auch bei vielen glutenfreien Broten gute Dienste leisten. Bekannt wurde diese Rezeptur durch eine kanadische Bloggerin vor etwa 10 Jahren, Sarah Britton. Sie nannte ihr Brot „Life changing Bread“, und unter diesem Namen ist es weltweit bekannt geworden. Ein echter „Blog-Buster“. Selbst die traditionsbewussten deutschen Innungsbäcker haben sich des Rezeptes angenommen und es für gut befunden. Und das will etwas heißen.

Ich wurde durch einen Post meiner Blogger-Kollegin Marta Ullmann im vergangenen Jahr darauf aufmerksam. Schaut bitte bei Marta mal vorbei – ich finde toll, was sie in den letzten Jahren gebloggt hat.

Das Prinzip funktioniert erstaunlich gut. Ich habe das Brot mehrfach gebacken, in verschiedenen Zusammensetzungen. Das Rezept ist nämlich ausserordentlich flexibel. Welche Zutaten ihr nehmt, hängt von Eurem Geschmack und Euren gesundheitlichen Bedürfnissen ab. Während meiner Backversuche zeigte sich, dass ich eine deutliche Hochskalierung der Rezeptparameter vornehmen musste, damit meine 5-Personen-Haushalt-Brotformen auch gefüllt sind und ich nicht so kleine Knickerchen backe, wie sie andere Nachbäcker zeigten.

Voller guter Nährstoffe und ohne Gluten, ohne Histamin oder andere fermentationsbedingte Reizstoffe

Wer Gluten verträgt, kann auch Weizenflocken, Dinkelflocken, Roggenflocken oder Ähnliches nehmen. Auch bei den Saaten ist volle Flexibilität vorhanden. Meine Rezeptversion ist glutenfrei. Wer Histamin nicht verträgt, nimmt statt Balsamico-Essig Verjus oder Branntweinessig. Oder lässt die Säuerung gleich ganz weg. Sogar die Zugabe von Sauerteigresten von der Fütterung ist möglich. Dann vertragen das Brot aber Gluten- oder Histaminintolerante nicht mehr.

Also eines der flexibelsten Rezepte, die ich kenne. Aber: ist das wirklich Brot? Könnte man sich fragen, weil: kein Mehl, kein Triebmittel, keine Fermentation… Es erfüllt aber seinen Zweck als „Brot“ sehr gut. Eine bis zwei Scheiben sättigen für viele Stunden und versorgen den Körper gleichzeitig mit vielen wichtigen Nährstoffen, die in einer „normalen“ Brotscheibe in dem Ausmaß nicht enthalten sind. Und nicht alle Menschen brauchen Brottteige, die erst nach mindestens vierundzwanzigstündiger Reifezeit in den Ofen dürfen. Aus eigener Erfahrung kann ich zudem bestätigen, dass es eine gute Brotalterative für Menschen mit Diabetes Mellitus ist – der Zuckerspiegel steigt laut Sensormessung nur moderat an nach dem Genuss.

Bernd Kütscher mit den „Heimatbroten“ (Foto: Bernd Kütscher)

Noch etwas kann ich berichten: ich war mit Heidi Schlautmann, Michaela Pelz, Noemi Mollet und Oliver Distelkamp die letzten Tage in der Akademie Deutsches Bäckerhandwerk in Weinheim. Dort gab Wayne Caddy aus dem Vereinigten Königreich eine „Master-Class“ für Artisan-Bread und dekorative Brote, sowie Brote mit besonderen Zutaten. Ein tolles Erlebnis! Für mich war es meine erste Rückkehr zur Akademie nach der Pandemie und ich konnte endlich dem Leiter der Akademie, Bernd Kütscher, ein Exemplar meines Buchs „Heimatbrote“ persönlich überreichen. Bernd hat mir während der Recherchen mit Rat und Tat beiseite gestanden. Hierfür möchte ich mich auch hier noch einmal bedanken.

Ergebnisse
Weinheimer Marktplatz
Die Kirche
Bei Nacht
Weinheim von der Ruine Windeck
Burgruine Windeck
Blick von der Burg Landeck auf Klingenmünster
Ergebnisse
Wayne und ich
Weinheimer Marktplatz

Mit Wayne haben wir sowohl im Kurs, als auch in den Abend- und Nachtstunden in den Kneipen Weinheims unglaublichen Spaß gehabt. Eine tolle Bäcker- und Lehrerpersönlichkeit, der es nicht nur um das Backen und die Knete geht. Sondern auch um die Menschen, die das machen. Seine Vorgehensweise deckt sich sehr mit der, die ich für mich gefunden habe. Wer die Chance bekommt, einen seiner Kurse zu erleben, sollte ohne nachzudenken zugreifen!

Doch nun zum Rezept. Ich entschuldige mich für den langen Text. Doch er musste diesmal sein.

Drucken

Saatenkraftbrot

Ein ungewöhnliches Brot, in jeder Hinsicht einzigartig
Gericht Brot
Küche Andere Triebmittel
Keyword Flohsamenschalen, Haferflocken, Saaten
Vorbereitungszeit 20 Minuten
Quellzeit 4 Stunden
Portionen 1 Brot/-e

Zutaten

Trockene Zutaten

  • 380 g Haferflocken grob alternativ: andere Getreideflocken Eurer Wahl
  • 65 g Quinoa alternativ: Amaranth
  • 230 g Kürbiskerne
  • 230 g Sonnenblumenkerne
  • 180 g Leinsamen geschrotet alternativ: ganze Leinsamen
  • 45 g Flohsamenschalen

Flüssige Zutaten

  • 640 g Wasser
  • 35 g Olivenöl alternativ: andere Pflanzenöle
  • 30 g Balsamico bianco alternativ: Branntweinessig, Verjus, Essig Essenz
  • 45 g Ahornsirup alternativ: Honig, Malzextrakt
  • 22 g Salz

Anleitungen

  • Die trockenen Zutaten in eine Schüssel geben und mit der Hand gründlich vermischen. Die Flohsamenschalen müssen gleichmäßig unter die anderen Zutaten gemischt werden.
  • Die flüssigen Zutaten in einer weiteren Schüssel miteinander vermischen. Das Salz sollte sich auflösen.
  • Die Mischung der flüssigen Zutaten in die Schüssel mit den festen Zutaten gießen. Mit einem Rührlöffel oder optimalerweise mit einem Handrührgerät die Masse gut verrühren.
  • Die Flohsamenschalen sorgen hierbei dafür, dass eine gute Teigbindigkeit entsteht.
  • Sobald die Masse gut gemischt ist, diese mit einem Löffel in eine Kastenform mit den Maßen 23 x 11 x 9,5 cm einfüllen. Dabei die Masse gut andrücken.
  • Einen Silikonschaber befeuchten und die Oberfläche schön glatt ziehen (siehe Foto).
  • Den Teigling insgesamt 4 Stunden bei Raumtemperatur (oder bis zu 24 h im Kühlschrank) quellen lassen.
  • Den Ofen auf 210 °C vorheizen (Ober-/Unterhitze).
  • Das Brot einschießen und nicht schwaden. Die Temperatur auf 150 °C herunterregeln.
  • Die Backzeit beträgt 2,5 bis 3 Stunden bei 150 °C. In dieser Zeit verfestigt sich die Krume und in der Kruste entstehen leckere Röstaromen.
  • Das Brot aus dem Ofen holen, auskippen und mindestens 12, besser 24 Stunden auskühlen lassen. Es empfiehlt sich, den Brotlaib nach einer Stunde in eine Kunststofftüte zu legen.
❌